Feed: Matt Segal
Entries found: 22
How I hunt down (and fix) errors in production
Published: 2022-05-03T12:00:00+10:00
Updated: 2022-05-03T12:00:00+10:00
UTC: 2022-05-03 02:00:00+00:00
URL: https://mattsegal.dev/prod-bug-hunt.htmlOnce you’ve deployed your web app to prod there is a moment of satisfaction: a brief respite where you can reflect on your hard work. You sit, adoringly refreshing the homepage of www.mysite.com to watch it load over and over. It’s beautiful, perfect, timeless. A glittering …Content Preview
Once you’ve deployed your web app to prod there is a moment of satisfaction: a brief respite where you can reflect on your hard work. You sit, adoringly refreshing the homepage of www.mysite.com to watch it load over and over. It’s beautiful, perfect, timeless. A glittering crystal palace of logic and reason. Then people start to actually use it in earnest and you begin to receive messages like this in Slack:
Hey Matt. I am not getting reply emails for case ABC123 Jane Doe
Ideally, with a solid monitoring stack , you will be alerted of bugs and crashes as they happen, but some may still slip through the cracks. In any case, you’ve got to find and fix these issues promptly or your users will learn to distrust you and your software, kicking off a feedback loop of negative perception. Best to nip this in the bud.
So a user has told you about a bug in production, and you’ve gotta fix it - how do you figure out what went wrong? Where do you start? In this post I’ll walk you through an illustrative example of hunting down a bug in our email system.
The problem
So this was the message I got over Slack from a user of my website:
Hey Matt. I am not getting reply emails for case ABC123 Jane Doe
A user was not receiving an email, despite their client insisting that they had sent the email. That’s all I know so far...
More detail
... and it’s not quite enough. I know the case number but that’s not enough to track any error messages efficiently. I followed up with my user to check:
- what address was used to send the email (eg. jane.doe@gmail.com)
- when they attempted to send the email (over the weekend apparently)
With this info in hand I can focus my search on a particular time range and sender address.
Knowledge of the system
There’s one more piece of info you need to have before you start digging into log files and such: what are the components of the email-receiving system? I assembled this one myself, but under other circumstances, in a team setting, I might ask around to build a complete picture of the system. In this case it looks like this:

In brief:
- The client sends an email from their email client
- The email travels through the mystical email realm
- SendGrid (SaaS product) receives the email via SMTP
- SendGrid sends the email content to a webhook URL on my webserver as an HTTP POST request
- My web application ingests the POST request and stores the relevant bits in a database table
Inside the web server there’s a pretty standard “3 tier” setup:
- NGINX receives all web traffic, sends requests onwards to the app server
- Gunicorn app server running the Django web application
- A database hosting all the Django tables (including email content)

My approach
So, the hunt begins for evidence of this missing email, but where to start looking? One needs a search strategy. In this case, my intuition is to check the “start” and “end” points of this system and work my way inwards. My reasoning is:
- if we definitely knew that SendGrid did not receive the email, then there’d be no point checking anywhere downstream (saving time)
- if we knew that the database contained the email (or it was showing up on the website itself!) then there’d be no point checking upstream services like SendGrid or NGINX (saving time)
So do you start upstream or downstream? I think you do whatever’s most convenient and practical.
Of course you may have a special system-specific knowledge that leads you towards checking one particular component first (eg. “our code is garbage it’s probably our code, let’s check that first”), which is a cool and smart thing to do. Gotta exploit that domain knowledge.
Did SendGrid get the email?
In this case it seemed easiest to check SendGrid’s fancy web UI for evidence of an email failing to be received or something. I had a click around and found their reporting on this matter to be... pretty fucking useless to be honest.

This is all I could find - so I’ve learned that we usually get emails. Reassuring but not very helpful in this case. They have good reporting on email sending, but this dashboard was disappointingly vague.
Is the email in the database?
After checking SendGrid (most upstream) I then checked to see if the the database (most downstream) had received the email content.
As an aside, I also checked if the email was showing up in the web UI, which it wasn’t (maybe my user got confused and looked at the wrong case?). It’s good to quickly check for stupid obvious things just in case.
Since we don’t have a high volume of emails I was able to check the db by just eyeballing the Django admin page. If we were getting many emails per day I would have instead run a query in the Django shell via the ORM (or run an SQL query directly on the db).

It wasn’t there >:(
Did my code explode?
So far we know that maybe SendGrid got the email and it’s definitely not in the database. Since it was easy to do I quickly scanned my error monitoring logs (using Sentry ) for any relevant errors. Nothing. No relevant application errors during the expected time period found.

Aside : yes my Sentry issue inbox is a mess. I know, it's bad. Think of it like an email in box with 200 unread emails, most of them spam, but maybe a few important ones in the pile. For both emails and error reports, it's best to have a clean inbox.
Aside : ideally I would get Slack notifications for any production errors and investigate them as they happen but Sentry recently made Slack integration a paid feature and I haven’t decided whether to upgrade or move.
Did NGINX receive the POST request?
Looking back upstream, I wanted to know if I could find anything interesting in the NGINX logs. If you’re not familiar with webserver logfiles I give a rundown in this article covering a typical Django stack.
All my server logs get sent to SumoLogic, a log aggregator (explained in the “log aggregation” section of this article ), where I can search through them in a web UI.
I checked the NGINX access logs for all incoming requests to the email webhook path in the relevant timeframe and found nothing interesting. This shows NGINX is receiving email data in general, which is good.

Next I checked the NGINX error logs... and found a clue!

For those who don’t want to squint at the screenshot above this was the error log:
2022/04/30 02:38:40 [error] 30616#30616: *129401 client intended to send too large body: 21770024 bytes, client: 172.70.135.74, server: www.mysite.com, request: "POST /email/receive/ HTTP/1.1", host: "www.mysite.com”
This error, which occurs when in receiving a POST request to the webhook URL, lines up with the time that the client apparently sent the email. So it seems likely that this is related to the email problem.
What is going wrong?
I googled the error message and found this StackOverflow post . It seems that NGINX limits the size of requests that it will receive (which is configurable via the nginx.conf file). I checked my NGINX config and I had a limit of 20MB set. Checking my email ingestion code, it seems like all the file attachments are included in the HTTP request body. So... my guess was that the client sending the email attached more than 20MB of attachments (an uncompressed phone camera image is ~5MB) and NGINX refused to receive that request. Most email providers (eg Gmail) offer ~25MB of attachments per email.
Testing the hypothesis
I actually didn’t do this because I got a little over-exicted and immediately wrote and pushed a fix.
What I should have done is verified that the problem I had in mind actually exists. I should have tried to send a 21MB email to our staging server to see if I could reproduce the error, plus asked my user to ask the client if she was sending large files in her email.
Oops. A small fuckup given I think the error message is pretty clear about what the problem is.
The fix
The fix was pretty simple, as it often is in these cases, I bumped up the NGINX request size limit (
client_max_body_size) to 60MB. That might be a little excessive, perhaps 30MB would have been fine, but whatever. I updated the config file in source control and deployed it to the staging and prod environments. I tested that I can send larger files by sending a 24MB email attachment to the staging server.Aftermath
We’ve asked the client to re-send her email. Hopefully it comes through and all is well.
I checked further back in the SumoLogic and this is not the first time this error has happened, meaning we’ve dropped a few emails. I’ll need to notify the team about this.
If I had more time to spend on this project and I’d consider adding some kind of alert to NGINX error logs so that we’d see them pop up in Slack - maybe SumoLogic offers this, I haven’t checked.
Another option would be going with an alternative to SendGrid that had more useful reporting on failed webhook delivery attempts.
Overview
Although it can sometimes be stressful, finding and fixing these problems can also be a lot of fun. It’s like a detective game where you are searching for clues to crack the case.
In summary my advice for productively hunting down errors in production are:
- Gather info from the user who reported the error
- Mentally sketch a map of the system
- Check each system component for clues, using a search strategy
- Use these clues to develop a hypothesis about what went wrong
- Test the hypothesis if you can (before writing a fix)
- Build, test, ship a fix (then check it's fixed)
- Tell your users the good news
Importantly I was only able to solve this issue because I had access to my server log files. A good server monitoring setup makes these issues much quicker and less painful to crack. If you want to know what montioring tools I like to use in my projects, check out my Django montioring stack .
How to setup Django with Pytest on GitHub Actions
Published: 2022-01-13T12:00:00+11:00
Updated: 2022-01-13T12:00:00+11:00
UTC: 2022-01-13 01:00:00+00:00
URL: https://mattsegal.dev/django-with-pytest-on-github-actions.htmlSomeone recently asked me When is a good time to get automated testing setup on a new Django project? The answer is "now". There are other good times, but now is best. In this post I'll briefly make my case for why, and show you an example of a minimal …Content Preview
Someone recently asked me
When is a good time to get automated testing setup on a new Django project?
The answer is "now". There are other good times, but now is best. In this post I'll briefly make my case for why, and show you an example of a minimal setup of Django running tests with pytest with fully automated continuous integration (CI) using GitHub Actions .
As soon as you know a Django project is going to be "serious", then you should get it set up to run tests. So, potentially before you write any features. My approach is to get testing setup and to write a dummy test or two and then get it running in CI. This means that as soon as you start writing features then you will have everything you need to write a real test and have it run automatically on every commit.
The alternate scenario is you start adding features and get swept up in that process. At some point you'll think "hmm maybe I should write a test for this...", but if you don't have tests and CI set up already then you're more likely to say "nah, fuck it I'll do it later" and not write the test. Getting pytest to work with Django on GitHub actions is pretty easy these days. Bite the bullet, it tastes better than you may expect.
Or you could just not write any tests. This is fine for small personal projecs. Tests are a lot of things but they're not fun. For more serious endeavours though, not having tests will lead to riskier deployments, longer feedback loops on errors and less confidence in making big changes. Have you ever done a huge, wild refactor of a chunk of code, followed by a set of passing tests? It feels great man, that's when you're really living.
The other question is: when should I run my tests? Sometimes you forget or you can't be bothered. This is where GitHub Actions (or any other CI) is very useful. You can set this service up to automatically run your tests every time you push a commit up to GitHub.
Let's go then: how do you set up Django + pytest + GitHub Actions? All the code discussed here can be found in this example GitHub repository .
Installation
Alongside Django you will need to install
pytestandpytest-django. These libraries are not required to run tests with Django: the official docs show you how to use Python's unittest library instead. I like pytest better though, and I think you will too. My requirements.txt file looks like this:django pytest pytest-djangoI don't pin my dependencies because I'm lazy: what can I say? I recommend you setup a virtual environment and then install as follows:
pip install -r requirements.txtConfiguraton
You can configure pytest with a standard pyproject.toml file. Here's mine . The most important thing is to set
DJANGO_SETTINGS_MODULEso pytest knows which settings to use. It's good to have a separate set of test settings for your project so that you can avoid, for example, accidently changing your production environment with credentials stored in settings when you run a test.[tool.pytest.ini_options] DJANGO_SETTINGS_MODULE = "demo.settings" filterwarnings = [ "ignore::UserWarning", ]This file should live in whichever folder you will be running
pytestfrom. For the reference project, that means in the./appfolder alongsidemanage.py.Adding a dummy test
That's a good start. Now we can test the setup so far with a dummy test. This test does nothing: it always passes, but it verifies that all the plumbing is working. In pytest, tests are just functions that use assert statements to check things:
def test_nothing():
    """A dummy test"""
    assert True
Pytest looks for a
testsfolder in your Django apps. For example, here is the tests folder in the reference project. So this dummy test function could live in a file namedapp/web/tests/test_dummy.py. You can add as many tests to a file as you like, or have as many test files as you like. Avoid duplicate names though!Running the tests locally
At this stage it's good to check that the dummy test works by running pytest from the command line:
pytest -vvRead
-vvas "very verbose". Here are specific instructions for anyone trying out the reference project. Hopefully that worked. You may see a folder called.pytest_cacheappear in your project. I recommend you gitignore this.Now let's add some more meaningful example tests before we move on to setting up GitHub Actions.
Adding a basic view test
My reference project has a very basic view named "goodbye" which just returns the text "Goodbye world". Here it is:
def goodbye_view(request):
    return HttpResponse(f"Goodbye world")
You can test that this view returns the expected response using the Django test client . Pytest has a handy feature called fixtures , which is a little piece of magic where you ask for an speficic object via the test function arguments and pytest automagically provides it. In this case we add "client" to the function arguments to get a test client. It's a little out of scope for this post, but you can write your own fixtures too!
def test_goodbye_view(client):
    """Test that goodbye view works"""
    # Build the URL from the url's name
    url = reverse("goodbye")
    # Make a GET request to the view using the test client
    response = client.get(url)
    # Verify that the response is correct
    assert response.status_code == 200
    assert response.content == b"Goodbye world"
Very nice, but you will find that you need to do a little more work to test views that include database queries.
Adding a view test with database interaction
With pytest-django you need to explicitly request access to the database using the pytest.mark.django_db decorator. Below is an example of a test that hits the database. In this example there is a page view counter that increments +1 every time someone views the page:
def hello_view(request):
    counter, _ = PageViewCount.objects.get_or_create(title="hello")
    counter.count += 1
    counter.save()
    return HttpResponse(f"Hello world. The counter is: {counter.count}")
So if you load the page over and over again it should say:
Hello world. The counter is: 1
Hello world. The counter is: 2
Hello world. The counter is: 3
Hello world. The counter is: 4
... etc
Here is a test for this view:
import pytest
from django.urls import reverse

from web.models import PageViewCount


@pytest.mark.django_db
def test_hello_view(client):
    url = reverse("hello")
    assert PageViewCount.objects.count() == 0

    response = client.get(url)
    assert response.status_code == 200
    assert PageViewCount.objects.count() == 1
    counter = PageViewCount.objects.last()
    assert counter.count == 1
    assert b"Hello world" in response.content
    assert b"The counter is: 1" in response.content

    response = client.get(url)
    assert response.status_code == 200
    counter.refresh_from_db()
    assert counter.count == 2
    assert b"The counter is: 2" in response.content
Setting up GitHub Actions
Ok so all our tests are running locally, how do we get them to run automatically in GitHub Actions? You can configure an action by adding a config file to your GitHub project at the location
.github/workflows/whatever.yml. I named mine tests.yml .Let's walk through the contents of this file (docs here ):
# The name of the action
name: Django Tests
# When the action is triggered
on:
  push:
    branches:
      - master
  pull_request:
    branches:
      - master

# What to do when the action is triggered
jobs:
  # A job called 'build' - arbitrary
  build:
    # Run on a Ubuntu VM
    runs-on: ubuntu-latest
    steps:
      # Checkout the GitHub repo
      - uses: actions/checkout@v2

      # Install Python 3.8
      - name: Set up Python 3.8
        uses: actions/setup-python@v2
        with:
          python-version: "3.8"

      # Pip install project dependencies
      - name: Install dependencies
        run: |
          python -m pip install --upgrade pip
          pip install -r requirements.txt

      # Move into the Django project folder (./app) and run pytest
      - name: Test with pytest
        working-directory: ./app
        run: pytest -vv
That's it, now pytest will run on every commit to master, and every pull request to master. You can see the actions for the reference project here . Every test run will put a little tick or cross in your GitHub commit history.

You can also embed a nice little badge in your README:

Conclusion
I hope this post helps you get started with writing and running automated tests for your Django project. They're a real lifesaver. If you liked this post about testing, you might also like this post about different testing styles ( There's no one right way to test your code ) and this post about setting up pytest on GitHub actions, without Django ( Run your Python unit tests via GitHub actions ).
My (free) Django monitoring stack for 2022
Published: 2022-01-01T12:00:00+11:00
Updated: 2022-01-01T12:00:00+11:00
UTC: 2022-01-01 01:00:00+00:00
URL: https://mattsegal.dev/django-monitoring-stack.htmlYou've built and deployed a website using Django. Congrats! After that initial high of successfully launching your site comes the grubby work of fixing bugs. There are so many things that can will go wrong. Pages may crash with 500 errors in prod, but not locally. Some offline tasks never …Content Preview
You've built and deployed a website using Django. Congrats! After that initial high of successfully launching your site comes the grubby work of fixing bugs. There are so many things that
canwill go wrong. Pages may crash with 500 errors in prod, but not locally. Some offline tasks never finish. The site becomes mysteriously unresponsive . This one pain-in-the-ass user keeps complaining that file uploads "don't work" but refuses to elaborate further: "they just don't work okay!?!".If enough issues crop up and you aren't able to solve them quickly and decisively, then you will lose the precious trust of your coworkers or clients. Often reputational damage isn't caused by the bug itself, but by the perception that you have no idea what's going on.
Imagine that you are able to find out about bugs or outages as they happen . You proactively warn your users that the site is down, not the other way around. You can quickly reproduce problems locally and push a fix to prod in a matter of hours. Sounds good right? You're going to need a good "monitoring stack" to achieve this dream state of omniscient hyper-competence.
You'll need a few different (free) tools to get a holistic picture of what your Django app is doing:
- Uptime monitoring : tells you when the site is down ( StatusCake )
- Error reporting : tells you when an application error occurs, collects details ( Sentry )
- Log aggregation : allows you to read about what happened on your servers ( Sumologic )
- Performance : tells you how long requests took, what's fast, what's slow ( Sentry , New Relic )
In the rest of this post I'll talk about these SaaS tools in more detail and why I like to use the ones linked above.
Uptime monitoring
It's quite embarrasing when your site goes down, but what's more embarrasing is when you learn about it from someone else . An uptime monitoring service can help: it sends a request to your site every few minutes and pings you (Slack, email) when it's unresponsive. This allows you to quickly get your site back online, hopefully before anyone notices. If you want to get fancy you can build a health check route (eg.
/health-check/) into your Django app which, for example, checks that the database, or cache, or whatever are still online as well.Another benefit of uptime monitoring is that you'll get a clear picture of when the outage started. For example, in the picture below you can see that a website of mine stopped responding to requests between ~21:00 and ~23:30 UTC. You can use this knowledge of exactly when the site become unresponsive to check other sources of information, such as server logs or error reports for clues.

I like to use StatusCake for this function because it's free, simple and easy to set up.
Error reporting
There are lots of ways for your site to break that don't render it completely unresponsive. A user might click a button to submit a form and receive a 500 error page because you made some trivial coding mistake that wasn't caught by your automated testing pipeline . This user comes to you and complains that "the site is broken". Sometimes they will provide you with a very detailed explanation of what they did to produce the error, which you can use to replicate the issue, but as often as not they may, infuriated by your shitty website and seemingly antagonistic line of questioning, follow up with "iTs JuST brOken OKAY!?". Wouldn't it be nice to get the detailed information that you need to fix the bug without having to talk to a human?
This is where error reporting comes in. When your Django web app catches some kind of exception, then an error reporting library can inspect the error and send the details to a SaaS service which records it for you. These error reporting tools capture heaps of useful information, such as:
- When the error happened first and most recently
- The exception type and message
- Which line of code triggered the error
- The stack trace of the error
- The value of local variables in each frame of the stack trace
- The Python version, package versions, user browser, IP, etc etc etc.
This rich source of information makes error reporting a vital tool. It really shines when you encounter errors that only happen in production, where you have no idea how to replicate them locally. Sentry is great for this task because it's free, easy to set up and has a great web UI. You can set up Sentry to send you error alerts via Slack and/or email.
Log aggregation
Production errors can be more complicated than a simple Python exception crashing a page. Sometimes, much more complicated. If you want to get a feel for the twisted shit computers will get up to then give Rachel by the Bay a read. To solve the trickier issues in production you're going to need to reconstruct what actually happened at the time of the error. You'll need to draw upon multiple sources of information, such as:
- application logs (eg. Django logs )
- webserver logs (eg. NGINX, Gunicorn logs )
- logs from other services (eg. Postgres, syslog, etc)
You can
sshinto your server and read these logs from the command line usinglessorgreporawkor something. Even so, it's much more convenient to access these logs via a log aggregation service's web UI, where you can run search queries to quickly find the log lines of interest. These tools work by running a "logging agent" on your server, which watches files of interest and sends them to a centralised server.

This model is paritcularly valuable if you have transient infrastructure (servers that don't last forever) or if you have many different servers, or if you want to limit
sshaccess for security reasons.Sumologic if my favourite free SaaS for this task because it's easy to install the logging agent and add new files to be watched. The search is pretty good as well. The main downside is that web UI can be a little complicated and overwhelming at times. The search DSL is very powerful but I always need to look up the syntax. Log retention times seem reasonable, 30 days by default. The Sumologic agent seems to consume several hundred MB of RAM (~300MB?).
Papertrail is, in my opinion, worse than Sumologic in every way I can think of. However, it is also free and presents a simple web UI for viewing and searching your logs. If you're interested I wrote about setting up Papertrail here . New Relic offer a logging service as well - never tried it though. There are open source logging solutions like Elasticsearch + Kibana and other alternatives, but they come with the downside of having to run them yourself: "now you have two problems".
Performance montioring
Sometimes your website isn't broken per-se, but it's too slow. People hate slow websites. You can often diagnose and fix these issues locally using tools like Django Debug Toolbar (I made a video on how to do this here ), but sometimes the slowness only happens in production. Furthermore, riffing on the general theme of this article, you want to know about (and fix) slow pages before your boss walks over to your desk and complains about it.
Performance monitoring tools instrument your Django web app and record information about how long various requests take. What's fast? What's slow? Which pages have problems? I recommend that you start out by using Sentry for this task because their performance monitoring service comes bundled with their error reporting by default. It's kind of basic, but maybe that's all you need.
The best appilcation performance monitoring for Django that I know of is New Relic's offering , which seems to have a free tier. The request traces that they track include a very detailed breakdown of where the time was spent in serving a request. For example, it will tell you how much time was spent querying the database, or a cache, or building HTML templates. Sometimes you need that level of detail to solve tricky performance issues. The downside of using New Relic is that you have to reconfigure your app server to boot using their agent as a wrapper.
Although it's not strictly on-topic, PageSpeed Insights is pretty useful for checking page load performance from a front-end perspective. If you're interested in more on Django web app performance then you might like this post I wrote, where I ponder: is Django too slow?
Conclusion
This list is not exhaustive or definitive, it's just the free-tier tools that I like to use for my freelance and personal projects. Nevertheless I hope you find them useful. It can be a pain to integrate them all into your app, but over the long run they'll save you a lot of time and energy.
Be prepared!
DevOps in academic research
Published: 2021-11-21T12:00:00+11:00
Updated: 2021-11-21T12:00:00+11:00
UTC: 2021-11-21 01:00:00+00:00
URL: https://mattsegal.dev/devops-academic-research.htmlI'd like to share some things I've learned and done in the 18 months I worked as a "Research DevOps Specialist" for a team of infectious disease epidemiologists. Prior to this job I'd worked as a web developer for four years and I'd found that the day-to-day had become quite …Content Preview
I'd like to share some things I've learned and done in the 18 months I worked as a "Research DevOps Specialist" for a team of infectious disease epidemiologists . Prior to this job I'd worked as a web developer for four years and I'd found that the day-to-day had become quite routine. Web dev is a mature field where most of the hard problems have been solved. Looking for something new, I started a new job at a local university in early 2020. The job was created when my colleagues wrote ~20k lines of Python code and then found out what a pain in the ass it is to maintain a medium-sized codebase. It's the usual story: the code is fragile, it's slow, it's easy to break things, changes are hard to make. I don't think this situation is anyone's fault per-se: it arises naturally whenever you write a big pile of code.
In the remainder of this post I'll talk about the application we were working on and the awesome, transformative, <superlative> power of:
- mapping your workflow
- an automated test suite
- performance improvements
- task automation
- visualisation tools; and
- data management
If you're a web developer, you might be interested to see how familar practices can be applied in different contexts. If you're an academic who uses computers in your work, then you might be interested to learn how some ideas from software development can help you be more effective.
The application in question
We were working on a compartmental infectious disease model to simulate the spread of tuberculosis. Around March 2020 the team quickly pivoted to modelling COVID-19 as well (surprise!). There's documentation here with examples if you want to poke around.
In brief, it works like this: you feed the model some data for a target region (population, demographics, disease attributes) and then you simulate what's going to happen in the future (infections, deaths, etc). This kind of modelling is useful for exploring different scenarios, such as "what would happen if we closed all the schools?" or "how should we roll out our vaccine?". These results are presented to stakeholders, usually from some national health department, via a PowerBI dashboard. Alternatively the results are included in a fancy academic paper as graphs and tables.

(Note: "notifications" are the infected cases that we know about)
A big part of our workflow was model calibration. This is where we would build a disease model with variable input parameters, such as the "contact rate" (proportional to how infectious the disease is), and then try to learn the best value of those parameters given some historical data (such as a timeseries of the number of cases). We did this calibration using a technique called Markov chain Monte Carlo (MCMC). MCMC has many nice statistical properties, but requires running the model 1000 to 10,000 times - which is quite computationally expensive.

This all sounds cool, right? It was! The problem is that when I started. the codebase just hadn't been getting the care it needed given its size and complexity. It was becoming unruly and unmanageable. Trying to read and understand the code was stressing me out.
Furthermore, running calibrations was slow . It could take days or weeks. There was a lot of manual toil where someone needed to upload the application to the university computer cluster, babysit the run and download the outputs, and then post-process the results on their laptop. The execution of the code itself took days or weeks. This time-sink is a problem when you're trying to submit an academic paper and a reviewer is like "hey can you just re-run everything with this one small change" and that means re-running days or weeks of computation.
So there were definitely some pain points and room for improvement when I started.
Improving our workflow with DevOps
The team knew that there were problems and everybody wanted to improve the way we worked. If I could point to any key factor in our later succeses it would be their willingness to change and openness to new things.
I took a "DevOps" approach to my role (it was in the job title after all). What do I mean by DevOps? This article sums it up well:
a set of practices that works to automate and integrate the processes between [different teams], so they can build, test, and release software faster and more reliably
Traditionally this refers to work done by Software Dev elopers and IT Op eration s , but I think it can be applied more broadly. In this case we had a software developer, a mathematician, an epidemiologist and a data visualisation expert working on a common codebase.
A key technique of DevOps is to think about the entire system that produces finished work. You want to conceive of it as a kind of pipeline to be optimised end-to-end, rather than focusing on any efficiencies achieved by individuals in isolation. One is encouraged to explicitly map the flow of work through the system. Where does work come from? What stages does it need to flow through to be completed? Where are the bottlenecks? Importantly: what is the goal of the system?
In this case, I determined that our goal was to produce robust academic research, in the form of published papers or reports. My key metric was to minimise "time to produce a new piece of research", since I believed that our team's biggest constraint was time, rather than materials or money or ideas or something else. Another key metric was "number of errors", which should be zero: it's bad to publish incorrect research.
If you want to read more about DevOps I recommend checking out The Phoenix Project and/or The Goal (the audiobooks are decent).
Mapping the workflow
As I mentioned, you want to conceive of your team's work as a kind of pipeline. So what was our pipeline? After chatting with my colleagues I came up with something like this:

It took several discussions to nail this process down. People typically have decent models of how they work floating around in their heads, but it's not common to write it out explicitly like this. Getting this workflow on paper gave us some clear targets for improvement. For example:
- Updating a model required tedious manual testing to check for regressions
- The update/calibrate cycle was the key bottleneck, because calibration ran slowly and manual steps were required to run long jobs on the compute cluster
- Post processing was done manually and was typically only done by the one person who knew the correct scripts to run
Testing the codebase
My first concern was testing. When I started there were no automated tests for the code. There were a few little scripts and "test functions" which you could run manually, but nothing that could be run as a part of continuous integration .
This was a problem. Without tests, errors will inevitably creep into the code. As the complexity of the codebase increases, it becomes infeasible to manually check that everything is working since there are too many things to check. In general writing code that is correct the first time isn't too hard - it's not breaking it later that's difficult.
In the context of disease modelling, automated tests are even more important than usual because the correctness of the output cannot be easily verified. The whole point of the system is to calculate an output that would be infeasible for a human to produce. Compare this scenario to web development where the desired output is usually known and easily verified. You can usually load up a web page and click a few buttons to check that the app works.
Smoke Tests
So where did I start? Trying to add tests to an untested codebase with thousands of lines of code is very intimidating. I couldn't simply sit down and write unit tests for every little bit of functionality because it would have taken weeks. So instead I wrote "smoke tests". A smoke test runs some code and checks that it doesn't crash. For example:
def test_covid_malaysia():
    """Ensure the Malaysia region model can run without crashing"""
    # Load model configuration.
    region = get_region("malaysia")
    # Build the model with default parameters.
    model = region.build_model()
    # Run the model, don't check the outputs.
    model.run_model()
To some this may look crimininally stupid, but these tests give fantastic bang-for-buck. They don't tell you whether the model outputs are correct, but they only takes a few minutes to write. These tests catch all sorts of stupid bugs: like someone trying to add a number to a string, undefined variables, bad filepaths, etc. They doesn't help so much in reducing semantic errors, but they do help with development speed.
Continuous Integration
A lack of testing is the kind of problem that people don't know they have. When you tell someone "hey we need to start writing tests!" the typical reaction is "hmm yeah sure I guess, sounds nice..." and internally they're thinking "... but I've got more important shit to do". You can try browbeating them by telling them how irresponsible they're being etc, but that's unlikely to actually get anyone to write and run tests on their own time.
So how to convince people that testing is valuable? You can show them, with the magic of ✨continuous integration✨. Our code was hosted in GitHub so I set up GitHub Actions to automatically run the new smoke tests on every commit to master. I've written a short guide on how to do this here .
This setup makes tests visible to everyone. There's a little tick or cross next to every commit and, importantly, next to the name of the person who broke the code.

With this system in place we eventually developed new norms around keeping the tests passing. People would say "Oops! I broke the tests!" and it became normal to run the tests locally and fix them if they were broken. It was a little harder to encourage people to invest time in writing new tests.
Once I become more familiar with the codebase I eventually wrote integration and unit tests for the critical modules. I've written a bit more about some testing approaches I used here .
Something that stood out to me in this process was that perhaps the most valuable thing I did in that job was one of the easiest things to do. Setting up continuous integration with GitHub took me an hour to two, but it's been paying dividends for ~2 years since. How hard something is to do and how valuable it is are different things.
Performance improvements
The code was too slow and the case for improving performance was clear. Slowness can be subjective, I've written a little about the different meanings of "slow" in backend web dev, but in this case having to wait 2+ days for a calibration result was obviously way too slow and was our biggest productivity bottleneck.
The core of the problem was that a MCMC calibration had to run the model over 1000 times. When I started, a single model run took about 2 minutes. Doing that 1000 times means ~33 hours of runtime per calibration. Our team's mathematician worked on trying to make our MCMC algorithm more sample-efficient, while I tried to push down the 2 minute inner loop.
It wasn't hard to do better, since performance optimisation hadn't been a priority so far. I used Python's cProfile module, plus a few visualisation tools to find the hot parts of the code and speed them up. This article was a lifesaver. In broad strokes, these were the kinds of changes that improved performance:
- Avoid redundant re-calculation in for-loops
- Switching data structures for more efficient value look-ups (eg. converting a list to a dict)
- Converting for-loops to matrix operations ( vectorisation )
- Applying JIT optimisation to hot, pure, numerical functions ( Numba )
- Caching function return values ( memoization )
- Caching data read from disk
This work was heaps of fun. It felt like I was playing a video game. Profile, change, profile, change, always trying to get a new high score. Initially there were lots of easy, huge wins, but it became harder to push the needle over time.
After several months the code was 10x to 40x faster, running a model in 10s or less, meaning we could run 1000 iterations in a few hours, rather than over a day. This had a big impact on our ability to run calibrations for weekly reports, but the effects of this speedup were felt more broadly. To borrow a phrase: "more is different". Our tests ran faster. CI was more snappy and people were happier to run the tests locally, since they would take 10 seconds rather than 2 minutes to complete. Dev work was faster since you could tweak some code, run it, and view the outputs in seconds. In general, these performance improvements opened up other opportunities for working better that weren't obvious from the outset.
There were some performance regressions over time as the code evolved. To try and fight these slowdowns I added automatic benchmarking to our continuous integration pipeline.
Task automation
Once our calibration process could run in hours instead of days we started to notice new bottlenecks in our workflow. Notably, running a calibration involved a lot of manual steps which were not documented, meaning that only one person knew how to do it.
Interacting with the university's Slurm cluster was also a pain. The compute was free but we were at the mercy of the scheduler, which decided when our code would actually run, and the APIs for running and monitoring jobs were arcane and clunky.
Calibrations didn't always run well so this cycle could repeat several times before we got an acceptable result that we would want to use.
Finally, there wasn't a systematic method for recording input and output data for a given model run. It would be hard to reproduce a given model run 6 months later.
The process worked something like this when I started:

It was possible to automate most of these steps. After a lot of thrashing around on my part, we ended up with a workflow that looks like this.

In brief:
- A disease modeller would update the code and push it to GitHub
- Then they could load up a webpage and trigger a job by filling out a form
- The calibration and any other post processing would run "in the cloud"
- The final results would be available on a website
- The data vis guy could pull down the results and push them to PowerBI
There were many benefits to this new workflow. There were no more manual tasks. The process could be run by anyone on the team. We could easily run multiple calibrations in parallel (and often did). We also created standard diagnostic plots that would be automatically generated for each calibration run (similar to Weights and Biases for machine learning). For example, these plots show how the model parameters change over the course of a MCMC calibration run.

I won't go into too much detail on the exact implementation of this cloud pipeline. Not my cleanest work, but it did work. It was a collection of Python scripts that hacked together several tools:
- Buildkite for task automation (it's really great)
- AWS EC2 for compute
- AWS S3 for storing data
- boto3 for managing transient servers
- NextJS for building the static results website
If I could build it again I'd consider using something like Azure ML pipelines . See below for an outline of the cloud architecture if you're curious.

Visualization tools
Our models had a lot of stuff that needed to be visualised: inputs, outputs, and calibration targets. Our prior approach was to run a Python script which used matplotlib to dump all the required plots to into a folder. So the development loop to visualise something was:
- Edit the model code, run the model
- Run a Python script on the model outputs
- Open up a folder and look at the plots inside
It's not terrible but there's some friction and toil in there.
Jupyter notebooks were a contender in this space, but I chose to use Streamlit , because many of our plots were routine and standardised. With Streamlit, you can use Python to build web dashboards that generate plots based on a user's input. This was useful for disease modellers to quickly check a bunch of different diagnostic plots when working on the model on their laptop. Given it's all Python (no JavaScript), my colleagues were able to independently add their own plots. This tool went from interesting idea to a key fixture of our workflow over a few months.

A key feature of Streamlit is "hot reloading", which is where the code that generates the dashboard automatically re-runs when you change it. This means you can adjust a plot by editing the Python code, hit "save" and the changes will appear in your web browser. This quick feedback loop sped up plotting tasks considerably.
Aside: This isn't super relevant but while we're here I just want to show off this visualisation I made of an agent based model simulating the spread of a disease through a bunch of households.

Data management
We had quite a variety of data flying around. Demographic inputs like population size, model parameters, calibration targets and the model outputs.
We had a lot of model input parameters stored as YAML files and it was hard to keep them all consistent. We had like, a hundred YAML files when I left. To catch errors early I used Cerberus and later Pydantic to validate parameters as they were loaded from disk. I wrote smoke tests, which were run in CI, to check that none of these files were invalid. I wrote more about this approach here , although now I prefer Pydantic to Cerberus becuase it's a little less verbose.
We had a lot of 3rd party inputs for our modelling such as Google mobility data , UN World Population info, social mixing matrices . Initially this data was kept in source control as a random scattering of undocumented .csv and .xls file. Pre-processing was done manually using some Python scripts. I pushed to get all of the source data properly documented and consolidated into a single folder and tried to encourage a standard framework for pre-processing all of our inputs with a single script. As our input data grew to 100s of megabytes I moved these CSV files to GitHub's Git LFS , since our repo was getting quite hefty and slow to download (>400MB).
In the end hand-rolled a lot of functionality that I probably shouldn't have. If you want to organise and standardise all your input data, I recommend checking out Data Version Control .
Finally I used AWS S3 to store all of the outputs, intermediate values, log files and plots produced by cloud jobs. Each job was stored using a key that included the model name, region name, timestamp and git commit. This was very helpful for debugging and convenient for everybody on the team to access via our results website. The main downside was that I had to occasionally manually prune ~100GB of results from S3 to keep our cloud bills low.
Wrapping Up
Overall I look back on this job fondly. You might have noticed that I've written thousands of words about it. There were some downsides specific to the academic environment. There was an emphasis on producing novel results, especially in the context of COVID in 2020, and as a consequence there were a lot of "one off" tasks and analyses. The codebase was constantly evolving and it felt like I was always trying to catch-up. It was cool working on things that I'd never done before where I didn't know what the solution was. I drew a lot of inspiration from machine learning and data science.
Thanks for reading. If this sounds cool and you think you might like working as a software developer in academia, then go pester some academics.
If you read this and were like "wow! we should get this guy working for us!", I've got good news. I am looking for projects to work on as a freelance web developer. See here for more details.
How to compress images for a webpage
Published: 2021-05-14T12:00:00+10:00
Updated: 2021-05-14T12:00:00+10:00
UTC: 2021-05-14 02:00:00+00:00
URL: https://mattsegal.dev/webpage-image-compressiom.htmlOften when you're creating a website, a client or designer will provide you with large images that are 2-5MB in size and thousands of pixels wide. The large file size of these images will make them slow to load on your webpage, making it seem slow and broken This video …Content Preview
Often when you're creating a website, a client or designer will provide you with large images that are 2-5MB in size and thousands of pixels wide. The large file size of these images will make them slow to load on your webpage, making it seem slow and broken
This video shows you a quick browser-only workflow for cropping, resizing and compressing these images so that they will load more quickly on a webpage. It's not very advanced, but it doesn't need to be. Here I convert images from ~2MB to ~100kB, which is a ~20x reduction in file size.
How to setup Django with React
Published: 2020-10-24T12:00:00+11:00
Updated: 2020-10-24T12:00:00+11:00
UTC: 2020-10-24 01:00:00+00:00
URL: https://mattsegal.dev/django-react.htmlIt's not too hard to get started with either Django or React. Both have great documentation and there are lots of tutorials online. The tricky part is getting them to work together. Many people start with a Django project and then decide that they want to "add React" to it …Content Preview
It's not too hard to get started with either Django or React. Both have great documentation and there are lots of tutorials online. The tricky part is getting them to work together. Many people start with a Django project and then decide that they want to "add React" to it. How do you do that though? Popular React scaffolding tools like Create React App don't offer you a clear way to integrate with Django, leaving you to figure it out yourself. Even worse, there isn't just one way to set up a Django/React project. There are dozens of possible methods , each with different pros and cons. Every time I create a new project using these tools I find the options overwhelming.
I think that most people should start with a setup that is as close to vanilla Django as possible: you take your existing Django app and sprinkle a little React on it to make the frontend more dynamic and interactive. For most cases, creating a completely seperate "single page app" frontend creates a lot of complexity and challenges without providing very much extra value for you or your users.
In this series of posts I will present an opinionated guide on how to setup and deploy a Django/React webapp. The focus will be on keeping things simple, incremental and understanding each step. I want you to be in a position to debug any problems yourself. At the end of each post, you should have a working project that you can use.
I'm going to assume that you know:
- the basics of web development (HTML, CSS, JavaScript)
- the basics of Django (views, templates, static files)
- the basics of React (components, props, rendering)
I'm not going to assume that you know anything about Webpack, Babel, or any other JavaScript toolchain insanity.
Example project
The example code for this guide is hosted on this GitHub repo . The code for each section is available as a Git branch:
Before you start the rest of the guide, I recommend setting up the example project by cloning the repo and following the instructions in the README :
git clone https://github.com/MattSegal/django-react-guide.gitDjango and static files
Before we dig into React, Babel and Webpack, I want to make sure that we have a common understanding around how static files work in Django:

The approach of this guide will be to re-use a lot of this existing setup. We will create an additional that system inserts our React app's JavaScript into a Django static files folder.

Why can't we just write React in a single static file?
Why do we need to add a new system? Django is pretty complicated already. Can't we just write our React app in a single JavaScript file like you usually do when writing JavaScript for webpages? The answer is yes, you totally can! You can write a complete React app in a single HTML file:
<html>
<body>
  <!-- React mount point -->
  <div id="app"></div>
  <!-- Download React library scripts -->
  <script crossorigin src="https://unpkg.com/react@16/umd/react.development.js"></script>
  <script crossorigin src="https://unpkg.com/react-dom@16/umd/react-dom.development.js"></script>
  <script>
    // Define the React app
    const App = () => {
      const [count, setCount] = React.useState(0)
      const onClick = () => setCount(c => c + 1)
      return React.createElement('div', null,
        React.createElement('h1', null, 'The count is ' + count),
        React.createElement('button', { onClick: onClick }, 'Count'),
      )
    }
    // Mount the app to the mount point.
    const root = document.getElementById('app')
    ReactDOM.render(React.createElement(App, null, null), root)
  </script>
</body>
</html>
Why don't we just do this? There are a few issues with this approach of writing React apps:
- We can't use JSX syntax in our JavaScript
- It's harder to break our JavaScript code up into modules
- It's harder to install/use external libraries
Webpack
The example code for this section starts here and ends here .
We need a tool that helps us use JSX, and it would be nice to also have a "module bundling system" which lets us install 3rd party libraries and split our JavaScript code up into lots of little files. For this purpose, we're going to use Webpack . Webpack is going to take our code, plus any 3rd party libraries that we want to install and combine them into a single JS file.

In this step we will just to create a minimal working Webpack setup. We're not goint try to use React yet. By the end of this section, we won't have added any new JavaScript features, but Webpack will be working.
To use Webpack you need to first install NodeJS so that you can run JavaScript outside of your web browser. You need to be able to run
nodeandnpm(the Node Package Manager) before you can continue.First, go into the example project and create a new folder called
frontend. We'll start by just copying over the existing JavaScript that is used by the Django app in main.js . We're going to copy this into a "source code" folder atfrontend/src/index.js.// frontend/src/index.js const btn = document.getElementById('click') btn.addEventListener('click', () => alert('You clicked the button!'))Inside of the
frontendfolder, install Webpack usingnpmas follows:npm init --yes npm install webpack webpack-cliNow is a good time to update your
.gitignorefile to excludenode_modules. Next, we need to add a file that tells Webpack what to do, which is calledwebpack.config.js// frontend/webpack.config.js const path = require('path') const webpack = require('webpack') module.exports = { // Where Webpack looks to load your JavaScript entry: { main: path.resolve(__dirname, 'src/index.js'), }, mode: 'development', // Where Webpack spits out the results (the myapp static folder) output: { path: path.resolve(__dirname, '../backend/myapp/static/myapp/'), filename: '[name].js', }, plugins: [ // Don't output new files if there is an error new webpack.NoEmitOnErrorsPlugin(), ], // Where find modules that can be imported (eg. React) resolve: { extensions: ['*', '.js', '.jsx'], modules: [ path.resolve(__dirname, 'src'), path.resolve(__dirname, 'node_modules'), ], }, }Finally let's make it easy to run Webpack by including an entry in the "scripts" section of our
package.jsonfile:// frontend/package.json { // ... "scripts": { "dev": "webpack --watch --config webpack.config.js" }, // ... }The
--watchflag is particularly useful: it makes Webpack re-run automatically on file change. Now we can run Webpack usingnpm:npm run devYou will now see that the contents of your
main.jsfile has been replaced with a crazy lookingevalstatement. If you check your Django app athttp://localhost:8000you'll see that the JavaScript on the page still works, but it's now using the Webpack build output athttp://localhost:8000/static/myapp/main.js// backend/myapp/static/myapp/main.js eval("const btn = document.getElementById('click')\nbtn.addEventListener('click', () => alert('You clicked the button!'))\n\n\n//# sourceURL=webpack://frontend/./src/index.js?");This file is the Webpack build output. Webpack has taken our source file (
index.js) and transformed it into an output file (main.js):

So now we have Webpack working. It's not doing anything particularly useful or interesting yet, but all the plumbing has been set up.
Source code vs. build outputs
It's a common newbie mistake to add Webpack build outputs like
main.jsto source control. It's a mistake because source control is for "source code", not "build artifacts". A build artifact is a file created by a build or compliation process. The reason you don't add build artifacts is because they're redundant: they are fully defined by the source code, so adding them just bloats the repo without adding any extra information. Even worse, having a mismatch between source code and build artifacts can create nasty errors that are hard to find. Some examples of build artifacts:
- Python bytecode (.pyc) file,s which are built from .py files by the Python interpeter
- .NET bytecode (.dll) files, built from compiling C# code
- Executable (.exe) files, build from compiling C code
None of these things should go in source control unless there's a special reason to keep them. In general they should be kept out of Git using the
.gitignorefile.My approach for this project is to create a special Webpack-only folder in Django's static file called "build", which is ignored by Git. To achieve this, you need to update your
webpack.config.jsfile:// frontend/webpack.config.js // ... module.exports = { // ... output: { path: path.resolve(__dirname, '../backend/myapp/static/myapp/build/'), filename: '[name].js', }, // ... }You will need to restart Webpack for these changes to take effect. Then you can add
build/to your.gitignorefile. Finally, you will need to update the static file link in your Django template:<!-- backend/myapp/templates/myapp/index.html --> <script src="{% static 'myapp/build/main.js' %}"></script>Adding React
The example code for this section starts here and ends here .
Now that Webpack is working, we can add React. Let's start by installing React in our
frontendfolder:npm install react react-domNow we can use React in our JavaScript source code. Let's re-use the small counter app I created earlier:
// frontend/src/index.js
import React from 'react'
import ReactDOM from 'react-dom'

// Define the React app
const App = () => {
  const [count, setCount] = React.useState(0)
  const onClick = () => setCount(c => c + 1)
  return React.createElement('div', null,
    React.createElement('h1', null, 'The count is ' + count),
    React.createElement('button', { onClick: onClick }, 'Count'),
  )
}
// Mount the app to the mount point.
const root = document.getElementById('app')
ReactDOM.render(React.createElement(App, null, null), root)
Now if you go to
http://localhost:8000/you should see a simple counter. If you inspect the contents ofmain.jsathttp://localhost:8000/static/myapp/build/main.js, you'll see that there is a lot more stuff included in the file. This is because Webpack has bundled up our code plus the development versions of React and ReactDOM into a single file:
Adding Babel
Next we need at tool that lets us write JSX. We want to be able to write our React components like this:
const App = () => {
  const [count, setCount] = React.useState(0)
  const onClick = () => setCount(c => c + 1)
  return (
    <div>
      <h1>The count is {count}</h1>
      <button onClick={onClick}>Count</button>
    </div>
  )
}
and then some magic tool transforms it into regular JavaScript, like this:
const App = () => {
  const [count, setCount] = React.useState(0)
  const onClick = () => setCount(c => c + 1)
  return React.createElement('div', null,
    React.createElement('h1', null, 'The count is ' + count),
    React.createElement('button', { onClick: onClick }, 'Count'),
  )
}
That magic tool is Babel , a JavaScript compiler that can transform JSX into standard JavaScript. Babel can use plugins , which apply custom transforms to your source code. It also offers presets , which are groups of plugins that work well together to achieve a goal.
Now we're going to install a whole bunch of Babel stuff with
npm:npm install --save-dev babel-loader @babel/core @babel/preset-reactWhat the hell is all of this? Let me break it down for you:
- @babel/core : The main Babel compiler library
- @babel/preset-react : A collection of React plugins: tranforms JSX to regular JavaScript
- babel-loader : Allows Webpack to use Babel
These are not the only Babel plugins that I like to use, but I didn't want to add too many new things at once. In addition to installing the plugins/presets, we need to tell Babel to use them, which we do with a config file called
.babelrc.// frontend/.babelrc { "presets": ["@babel/preset-react"] }Next, we need to tell Webpack to use our new Babel compiler for all our JavaScript files:
// frontend/webpack.config.js
// ...
module.exports = {
  // ...
    // Add a rule so Webpack reads JS with Babel
    module: { rules: [
    {
      test: /\.js$/,
      exclude: /node_modules/,
      use: ['babel-loader'],
    },
  ]},
  // ...
Essentially, this config change tells Webpack: "for any file ending with
.js, usebabel-loaderon that file, expect for anything innode_modules". Finally, we can now use JSX in our React app:// frontend/src/index.js import React from 'react' import ReactDOM from 'react-dom' // Define the React app const App = () => { const [count, setCount] = React.useState(0) const onClick = () => setCount(c => c + 1) return ( <div> <h1>The count is {count}</h1> <button onClick={onClick}>Count</button> </div> ) } // Mount the app to the mount point. const root = document.getElementById('app') ReactDOM.render(<App />, root)You will need to restart Webpack for the config changes to be loaded. After that, you should be able to visit
http://localhost:8000/and view your counter app, now working with JSX.Deployment
I won't cover deployment in detail in this post, because it's long enough already, but in short, you can now deploy your Django/React app as follows:
- Install JavaScript dependencies with
npm- Run Webpack to create build artifacts in your Django static files
- Deploy Django how you normally would
There a few things that it would be good to change before deploying, like not using "development" mode in Webpack, but this workflow should get you started for now. If you have never deployed a Django app before, I've written an introductory guide on that as well, which uses the same incremental, explanation-heavy style as this guide.
Next steps
There is a lot of stuff I didn't cover in this guide, which I'd like to write about in the future. Here are some things that I didn't cover, which are important or useful when building a React/Django app:
- Hot reloading
- Deployment
- Passing requests/data between Django and React
- Modular CSS / SCSS / styled components
- Routing and code-splitting
- Authentication
How to highlight unused Python variables in VS Code
Published: 2020-10-09T12:00:00+11:00
Updated: 2020-10-09T12:00:00+11:00
UTC: 2020-10-09 01:00:00+00:00
URL: https://mattsegal.dev/pylance-vscode.htmlI make a lot of stupid mistakes when I'm working on Python code. I tend to: make typos in variable names accidently delete a variable that's used somewhere else leave unused variables lying around when they should be deleted It's easy to accidentally create code like in the image below …Content Preview
I make a lot of stupid mistakes when I'm working on Python code. I tend to:
- make typos in variable names
- accidently delete a variable that's used somewhere else
- leave unused variables lying around when they should be deleted
It's easy to accidentally create code like in the image below, where you have unused variables (
y,z,q) and references to variables that aren't defined yet (z).

You'll catch these issues when you eventually try to run this function, but it's best to be able to spot them instantly. I want my editor to show me something that looks like this:

Here you can see that the vars
y,zandqare greyed out, to show that they're not used. The undefined reference tozis highlighted with a yellow squiggle. This kind of instant visual feedback means you can write better code, faster and with less mental overhead.Having your editor highlight unused variables can also help you remove clutter. For example, it's common to have old imports that aren't used anymore, like
copyandrequestsin this script:

It's often hard to see what imports are being used just by looking, which is why it's nice to have your editor tell you:

You'll also note that there is an error in my import statement.
import copy from copyisn't valid Python. This was an unintentional mistake in my example code that VS Code caught for me.Setting this up with VS Code
You can get these variable highlights in VS Code very easily by installing PyLance , and alternative "language server" for VS Code. A language server is a tool, which runs alongside the editor, that does static analysis of your code.
To get this language server, go into your extensions tab in VS Code, search for "pylance", install it, and then you'll see this popup:

Click "Yes, and reload".
Alternatives
PyCharm does this kind of static analysis out of the box. I don't like PyCharm quite so much as VS Code, but it's a decent editor and many people swear by it. You can also get this feature by enabling a Python linter in VS Code like flake8, pylint or autopep8. I don't like twiddling with linters, but again other people enjoy using them.
Next steps
If you're looking for more Python productivity helpers, then check out my blog post on the Black auto-formatter.
A Django project blueprint to help you learn by doing
Published: 2020-10-03T12:00:00+10:00
Updated: 2020-10-03T12:00:00+10:00
UTC: 2020-10-03 02:00:00+00:00
URL: https://mattsegal.dev/django-survey-project.htmlThere's an awkward point when you're learning Django where you've done the official tutorial and maybe built a simple project, like a to-do list, and now you want to try something a little more advanced. People say that you should "learn by building things", which is good advice, but it …Content Preview
There's an awkward point when you're learning Django where you've done the official tutorial and maybe built a simple project, like a to-do list, and now you want to try something a little more advanced. People say that you should "learn by building things", which is good advice, but it leaves you unsure about what to actually build .
In this post I'll share two things:
- a description of a Django project for beginners, which you can build; and
- a short guide on how to design a new website from scratch
I won't introduce many new tools or technical concepts beyond what is already in the Django tutorial. The project can be built using just the basic Django features. There is no need to use REST Framework, JavaScript, React, Webpack, Babel, JSON or AJAX to get this done. Only Django, HTML and CSS are required.
Even though this project only uses simple tools, I think building it is worthwhile for a beginner, since it will introduce you to many of the common themes of backend web development.
Project overview
In this project, you will build a Django app that runs a survey website. On this site, users can create surveys and send them out to other people to get answers. A user can sign up, create a survey and add multi-choice questions to it. They can then send a survey link to other people, who will answer all the questions. The user who created the survey can see how many people answered, and what percentage of people chose each multi-choice option.
That's the whole app. I have created a reference implementation on my GitHub which you can look at if you get stuck when building it yourself.
The project description sounds simple, doesn't it? I thought this would take me 8 hours to design and build, but I spent 20 hours at the keyboard to get it done. Software projects are hard to estimate before they are built, since they have a surprising amount of detail that you don't think about beforehand.
Designing the app
So now you know what you're building, but you're not ready to write any code yet. We need to create a design first. As the saying goes: weeks of coding can save hours of planning .
This design will have three parts:
- User journeys : where you decide who is using your app and how they will use it
- Data models : where you decide how you will structure the database
- Webpage wireframes : where you decide what your user interface (UI) will look like
User journey
The most important thing to do when building a website is to consider the users and their goals. In this case, I think there are two sets of users:
- Survey takers : people who want to answer a survey's questions
- Survey creators : people who want to create a survey, send it out and view the answers
To better understand who your users are and what they want, you should construct a user journey for each of them: a high-level description of the steps that they will need to take to get what they want. This is easily represented as a diagram, created with a free wireframing tool like Exalidraw or Wireflow .
Let's start with the person who is answering the survey, the "survey taker", who has a simple user journey:

Next, let's look at the person who created the survey, the "survey creator":

Creating these diagrams will force you to think about what you will need to build and why. For example, a survey creator will probably need a user account and the ability to "log in", since they will want private access to their surveys. Lots of thoughts about how to build your app will cross your mind when you are mapping these user journeys.
Data models
Once you know what your users want to do, you should focus on what data you will need to describe all of the things in your app. So far we have vague ideas of "surveys", "questions", "answers" and "results", but we need a more specific description of these things so that we can write our Model classes in Django.
To better understand your data, I recommend that you create a simple diagram that displays your models and how they relate to each other. Each connection between a model is some kind of foreign key relation. Something like this:
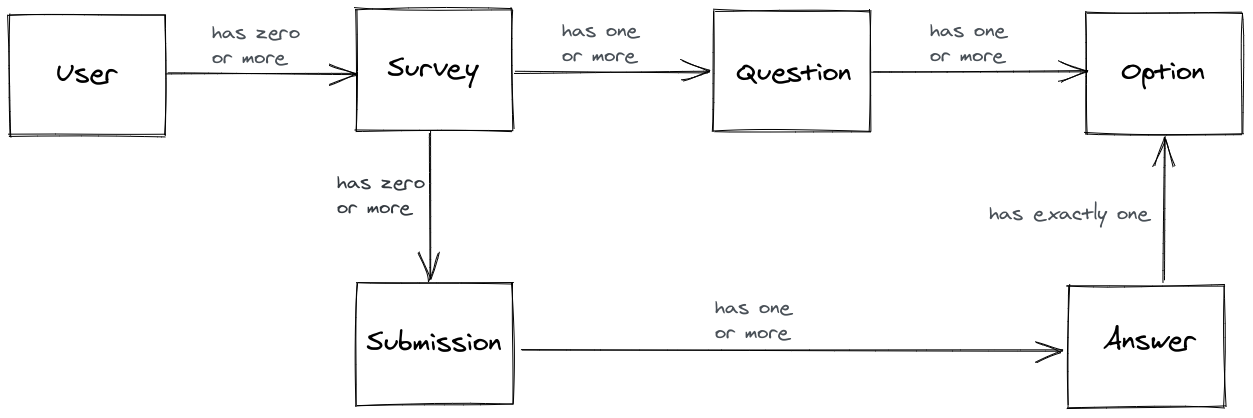
I explain how I came up with this particular data model in this appendix page .
You don't need to get too formal or technical with these diagrams. They're just a starting point, not a perfect, final description of how your app will work. Also, the data model which I made isn't the only possible one for this app. Feel free to make your own and do it differently.
Webpage wireframes
Now we have an idea of how our users will interact with the app and we know how we will structure our data. Next, we design our user interfaces. I suggest you create a rough wireframe that describes the user interface for each webpage. Creating wireframes for webpages is a good idea for two reasons:
- Wireframing allows you to quickly explore different page designs and it forces you to think about how your app needs to work
- It's much easier to write HTML and CSS for pages where you already have a simple design to work from
You can use a free wireframing tool like Exalidraw or Wireflow for these diagrams. Keep in mind that this project doesn't use JavaScript, so you can't get too fancy with custom interactions. You will need to use HTML forms to POST data to the backend.
You can create your own wireframes or you can use the ones that I've already created, which are all listed in this appendix page with some additional notes for each page:
- Starting the survey
- Answering the survey
- Survey submitted
- Landing page
- Signing up
- Logging in
- Survey list
- Create a survey
- Edit a survey
- Add questions to a survey
- Add options to a survey question
- Survey details
General advice
Now with some user journeys, a data model and a set of wireframes, you should be ready to start building your Django app. This project blueprint will help you get started, but there is still a lot of work for you to do if you want to build this app. You still need to:
- decide on a URL schema
- create models to represent the data
- create forms to validate the user-submitted data
- write HTML templates to build each page
- add views to bind everything together
There's about 12 views, 12 templates, 5 forms and 5 models to write. Given all this work, it's really important that you focus and keep the scope of this project narrow. Keep everything simple . Don't use any JavaScript and write as little CSS as possible. Use a CSS framework like Boostrap or Semantic UI if you want it to look nice. Get something simple working first , and then you can make it fancy later. If you don't focus, you could spend weeks or months on this project before it's done.
As a specific example, consider the user authentication feature. In this app, your users can log in or sign up. To really make the auth system "complete", you could also add a log out button, a password reset page, and an email validation feature. I think you should skip these features for now though, and get the core functionality working first.
Software projects are never finished, and you can improve this app again and again even after you are "done". Don't try to make it perfect, just finish it.
Next steps
I hope you find this blueprint project and design guide helpful. If you actually end up building this, send me an email! I'd love to see it. If you like this post and you want to read some more stuff I've written about Django, check out:
- A beginner's guide to Django deployment
- How to read the Django documentation
- How to make your Django project easy to move and share
- How to polish your GitHub projects when you're looking for a job
- Tips for debugging with Django
You can also subscribe to my mailing list below for emails when I post new articles.
Django project blueprint: data model
Published: 2020-10-03T12:00:00+10:00
Updated: 2020-10-03T12:00:00+10:00
UTC: 2020-10-03 02:00:00+00:00
URL: https://mattsegal.dev/django-survey-project-data-model.htmlThis post is an appendix to my post on designing a Django project. In this page I explain why I chose to use this data model: I created this data model by looking at the user journeys and thinking about what data I would need to make them work. Here's …Content Preview
This post is an appendix to my post on designing a Django project . In this page I explain why I chose to use this data model:
I created this data model by looking at the user journeys and thinking about what data I would need to make them work. Here's the thought process I used. First I thought about the data that I need to define everything about a "survey" in the app. I decided that I would need:
- a Survey model to represent each survey; and then
- a link between each Survey and a User , since we need to restrict survey access to only the user who owns it
- a Question model for each question on the survey. Each survey needs to have one or more questions, so we can't hardcode questions as fields on the Survey model, so we must create a new Question model which knows which survey owns it
- each Question has one re more multi-choice answer options, so we must create an Option model
Next, I thought about how we would record a survey taker answering the questions. We would need:
- a Submission model to represent each survey taker's submission
- a link between Submission and Survey , so each submission can know which survey it belongs to
- the Answers to each question, where the answer is for a particular Option
Django project blueprint: wireframes
Published: 2020-10-03T12:00:00+10:00
Updated: 2020-10-03T12:00:00+10:00
UTC: 2020-10-03 02:00:00+00:00
URL: https://mattsegal.dev/django-survey-project-wireframes.htmlThis post is an appendix to my post on designing a Django project. This page shows all the wireframes for the app, with some additional notes for each page. Page designs for the user who answers the survey This section covers the pages required for the "survey taker" user journey …Content Preview
This post is an appendix to my post on designing a Django project . This page shows all the wireframes for the app, with some additional notes for each page.
Page designs for the user who answers the survey
This section covers the pages required for the "survey taker" user journey:
Taken literally, this journey suggests that we should build ~3 pages.
Starting the survey
The person taking the survey should start on a "landing" page, where we explain what's going on and invite them to take the survey.

The "start survey" button can just be a link to the next page.
Answering the survey
Next, we need a page for the survey taker to actually answer the questions.

You will need to render all of the questions on the survey inside an HTML form. The "submit" button should trigger a POST request to the backend.
If you want to answer multiple questions on one page, then you will need to use a more advanced feature of Django: a formset. I found this blog post and this other one useful for creating my formsets, along with the official Django docs on formsets .
Alternatively, you could have one page per question, which would mean splitting up this single page across multiple pages, but it would make your Django forms simpler.
Survey submitted
Once the user submits their answers for the survey, they should then receive confirmation that everything worked so that they don't try to submit the survey again or get frustrated. When they click "submit", let's take them to a "thank you" page.

That's it for the survey taker. Next let's look at the survey creator pages.
Page designs for the user who creates the survey
Here's the "survey creator" user journey again.
The correspondence between this journey and the pages won't be exact, but it'll be pretty close.
Landing page
We should start the user's experience with a landing page, where we will explain the app to the user and invite them to log in with a call to action button.

The button can just be a link to the login or signup page. If you're not sure what to write for the landing page, check out this article .
Signing up
We need a signup page for new users to create accounts.
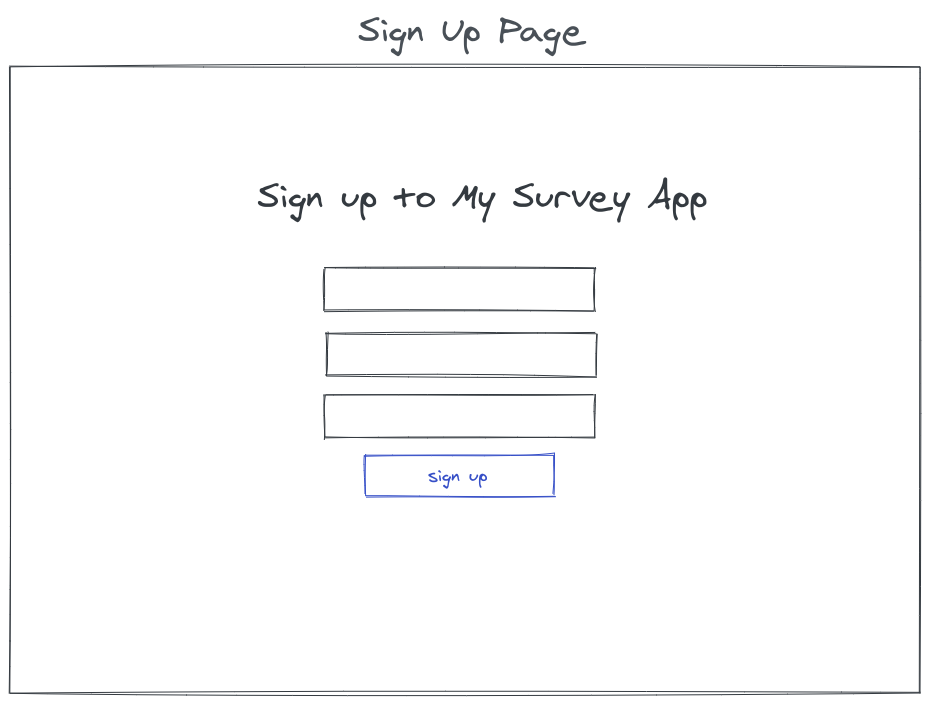
There should also be a link to the log in page from the signup page, just in case a user who alread has an account gets lost. This blog post is a good guide for how to create a sign up view in Django.
Logging in
We also need a login page for returning users.

Use a LoginView for the log in view. More details on this view class at CCBV . There should be a link to the signup page from the login page.
Survey list
Where do users go after they log in? There are two viable options. You could send them straight to a "create survey" page, or you could send them to a "list" page, where they can see all their surveys. I chose the list page option, becuase I think it's less disorienting for the user and less complicated to implement.

For this page to work you'll need to grab all of the Survey objects that the user has created and list them in the HTML template.
In this wireframe, a survey can be either in an "active" or "editing" state, where if the survey is "active" then the user can view the results and if it is "editing" then they can add more questions.
This is the first page we've seen that is specific to one user. You need to implement authorization so that one user cannot spy on another user's surveys.
Create survey
On this page a user types in the name of a new survey, and presses "create survey" to create a new survey with that name.

This can be implented with a HTML form which sends a POST request to a Django view. You will need a Django Form to validate the data.
I have broken the "survey creation" pages (this page an the ones after it) up into many stages to try and make the Django views simple. This is not the only way to design pages for the "survey creation" feature, and you can do this differently, with fewer pages, if you like.
You will need to think about authorization for this view, and all the other views where the user can change data. We don't want users to be able to change the data of other users. You will need to write some code in your views to check that the user who is changing some data is also the user who owns it.
Edit survey
On this page a user can add questions to the survey they just created.

Clicking "add another question" takes the user to a seperate "add question" page. The user can add as many questions as they like until they are ready to make the survey "active".
When they click "start survey", the button should use an HTML form to send a POST request to a Django view which moves the survey from "edit mode" to "active mode".
Add a question to survey
On this page the user can create a new question for the survey. They type in the prompt for the question, like "what is your favourite colour?" and then click "add question" to create the new question.

Add options to a new question
On this page the user can add multiple options to a question that they just created.

Survey details
This is the final page that a user who is running a survey wants to look at. They will view this dashboard to check the answers of a survey that they've created and sent out.
This page tells the user how many people have answered their survey and what percentage of people chose each answer.

You will need to do a bit of maths in the view for this page. You can calculate the percentages using some fancy database queries using aggregation . Otherwise you can query the Survey model, its Questions and all of its Submissions and their Answers. Once you have pulled all the data you need into memory, then you can write a for loop or something to do the percentage calculations. I recommend using
filterandcountin your queries.When thinking about database queries for this view, you should imagine that you have thousands of surveys and each survey has dozens of questions and hundreds of answers.
You will need to implement authorization on in this page's view so that only the user who created the survey can view the results.
How to use both camelCase and snake_case in your frontend and backend
Published: 2020-09-24T12:00:00+10:00
Updated: 2020-09-24T12:00:00+10:00
UTC: 2020-09-24 02:00:00+00:00
URL: https://mattsegal.dev/camel-and-snake-case.htmlPython uses snake_case variable naming while JavaScript favours camelCase. When you're buiding an web API with Django then you'll be using both langauges together. How do you keep your styles consistent? You could just use one style for both your frontend and backend, but it looks ugly. Perhaps this …Content Preview
Python uses
snake_casevariable naming while JavaScript favourscamelCase. When you're buiding an web API with Django then you'll be using both langauges together. How do you keep your styles consistent? You could just use one style for both your frontend and backend, but it looks ugly. Perhaps this is not the biggest problem in your life right now, but it's a nice one to solve and it's easy to fix.In this post I'll show you can use snake case on the backend and camel case on the frontend, with the help of the the
camelizeandsnakeizeJS libraries.The problem: out of place naming styles
Let's say you've got some Django code that presents an API for a
Personmodel:# Inside your Django app. # The data model class Person(models.Model): full_name = models.CharField(max_length=64) biggest_problem = models.CharField(max_length=128) # The serializer class PersonSerializer(serializers.ModelSerializer): class Meta: model = Person fields = ["full_name", "biggest_problem"] # The API view class PersonViewSet(viewsets.ModelViewSet): serializer_class = PersonSerializer queryset = Person.objects.all()And you've also got some JavaScript code that talks to this view:
// Inside your frontend JavaScript codebase.
const createPerson = (personData) => {
    requestData = {
      method: 'POST',
      body: JSON.stringify(personData),
      // etc.
    }
    const response = await fetch('/api/person/', requestData)
    return await resp.json()
}
The problem occurs when you try to use the data fetched from the backend and it is using the wrong variable naming style:
// Inside your frontend JavaScript codebase.
const personData = {
    full_name: 'Matt Segal',
    biggest_problem: 'My pants are too red',
}
const person = createPerson(personData).then(console.log)
// {
//   full_name: 'Matt Segal',
//   biggest_problem: 'My pants are too red',
// }
This usage of snake case in JavaScript is a little yucky and it's a quick fix.
The solution: install more JavaScript libraries
Hint: the solution is always to add more dependencies.
To fix this we'll install snakeize and camelize using npm or yarn:
yarn add snakeize camelizeThen you just need to include it in your frontend's API functions:
// Inside your frontend JavaScript codebase.
import camelize from 'camelize'
import snakeize from 'snakeize'

const createPerson = (personData) => {
    requestData = {
      method: 'POST',
      body: JSON.stringify(snakeize(personData)),
      // etc.
    }
    const response = await fetch('/api/person/', requestData)
    const responseData = await resp.json()
    return camelize(responseData)
}
Now we can use
camelCasein the frontend and it will automatically be transformed tosnake_casebefore it gets sent to the backend:// Inside your frontend JavaScript codebase. const personData = { fullName: 'Matt Segal', biggestProblem: 'I ate too much fish', } const person = createPerson(personData).then(console.log) // { // fullName: 'Matt Segal', // biggestProblem: 'I ate too much fish', // }That's it! Hope this helps your eyes a little.
A breakdown of how NGINX is configured with Django
Published: 2020-07-31T12:00:00+10:00
Updated: 2020-07-31T12:00:00+10:00
UTC: 2020-07-31 02:00:00+00:00
URL: https://mattsegal.dev/nginx-django-reverse-proxy-config.htmlYou are trying to deploy your Django web app to the internet. You have never done this before, so you follow a guide like this one. The guide gives you many instructions, which includes installing and configuring an "NGINX reverse proxy". At some point you mutter to yourself: What-the-hell is …Content Preview
You are trying to deploy your Django web app to the internet. You have never done this before, so you follow a guide like this one . The guide gives you many instructions, which includes installing and configuring an "NGINX reverse proxy". At some point you mutter to yourself:
What-the-hell is an NGINX? Eh, whatever, let's keep reading.
You will have to copy-paste some weird gobbledygook into a file, which looks like this:
# NGINX site config file at /etc/nginx/sites-available/myproject
server {
    listen 80;
    server_name foo.com;
    location / {
        proxy_pass http://127.0.0.1:8000;
        proxy_set_header Host $host;
        proxy_set_header X-Forwarded-For $proxy_add_x_forwarded_for;
        proxy_set_header X-Forwarded-Proto $scheme;
        proxy_redirect http://127.0.0.1:8000 http://foo.com;
    }
    location /static/ {
        root /home/myuser/myproject;
    }
}
What is all this stuff? What is it supposed to do?
Most people do their first Django deployment as a learning exercise. You want to understand what you are doing, so that you can fix problems if you get stuck and so you don't need to rely on guides in the future. In this post I'll break down the elements of this NGINX config and how it ties in with Django, so that you can confidently debug, update and extend it in the future.
What is this file supposed to achieve?
This scary-looking config file sets up NGINX so that it acts as the entrypoint to your Django application. Explaining why you might choose to use NGINX is a topic too expansive for this post, so I'm just going to stick to explaining how it works.
NGINX is completely separate program to your Django app. It is running inside its own process, while Django is running inside a WSGI server process, such as Gunicorn. In this post I will sometimes refer to Gunicorn and Django interchangeably.

All HTTP requests that hit your Django app have to go through NGINX first.

NGINX listens for incoming HTTP requests on port 80 and HTTPS requests on port 443. When a new request comes in:
- NGINX looks at the request, checks some rules, and sends it on to your WSGI server, which is usually listening on localhost, port 8000
- Your Django app will process the request and eventually produce a response
- Your WSGI server will send the response back to NGINX; and then
- NGINX will send the response back out to the original requesting client
You can also configure NGINX to serve static files, like images, directly from the filesystem, so that requests for these assets don't need to go through Django

You can adjust the rules in NGINX so that it selectively routes requests to multiple app servers. You could, for example, run a Wordpress site and a Django app from the same server:

Now that you have a general idea of what NGINX is supposed to do, let's go over the config file that makes this happen.
Server block
The top level block in the NGINX config file is the virtual server . The main utility of virtual servers is that they allow you to sort incoming requests based on the port and hostname. Let's start by looking at a basic server block:
server {
    # Listen on port 80 for incoming requests.
    listen 80;
    # Return status code 200 with text "Hello World".
    return 200 'Hello World';
}
Let me show you some example requests. Say we're on the same server as NGINX and we send a GET request using the command line tool
curl.curl localhost # Hello WorldThis
curlcommand sends the following HTTP request to localhost, port 80:GET / HTTP/1.1 Host: localhost User-Agent: curl/7.58.0We will get the following HTTP response back from NGINX, with a 200 OK status code and "Hello World" in the body:
HTTP/1.1 200 OK Content-Type: application/octet-stream Content-Length: 11 Hello WorldWe can also request some random path and we get the same result:
curl localhost/some/path/on/website # Hello WorldWith
curlsending this HTTP request:GET /some/path/on/website HTTP/1.1 Host: localhost User-Agent: curl/7.58.0and we get back the same response as before:
HTTP/1.1 200 OK Content-Type: application/octet-stream Content-Length: 11 Hello WorldSimple so far, but not very interesting, let's start to mix it up with multiple server blocks.
Multiple virtual servers
You can add more than one virtual server in NGINX:
# All requests to foo.com return a 200 OK status code server { listen 80; server_name foo.com; return 200 'Welcome to foo.com!'; } # Any other requests get a 404 Not Found page server { listen 80 default_server; return 404; }NGINX uses the
server_namedirective to check theHostheader of incoming requests and match the request to a virtual server. Your web browser will usually set this header automatically for you. You can set up a particular virtual server to be the default choice (default_server) if no other ones match the incoming request. You can use this feature to host multiple Django apps on a single server. All you need to do is set up your DNS to get multiple domain names to point to a single server, and then add a virtual server for each Django app.Let's test out the config above. If send a request to
localhost, we'll get a 404 status code from the default server:curl localhost # <html> # <head><title>404 Not Found</title></head> # ... # </html>This is the request that gets sent:
GET / HTTP/1.1 Host: localhost User-Agent: curl/7.58.0Our request was matched to the default server because the
Hostheader we sent didn't matchfoo.com. Let's try setting theHostheader tofoo.com:curl localhost --header "Host: foo.com" # Welcome to foo.com!This is the request that gets sent:
GET / HTTP/1.1
Host: foo.com
User-Agent: curl/7.58.0
Now are directed to the
foo.comvirtual server because we sent the correctHostheader in our request. Finally, we can see that setting a randomHostheader sends us to the default server:curl localhost --header "Host: fasfsadfs.com" # <html> # <head><title>404 Not Found</title></head> # ... # </html>There's more that you can do with virtual servers in NGINX, but what we've covered so far should be enough for you to understand their typical usage with Django.
Location blocks
Within a virtual server you can route the request based on the path.
server {
    listen 80;
    # Requests to the root path get a 200 OK response
    location / {
        return 200 'Cool!';
    }
    # Requests to /forbidden get 403 Forbidden response
    location /forbidden {
        return 403;
    }
}
Under this configuration, any requested path that matches
/forbiddenwill return a 403 Forbidden status code, and everything else will return Cool! Let's try it out:curl localhost # Cool! curl localhost/blah/blah/blah # Cool! curl localhost/forbidden # <html> # <head><title>403 Forbidden</title></head> # ... # </html> curl localhost/forbidden/blah/blah/blah # <html> # <head><title>403 Forbidden</title></head> # ... # </html>Now that we've covered
serverandlocationblocks it should be easier to make sense of some of the config that I showed you at the start of this post:server { listen 80; server_name foo.com; location / { # Do something... } location /static/ { # Do something... } }Next we'll dig into the connection between NGINX and our WSGI server.
Reverse proxy location
As mentioned earlier, NGINX acts as a reverse proxy for Django:
This reverse proxy setup is configured within this location block:
location / {
    proxy_pass http://127.0.0.1:8000;
    proxy_set_header Host $host;
    proxy_set_header X-Forwarded-For $proxy_add_x_forwarded_for;
    proxy_set_header X-Forwarded-Proto $scheme;
    proxy_redirect http://127.0.0.1:8000 http://foo.com;
}
In the next few sections I will break down the directives in this block so that you understand what is going on. You might also find the NGINX documentation on reverse proxies helpful for understanding this config.
Proxy pass
The
proxy_passdirective tells NGINX to send all requests for that location to the specified address. For example, if your WSGI server was running on localhost (which has IP 127.0.0.1), port 8000, then you would use this config:server { listen 80; location / { proxy_pass http://127.0.0.1:8000; } }You can also point
proxy_passat a Unix domain socket , with Gunicorn listening on that socket, which is very similar to using localhost except it doesn't use up a port number and it's a bit faster:server { listen 80; location / { proxy_pass http://unix:/home/user/my-socket-file.sock; } }Seems simple enough - you just point NGINX at your WSGI server, so... what was all that other crap? Why do you set
proxy_set_headerandproxy_redirect? That's what we'll discuss next.NGINX is lying to you
As a reverse proxy, NGINX will receive HTTP requests from clients and then send those requests to our Gunicorn WSGI server. The problem is that NGINX hides information from our WSGI server. The HTTP request that Gunicorn receives is not the same as the one that NGINX received from the client.

Let me give you an example, which is illustrated above. You, the client, have an IP of
12.34.56.78and you go tohttps://foo.comin your web browser and try to load the page. The request hits the server on port 443 and is read by NGINX. At this stage, NGINX knows that:
- the protocol is HTTPS
- the client has an IP address of
12.34.56.78- the request is for the host
foo.comNGINX then sends the request onwards to Gunicorn. When Gunicorn receives this request, it thinks:
- the protocol is HTTP, not HTTPS, because the connection between NGINX and Gunicorn is not encrypted
- the client has the IP address
127.0.0.1, because that's the address NGINX is using- the host is
127.0.0.1:8000because NGINX said soSome of this lost information is useful, and we want to force NGINX to send it to our WSGI server. That's what these lines are for:
proxy_set_header Host $host;
proxy_set_header X-Forwarded-For $proxy_add_x_forwarded_for;
proxy_set_header X-Forwarded-Proto $scheme;
Next, I will explain each line in more detail.
Setting the Host header
Django would like to know the value of the
Hostheader so that various bits of the framework, like ALLOWED_HOSTS or HttpRequest.get_host can work. The problem is that NGINX does not pass theHostheader to proxied servers by default.For example, when I'm using
proxy_passlike I did in the previous section, and I send a request with theHostheader to NGINX like this:curl localhost --header "Host: foo.com"Then NGINX receives the HTTP request, which looks like this:
GET / HTTP/1.1
Host: foo.com
User-Agent: curl/7.58.0
and then NGINX sends a HTTP request to your WSGI server, like this:
GET / HTTP/1.0
Host: 127.0.0.1:8000
User-Agent: curl/7.58.0
Notice something? That rat-fuck-excuse-for-a-webserver sent different headers to our WSGI server! I'm sure there is a good reason for this behaviour, but it's not what we want because it breaks some Django functionality. We can fix this by using the
proxy_set_headeras follows:server { listen 80; location / { proxy_pass http://127.0.0.1:8000; # Ensure original Host header is forwarded to our Django app. proxy_set_header Host $host; } }Now NGINX will send the desired headers to Django:
GET / HTTP/1.0
Host: foo.com
User-Agent: curl/7.58.0
Gunicorn will read this
Hostheader and provide it to you in your Django views via therequest.METAobject:# views.py def my_view(request): host = request.META['HTTP_HOST'] print(host) # Eg. "foo.com" return HttpResponse(f"Got host {host}")Setting the X-Forwarded-Whatever headers
The
Hostheader isn't the only useful information that NGINX does not pass to Gunicorn. We would also like the protocol and source IP address of the client request to be passed to our WSGI server. We achieve this with these two lines:proxy_set_header X-Forwarded-For $proxy_add_x_forwarded_for; proxy_set_header X-Forwarded-Proto $scheme;I just want to point out that these header names are completely arbitrary. You can send any header you want with the format
X-Insert-Words-Hereto Gunicorn and it will parse it and send it onwards to Django. For example, you could set the header to beX-Matt-Is-Coolas follows:proxy_set_header X-Matt-Is-Cool 'it is true';Now NGINX will include this header with every request it sends to Gunicorn. When Gunicorn parses the HTTP request it reads any header with the format
X-Insert-Words-Hereinto a Python dictionary, which ends up in theHttpRequestobject that Django passes to your view. So in this case,X-Matt-Is-Coolgets turned into the keyHTTP_X_MATT_IS_COOLin your request object. For example:# views.py def my_view(request): # Prints value of X-Matt-Is-Cool header included by NGINX print(request.META["HTTP_X_MATT_IS_COOL"]) # it is true return HttpResponse("Hello World")This means you can add in whatever custom headers you like to your NGINX config, but for now let's focus on getting the protocol and client IP address to your Django app.
Setting the X-Forwarded-Proto header
Django sometimes needs to know whether the incoming request is secure (HTTPS) or not (HTTP). For example, some features of the SecurityMiddleware class checks for HTTPS. The problem is, of course, that NGINX is always telling Django that the client's request to the sever is not secure, even when it is. This problem always crops up for me when I'm implementing pagination, and the "next" URL has
http://instead ofhttps://like it should.Our fix for this is to put the client request protocol into a header called
X-Forwarded-Proto:proxy_set_header X-Forwarded-Proto $scheme;Then you need to set up the SECURE_PROXY_SSL_HEADER setting to read this header in your
settings.pyfile:SECURE_PROXY_SSL_HEADER = ('HTTP_X_FORWARDED_PROTO', 'https')Now Django can tell the difference between incoming HTTP requests and HTTPS requests.
Setting the X-Forwarded-For header
Now let's talk about determining the client's IP address. As mentioned before, NGINX will always lie to you and say that the client IP address is
127.0.0.1. If you don't care about client IP addresses, then you don't care about this header. You don't need to set it if you don't want to. Knowing the client IP might be useful sometimes. For example, if you want to guess at where they are located, or if you are building one of those What's My IP? websites:

You can set the X-Forwarded-For header to tell Gunicorn the original IP address of the client:
proxy_set_header X-Forwarded-For $proxy_add_x_forwarded_for;As described earlier, the header
X-Forwarded-Forgets turned into the keyHTTP_X_FORWARDED_FORin your request object. For example:# views.py def my_view(request): # Prints client IP address: "12.34.56.78" print(request.META["HTTP_X_FORWARDED_FOR"]) # Prints NGINX IP address: "127.0.0.1", ie. localhost print(request.META["REMOTE_ADDR"]) return HttpResponse("Hello World")Does this seem kind of underwhelming? Maybe a little pointless? As I said before, if you don't care about client IP addresses, then this header isn't for you.
Proxy redirect
Let's cover the final line of the Django reverse proxy config:
proxy_redirect. The NGINX docs for this directive are here .proxy_redirect http://127.0.0.1:8000 http://foo.com;This directive is used when handling redirects that are issued by Django. For example, you might have a webpage that used to live at path
old/page/, but you moved it tonew/page/. You want to send any user that asked forold/page/tonew/page/. To achieve this you could write a Django view like this:# view.py def redirect_view(request): return HttpResponseRedirect("new/page/")When a user asks for
old/page/, this view will send them a HTTP response with a 302 redirect status code:HTTP/1.1 302 Found Location: new/page/Your web browser will follow the
Locationresponse header to the new page. A problem occurs when your Django app includes the WSGI server's address and port in theLocationheader:HTTP/1.1 302 Found Location: http://127.0.0.1:8000/new/page/This is a problem because the client's browser will try to go to that address, and it will fail because the WSGI server is not on the same server as the client.
Here's the thing: I have never actually seen this happen, and I'm having trouble thinking of a common scenario where this would happen. Send me an email if you know where this issue crops up. Anyway, using
proxy_redirecthelps in the hypothetical case where Django does include the WSGI address in a redirect'sLocationheader.The directive rewrites the header using the syntax:
proxy_redirect redirect replacementSo, for example, if there was a redirect response like this:
HTTP/1.1 302 Found Location: http://127.0.0.1:8000/new/page/and you set up your
proxy_redirectlike thisproxy_redirect http://127.0.0.1:8000 https://foo.com/blog/;then the outgoing response would be re-written to this:
HTTP/1.1 302 Found
Location: https://foo.com/blog/new/page/
I guess this directive might be useful in some situations? I'm not really sure.
Static block
Earlier I mentioned that NGINX can serve static files directly from the filesystem.
This is a good idea because NGINX is much more efficient at doing this than your WSGI server will be. It means that your server will be able to respond faster to static file request and handle more traffic. You can use this technique to put all of your Django app's static files into a folder like this:
/home/myuser/myproject
└─ static               Your static files
    ├─ styles.css       CSS file
    ├─ main.js          JavaScript file
    └─ cat.png          A picture of a cat
Then you can set the
/static/location to serve files directly from this folder:location /static/ { root /home/myuser/myproject; }Now a request to
http://localhost/static/cat.pngwill cause NGINX to read from/home/myuser/myproject/static/cat.png, without sending a request to the WSGI server.Next steps
Now you know what every line of your Django app's NGINX config is doing. Hopefully you will be able to use this knowledge to debug issues faster and customise your existing setup. If you have specific questions that weren't covered by this post, I recommend looking at the official NGINX documentation here .
If you liked this post then you might also like reading some other stuff I've written:
- A simple guide to deploying a Django app
- An overview of Django server setups
- How to manage logs with Django, Gunicorn and NGINX
- A mini rant on Django performance: Is Django too slow?
- A little series on Postgres database backups 1 , 2 , 3
If you found some of the stuff about HTTP in this post confusing, I heartily recommend checking out Brian Will's "The Internet" videos to learn more about what HTTP, TCP, and ports are: part 1 , part 2 , part 3 , part 4 .
And, of course, if you want to get updates on any new posts I write, you can subscribe to my blog's mailing list below.
How to manage logs with Django, Gunicorn and NGINX
Published: 2020-07-26T12:00:00+10:00
Updated: 2020-07-26T12:00:00+10:00
UTC: 2020-07-26 02:00:00+00:00
URL: https://mattsegal.dev/django-gunicorn-nginx-logging.htmlSo you want to run a Django app using NGINX and Gunicorn. Did you notice that all three of these tools have logging options? You can configure Django logging, Gunicorn logging, and NGINX logging. You just want to see what's happening in your Django app so that you can fix …Content Preview
So you want to run a Django app using NGINX and Gunicorn. Did you notice that all three of these tools have logging options? You can configure Django logging , Gunicorn logging , and NGINX logging .
You just want to see what's happening in your Django app so that you can fix bugs. How are you supposed to set these logs up? What are they all for? In this post I'll give you a brief overview of your logging options with Django, Gunicorn and NGINX, so that you don't feel so confused and overwhelmed.
I've previously written a short guide on setting up file logging with Django if you just want quick instructions on what to do.
NGINX logging
NGINX allows you to set up two log files , access_log and error_log. I usually configure them like this in my
/etc/nginx/nginx.conffile:access_log /var/log/nginx/access.log; error_log /var/log/nginx/error.log;NGINX access logs
The NGINX access_log is a file which records of all the requests that are coming in to your server via NGINX. It looks like this:
123.45.67.89 - - [26/Jul/2020:04:55:28 +0000] "GET / HTTP/1.1" 200 906 "-" "Mozilla/5.0 ... Chrome/98 Safari/537.4"
123.45.67.89 - - [26/Jul/2020:05:06:29 +0000] "GET / HTTP/1.1" 200 904 "-" "Mozilla/5.0 ... Chrome/98 Safari/537.4"
123.45.67.89 - - [26/Jul/2020:05:10:33 +0000] "GET / HTTP/1.1" 200 904 "-" "Mozilla/5.0 ... Chrome/98 Safari/537.4"
123.45.67.89 - - [26/Jul/2020:05:21:33 +0000] "GET / HTTP/1.1" 200 910 "-" "Mozilla/5.0 ... Chrome/98 Safari/537.4"
123.45.67.89 - - [26/Jul/2020:05:25:37 +0000] "GET / HTTP/1.1" 200 907 "-" "Mozilla/5.0 ... Chrome/98 Safari/537.4"
There's a new line for each request that comes in. Breaking a single like down:
123.45.67.89 - - [26/Jul/2020:04:55:28 +0000] "GET / HTTP/1.1" 200 906 "-" "Mozilla/5.0 ... Chrome/98 Safari/537.4"From this line can see:
- the IP is 123.45.67.89
- the request arrived at 26/Jul/2020:04:55:28 +0000
- the HTTP request method was GET
- the path requested was /
- the version of HTTP used was HTTP/1.1
- the status code returned by the server was "200" (ie. OK )
- the requester's user agent was "Mozilla/5.0 ... Chrome/98 Safari/537.4"
This is very useful information to have when debugging issues in production, and I recommend you enable these access logs in NGINX. You can quickly view these logs using
tail:# View last 5 log lines tail -n 5 /var/log/nginx/access.log # View last 5 log lines and watch for new ones tail -n 5 -f /var/log/nginx/access.logIn addition to legitimate requests to your web application, NGINX will also log all of the spam, crawlers, and hacking attempts that hit your webserver. If you have your server accessible via the internet, then you will get garbage requests like this in your access log:
195.54.160.21 - - [26/Jul/2020:03:58:25 +0000] "POST /vendor/phpunit/phpunit/src/Util/PHP/eval-stdin.php HTTP/1.1" 404 564 "-" "Mozilla/5.0 (Windows NT 10.0; Win64; x64) AppleWebKit/537.36 (KHTML, like Gecko) Chrome/78.0.3904.108 Safari/537.36"I assume this is a bot trying to hack an old version of PHP (which I do not run on this server).
NGINX error logs
NGINX also logs errors to error_log, which can occur when you've messed up your configuration somehow, or if your Gunicorn server is unresponsive. This file is also useful for debugging so I recommend you include it as well in your NGINX config. You get error messages like this:
2020/07/25 08:14:57 [error] 32115#32115: *44242 connect() failed (111: Connection refused) while connecting to upstream, client: 11.22.33.44, server: www.example.com, request: "GET /admin/ HTTP/1.1", upstream: "http://127.0.0.1:8000/admin/", host: "clerk.anikalegal.com", referrer: "https://www.example.com/admin/"Gunicorn logging
Gunicorn has two main logfiles that it writes, the error log and the access log. You can configure the log settings through the command line or a config file . I recommend using the config file because it's easier to read.
Gunicorn access logs
The Gunicorn access log is very similar to the NGINX access log, it records all the requests coming in to the Gunicorn server:
10.255.0.2 - - [26/Jul/2020:05:10:33 +0000] "GET /foo/ HTTP/1.0" 200 1938 "-" "Mozilla/5.0 ... (StatusCake)"
10.255.0.2 - - [26/Jul/2020:05:25:37 +0000] "GET /foo/ HTTP/1.0" 200 1938 "-" "Mozilla/5.0 ... (StatusCake)"
10.255.0.2 - - [26/Jul/2020:05:40:42 +0000] "GET /foo/ HTTP/1.0" 200 1938 "-" "Mozilla/5.0 ... (StatusCake)"
I think you may as well enable this so that you can debug issues where you're not sure if NGINX is sending requests to Gunicorn properly.
Gunicorn error logs
The Gunicorn error log is a little bit more complicated. By default it contains information about what the Gunicorn server is doing, like starting up and shutting down:
[2020-04-06 06:17:23 +0000] [53] [INFO] Starting gunicorn 20.0.4
[2020-04-06 06:17:23 +0000] [53] [INFO] Listening at: http://0.0.0.0:8000 (53)
[2020-04-06 06:17:23 +0000] [53] [INFO] Using worker: sync
[2020-04-06 06:17:23 +0000] [56] [INFO] Booting worker with pid: 56
[2020-04-06 06:17:23 +0000] [58] [INFO] Booting worker with pid: 58
You can change how verbose these messages are using the " loglevel " setting, which can be set to log more info using the "debug" level, or only errors, using the "error" level, etc.
Finally, and importantly there is the " capture_output " logging setting, which is a boolean flag. This setting will take any stdout/stderr, which is to say print statements, log messages, warnings and errors from your Django app, and log then to the Gunicorn error file. I like to keep this setting enabled so that I can catch any random output that is falling through from Django to Gunicorn. Here is an example Gunicorn config file with logging set up:
# gunicorn.conf.py
# Non logging stuff
bind = "0.0.0.0:80"
workers = 3
# Access log - records incoming HTTP requests
accesslog = "/var/log/gunicorn.access.log"
# Error log - records Gunicorn server goings-on
errorlog = "/var/log/gunicorn.error.log"
# Whether to send Django output to the error log
capture_output = True
# How verbose the Gunicorn error logs should be
loglevel = "info"
You can run Gunicorn using config like this as follows:
gunicorn myapp.wsgi:application -c /some/folder/gunicorn.conf.pyDjango logging
Django logging refers to the output of your Django application. The kind of messages you see printed by
runserverin development. Stuff like this:Sending Thing<b5d1854b-7efc-4c67-9e9b-a956c10e5b86]> to Google API Google API called failed: {'error_description': 'You failed hahaha'} Traceback (most recent call last): File "/app/google/api/base.py", line 102, in _handle_json_response resp.raise_for_status() File "/usr/local/lib/python3.6/dist-packages/requests/models.py" raise HTTPError(http_error_msg, response=self) requests.exceptions.HTTPError: 403 Client Error Setting expired tokens to inactive: []I discuss Django logging in more detail in this guide , but I will give you a brief summary here. Django uses the same conventions as Python's standard library logging module, which is kind of a pain to learn, but valuable to know. The Django docs provide a nice overview of logging config here .
I think you have two viable options for your Django logging:
- Set up Django to log everything to stdout/stderr using the
StreamHandlerand capture the output using Gunicorn via the capture_output option, so that your Django logs end up in the Gunicorn error logfile- Set up Django to log to a file using
FileHandlerso you can keep your Django and Gunicorn logs separateI personally prefer option #2, but you whatever makes you happy.
Next steps
I encourage you to set up the logging described in this post, so that you don't waste hours trying to figure out what is causing bugs in production. I also recommend that you configure error alerting with Django, with Sentry being a strong choice.
Finally, if you're having other difficulties getting your Django app onto the internet, then check out my guide on Django deployment
How to make your Django project easy to move and share
Published: 2020-07-24T12:00:00+10:00
Updated: 2020-07-24T12:00:00+10:00
UTC: 2020-07-24 02:00:00+00:00
URL: https://mattsegal.dev/django-portable-setup.htmlYou need your Django project to be portable. It should be quick and easy to start it up on a new laptop. If it isn't portable, then your project is trapped on your machine. If it gets deleted or corrupted, then you've lost all your work! This issue comes up …Content Preview
You need your Django project to be portable. It should be quick and easy to start it up on a new laptop. If it isn't portable, then your project is trapped on your machine. If it gets deleted or corrupted, then you've lost all your work! This issue comes up in quite a few scenarios:
- you want to work on your code on multiple machines, like a laptop and a PC
- you want to get help from other people, and they want to try running your code
- you somehow screwed up your files very badly and you want to start from scratch
In the worst case, moving your Django project from one machine to another is a frustrating and tedious experience that involves dead ends, mystery bugs and cryptic error messages. It's the kind of thing that makes you want to scream at your computer.

In the best case, this process can take minutes. To achieve this best case, there are some steps that you'll need to take to make your development environment reproducable.
If you don't believe that this is achievable, then here's a quick example of me cloning and setting up an example project from scratch in under a minute:
In the rest of this post, I'll describe some practices that will help ensure that anyone with Python installed can quickly start working on your Django app.
Hosting your code
The best way to make your code portable between multiple computers is to put it online in a place that is publicly accessible, like GitHub . For example, this blog is hosted on GitHub so that I can access the latest copy of my writing from both my laptop and PC. Git, the version control tool, is widely used by software developers and allows you to efficently and reliably sync your code between multiple machines.
If you don't know Git and you plan to work with software in any capacity, then I strongly recommend that you start learning how to use it as soon as possible. There are plenty of books , online courses , lectures and more to help you learn. It's a pain in the ass to start with, no doubt about that, but it is definitely worth your time.
Tracking Python dependencies
Your project needs a bunch of 3rd party libraries to run. Obviously Django is required, plus maybe, Django Rest Framework, Boto3... Pillow, perhaps? It's hard to remember all the thing that you've
pip install'd, which is why it's really important to track all the libraries that your app needs, plus the versions, if those are important to you.There is a Python convention of tracking all your libraries in a requirements.txt file. Experienced Python devs immediately know what to do if they see a project with one of these files, so it's good if you stick with this practice. Installing all your requirements is as easy as:
pip install -r requirements.txtYou can also use
pip freezeto get an exact snapshot of your current Python packages and write them to a file:pip freeze > requirements.txtPython's
pippackage manager tries to install all of your dependencies in your global system Python folder by default, which is a really dumb idea, and it can cause issues where multiple Python projects are all installing libraries in the same place. When this happens you can get the wrong version installed, and you can no longer keep track of what dependencies you need to run your code, because they're are muddled together with the ones from all your other projects.The simplest way to fix this issue is to always use
virtualenvto isolate your Python dependencies. You can read a guide on that here . Usingvirtualenv, incidentally, also fixes the problem where you sometimes have to usesudoto pip install things on Linux. There are also other tools like pipenv or poetry that solve this problem as well. Use whatever you want, but it's a good idea to pick something , or you will shed many tears over Python dependency errors in the future.Repeatable setup instructions
Most simple Django projects have the exact same setup sequence. It's almost always roughly this:
# Create and activate virtual environment
virtualenv -p python3 env
. ./env/bin/activate

# Install Python dependencies
pip install -r requirements.txt

# Create SQLite databse, run migrations
cd myapp
./manage.py migrate

# Run Django dev server
./manage.py runserver
But for anything but the simplest projects there's usually a few extra steps that you'll need to get up and running. You need to write this shit down , preferably in your project's README, or you will forget . Even if you remember all these steps, your friends or colleagues will get stuck if they're not available.
You want to document all the instructions that someone needs to do to start running your project, with as much of it being explicit line of shell code as possible. Someone, who already has Python setup, should be able to clone your project onto their laptop with Git, follow your instructions, and then be able to run your Django app. The kind of extra things that you should document are:
- any extra scripts or management commands that the user must run
- any environment variables or files that the user needs to configure
- setup of required data in the Django admin or shell
- installing and running any 3rd party dependencies (eg. Docker, Postgres, Redis)
- building required front end web assets (eg. with Webpack)
- downloading essential data from the internet
Documenting the project setup isn't so important for small and simple projects, but it's also really easy to do (see script above). As your project becomes more complicated, the need to have replicable, explicit setup instructions becomes vital. If you do not maintain these instructions, then it will cost your hours of work when you forget to perform a vital step and your app doesn't work.
I've written before on how to write a nice README , which you might find useful. It's a little over the top for the purposes of just making your project portable and reproducible, but it should give you a general idea of what to cover.
Exclude unnecessary files
Your project should only contain source code, plus the minimum files required to run it. It should not not contain:
- Editor config files (.idea, .vscode)
- Database files (eg. SQLite)
- Random documents (.pdf, .xls)
- Non-essential media files (images, videos, audio)
- Bytecode (eg. *.pyc files)
- Build artifacts (eg. JavaScript and CSS from Webpack)
- Virtual environments (eg env/venv folders)
- JavaScript packages (node_modules)
- Log files (eg. *.log)
Some of these files are just clutter, but the SQLite databases and bytecode are particularly important to exclude.
SQLite files are a binary format, which Git does not store easily. Every change to the database causes Git to store a whole new copy. In addition, there's no way to "merge" databases with Git, meaning the data will get regularly overwritten by multiple users.
Python bytecode files, with the
.pycextension, can cause issues when shared between different machines, and are also just yucky to look at.You can exlude all of the files (and folders) I described above using a
.gitignorefile, in the root of your repository, with contents something like this:# General *.log *.pdf *.png # IDE .idea/ # PyCharm settings .vscode/ # VSCode settings # Python *.pyc env/ venv/ # Databases *.sqlite3 # JavaScript node_modules/ build/ # Webpack build outputIf you've already added these kinds of files to your project's Git history, then you'll need to delete them before ignoring them.
In addition, a common mistake by beginners is to exclude migration files from theit Git history. Django migration files belong in source control, so that you can ensure that everybody is running the same migrations on their data.
Automate common tasks
Although it's not strictly necessary, it's really nice to automate your project setup, so that you can get started by just running a few scripts. You can use bash scripts if you're a Linux or Mac user, PowerShell if you're using Windows, or even custom Django management commands. I also recommend checking out Invoke , which is a nice, cross-platform Python tool for running tasks ( example Invoke script ).
For example, in this demo repo , I added a script which fills the website with test data , which a user can quickly run via a management command:
./manage.py setup_test_dataIn other projects of mine, I also like to include a script that allows me to pull production data into my local database , which is also just one quick copy-paste to run.
./scripts/restore-prod.shNext steps
If you're working on a Django project right now, I recommend that you make sure that it's portable. It doesn't take long to do and you will save yourself hours and hours of this:

If multiple people are working on your Django project and you want to become even more productive as a team, then I also recommend that you begin writing tests and run them automatically with GitHub Actions .
If you've found moving your Django project around to be a frustrating experience, then you've probably also had trouble deploying it to the web as well. If that's the case, you might enjoy my guide on Django deployment , where I show you how to deploy Django to a DigitalOcean virtual machine.
Is Django too slow?
Published: 2020-07-24T12:00:00+10:00
Updated: 2020-07-24T12:00:00+10:00
UTC: 2020-07-24 02:00:00+00:00
URL: https://mattsegal.dev/is-django-too-slow.htmlDoes Django have "bad performance"? The framework is now 15 years old. Is it out of date? Mostly, no. I think that Django's performance is perfectly fine for most use-cases. In this post I'll review different aspects of Django's "performance" as a web framework and discuss how you can decide …Content Preview
Does Django have "bad performance"? The framework is now 15 years old. Is it out of date? Mostly, no. I think that Django's performance is perfectly fine for most use-cases. In this post I'll review different aspects of Django's "performance" as a web framework and discuss how you can decide whether it's a good fit for your web app.
Benchmarks
Let's start by digging into the ad-hoc web app performance benchmarks that you'll see pop up on Medium from time to time. To produce a graph like the one below, the author of this article sets up a server for each of the frameworks tested and sends them a bunch of HTTP requests. The benchmarking tool counts number of requests served per second by each framework.

I think these kind of measurements are irrelevant to practical web development. There are a few factors to consider:
- Is the metric being measured actually of interest? What's a good baseline? Is 100 requests per seconds good, or pathetic? Is 3000 requests/s practically better than 600 requests/s?
- Is the test representative of an actual web app workload? In this case, how often do we just send a static "hello world" JSON to users?
- Are we comparing apples to apples? For example, ExpressJS has 3 layers of relatively simple middleware enabled by default, wheras Django provides a larger stack of middleware features, "out of the box"
- Has each technology been set up correctly? Was Gunicorn, for example, run with an optimal number of workers?
This kind of naive comparsison is a little misleading and it's hard to use it to make practical decisions. So, what kind of performance metrics should you pay attention to when working on your Django app?
What do you mean by "performance"?
When you ask whether a framework or language is "slow", you should also ask "slow at what?" and "why do you care?". Fundamentally I think there are really only two performance goals: a good user experience and low hosting cost. How much money does running this website cost me, and do people enjoy using my website? For user experience I'm going to talk about two factors:
- Response time: how long people need to wait before their requests are fulfilled
- Concurrency: how many people can use your website at the same time
Cost, on the other hand, is typically proportional to compute resources: how many CPU cores and GB of RAM you will need to run your web app.
Response time in Django
Users don't like waiting for their page to load, so the less time they have to wait, the better. There are a few different metrics that you could use to measure page load speed, such as time to first byte or first contentful paint , both of which you can check with PageSpeed Insights . Faster responses don't benefit your user linearly though, not every 5x improvement in response is equally beneficial. A user getting a response in:
- 5s compared to 25s transforms the app from "broken" to "barely useable"
- 1s compared to 5s is a huge improvement
- 200ms instead of 1s is good
- 50ms instead of 200ms is nice, I guess, but many people wouldn't notice
- 10ms instead of 50ms is imperceptible, no one can tell the difference
So if someone says "this framework is 5x faster than that framework blah blah blah" it really doesn't mean anything without more context. The important question is: will your users notice? Will they care?
So, what makes a page load slowly in Django? The most common beginner mistakes are using too many database queries or making slow API calls to external services. I've written previously on how to find and fix slow database queries with Django Debug Toolbar and how to push slow API calls into offline tasks . There are many other ways to make your Django web pages or API endpoints load slowly, but if you avoid these two major pitfalls then you should be able to serve users with a time to first byte (TTFB) of 1000ms or less and provide a reasonable user experience.
When is Django's response time not fast enough?
Django isn't perfect for every use case, and sometimes it can't respond to queries fast enough. There are some aspects of Django that are hard to optimise without giving up much of the convenience that makes the framework attractive in the first place. You will always have to wait for Django when it is:
- running requests through middleware (on the way in and out)
- serializing and deserializing JSON strings
- building HTML strings from templates
- converting database queries into Python objects
- running garbage collection
All this stuff run really fast on modern computers, but it is still overhead. Most humans don't mind waiting roughly a second for their web page to load, but machines can be more impatient. If you are using Django to serve an API, where it is primarily computer programs talking to other computer programs, then it may not be fast enough for very high performance workloads. Some applications where you would consider ditching Django to shave off some latency are:
- a stock trading marketplace
- an global online advertisement serving network
- a low level infrastructure control API
If you find yourself sweating about an extra 100ms here or there, then maybe it's time to look at alternative web frameworks or languages. If the difference between a 600ms and 500ms TTFB doesn't mean much to you, then Django is totally fine.
Concurrency in Django
As we saw in the benchmark above, Django web apps can handle multiple requests at the same time. This is important if your application has multiple users. If too many people try to use your site at the same time, then it will eventually become overwhelmed, and they will be served errors or timeouts. In Australia, our government's household census website was famously overwhelmed when the entire country tried to access an online form in 2016. This effect is often called the " hug of death " and associated with small sites becoming popular on Reddit or Hacker News.
A Django app's WSGI server is the thing that handles multiple concurrent requests. I'm going to use Gunicorn , the WGSI server I know best, as a reference. Gunicorn can provide two kinds of concurrency: multiple child worker processes and multiple green threads per worker. If you don't know what a "process" or a "green thread" is then, whatever, suffice to say that you can set Gunicorn up to handle multiple requests at the same time.
What happens if a new request comes in and all the workers/threads are busy? I'm a little fuzzy on this, but I believe these extra requests get put in a queue, which is managed by Gunicorn. It appears that the default length of this queue is 2048 requests. So if the workers get overwhelmed, then the extra requests get put on the queue so that the workers can (hopefully) process them later. Typically NGINX will timeout any connections that have not received a response in 60s or less, so if a request gets put in the queue and doesn't get responded to in 60s, then the user will get a HTTP 504 "Gateway Timeout" error. If the queue gets full, then Gunicorn will start sending back errors for any overflowing requests.
It's interesting to note the relationship between request throughput and response time. If your WSGI server has 10 workers and each request takes 1000ms to complete, then you can only serve ~10 requests per second. If you optimise your Django code so that each request only takes 100ms to complete, then you can serve ~100 requests per second. Given this relationship, it's sometimes good to improve your app's response time even if users won't notice, because it will also improve the number of requests/second that you can serve.
There are some limitations to adding more Gunicorn workers, of course:
- Each additional worker eats up some RAM (which can be reduced if you use preload )
- Each additional worker/thread will eat some CPU when processing requests
- Each additional worker/thread will eat some extra CPU when listening to new requests, ie. the " thundering herd problem ", which is described in great detail here
So, really, the question of "how much concurrency can Django handle" is actually a question of "how much cloud compute can you afford":
- if you need to handle more requests, add more workers
- if you need more RAM, rent a virtual machine with more RAM
- if you have too many workers one server and are seeing "thundering herd" problems, then scale out your web servers ( more here )
This situation is, admittedly, not ideal, and it would be better if Gunicorn were more resource efficient. To be fair, though, this problem of scaling Django's concurrency doesn't really come up for most developers. If you're working at Instagram or Eventbrite , then sure, this is costing your company some serious money, but most developers don't run apps that operate at a scale where this is an issue.
How do you know if you can support enough concurrency with your current infrastructure? I recommend using Locust to load test your app with dozens, hundreds, or thousands of simultaneous users - whatever you think a realistic "bad case" scenario would look like. Ideally you would do this on a staging server that has a similar architecture and compute resources to your production enviroment. If your server becomes overwhelmed with requests and starts returning errors or timeouts, then you know you have concurrency issues. If all requests are gracefully served, then you're OK!
What if the traffic to your site is very "bursty" though, with large transient peaks, or you're afraid that you'll get the dreaded "hug of death"? In that case I recommend looking into " autoscaling " your servers, based on a metric like CPU usage.
If you're interested, you can read more on Gunicorn worker selection and how to configure Gunicorn to use more workers/threads . There's also this interesting case study on optimising Gunicorn for arxiv-vanity.com .
When is Django's concurrency not enough?
You will have hit the wall when you run out of money, or you can't move your app to a bigger server, or distribute it across more servers. If you've twiddled all the available settings and still can't get your app to handle all the incoming requests without sending back errors or burning through giant piles of cash, then maybe Django isn't the right backend framework for your application.
The other kind of "performance"
There's one more aspect of performance to consider: your performance as a developer. Call it your takt time , if you like metrics. Your ability to quickly and easily fix bugs and ship new features is valuable to both you and your users. Improvements to the speed or throughput of your web app that also makes your code harder to work with may not be worth it. Cost savings on infrastructure might be a waste if the change makes you less productive and costs you your time.
Choosing languages, frameworks and optimisations is an engineering decision, and in all engineering decisions there are competing tradeoffs to be considered, at least at the Pareto frontier .
If raw performance was all we cared about, then we'd just write all our web apps in assembly.

Next steps
If you liked reading about running Django in production, then you might also enjoy another post I wrote, which gives you a tour of some common Django production architectures . If you've written a Django app and you're looking to deploy it to production, then you might enjoy my guide on Django deployment .
There's no one right way to test your code
Published: 2020-07-11T12:00:00+10:00
Updated: 2020-07-11T12:00:00+10:00
UTC: 2020-07-11 02:00:00+00:00
URL: https://mattsegal.dev/alternate-test-styles.htmlToday I read a Reddit thread where a beginner was stumbling over themself, apologizing for writing tests the "wrong way": I'm now writing some unit tests ... I know that the correct way would be to write tests first and then the code, but unfortunately it had to be done this …Content Preview
Today I read a Reddit thread where a beginner was stumbling over themself, apologizing for writing tests the "wrong way":
I'm now writing some unit tests ... I know that the correct way would be to write tests first and then the code, but unfortunately it had to be done this way.
This is depressing... what causes newbies to feel the need to ask for forgiveness when writing tests? You can tell the poster has either previously copped some snark or has seen someone else lectured online for not doing things the "correct way".
I feel that people can be very prescriptive about how you should test your code, which is puzzling to me. There are so many different use-cases for automated tests that there cannot be one right way to do it. When you're reading blogs and forums you get the impression that you must write "unit tests" (the right way!) and that you need to do test driven development , or else you're some kind of idiot slacker.
In this post I am going to focus on the quiet dominance of "unit tests" as the default way to test your code, and suggest some other testing styles that you can use.
You should write "unit tests"
People often say that you should write unit tests for your code. In brief, these tests check that some chunk of code returns a an specific output for a given input. For example:
# The function to be tested
def add(a: int, b: int):
    """Returns a added with b"""
    return a + b


# Some tests for `add`
def test_add__with_positive_numbers():
    assert add(1, 2) == 3


def test_add__with_zero():
    assert add(1, 0) == 1

# etc. etc. etc
This style of testing is great under the right circumstances, but these are not the only kind of test that you can, or should, write. Unfortunately the name "unit test" is used informally to refer to all automated testing of code. This misnomer leads beginners to believe that unit tests are the best, and maybe only, way to test.
Let's start with what unit tests are good for. They favour a "bottom-up" style of coding. They're the most effective when you have a lots of little chunks of code that you want to write, test independently, and then assemble into a bigger program.
This is a perfect fit when you're writing code to deterministically transform data from one form into another, like parts of an ETL pipeline or a compiler. These tests work best when you're writing pure functions , or code with limited side effects .
When unit tests don't make sense
The main problem with unit tests is that you can't always break your code up into pretty little pure functions.
When you start working on an existing legacy codebase there's no guarantee that the code is well-structured enough to allow for unit tests. Most commercial code that you'll encounter is legacy code, and a lot of legacy code is untested. I've encountered a fair few 2000+ line classes where reasoning about the effect of any one function is basically impossible because of all the shared state. You can't test a function if you don't know what it's supposed to do. These codebases cannot be rigourly unit tested straight away and need to be gently massaged into a better shape over time , which is a whole other can of worms.
Another, very common, case where unit tests don't make much sense is when a lot of the heavy lifting is being done by a framework. This happens to me all the time when I'm writing web apps with the Django framework. In Django's REST Framework, we use a "serializer" class to validate Python objects and translate them into a JSON string. For example:
from django.db import models
from rest_framework import serializers
from rest_framework.renderers import JSONRenderer

# Create a data model that represents a person
class Person(models.Model):
    name = models.CharField(max_length=64)
    email = models.EmailField()

# Create a serializer that can map a Person to a JSON string
class PersonSerializer(serializers.ModelSerializer):
    class Meta:
        model = Person
        fields = ["name", "email"]

# Example usage.
p = Person(name="Matt", email="mattdsegal@gmail.com")
ps = PersonSerializer(p)
ps.is_valid() # True
JSONRenderer().render(ps.data)
# '{"name":"Matt","email":"mattdsegal@gmail.com"}'
In this case, there's barely anything for you to actually test. Don't get me wrong, you could write unit tests for this code, but anything you write is just a re-hash of the definitions of the
PersonandPersonSerializer. All the interesting stuff is handled by the framework. Any "unit test" of this code is really just a test of the 3rd party code, which already has heaps of tests . In this case, writing unit tests is just adding extra boilerplate to your codebase, when the whole point of using a framework was to save you time.So if "unit tests" don't always make sense, what else can you do? There are other styles of testing that you can use. I'll highlight my two favourites: smoke tests and integration tests .
Quick 'n dirty smoke tests
Some of the value of an automated test is checking that the code runs at all. A smoke test runs some code and checks that it doesn't crash. Smoke tests are really, really easy to write and maintain and they catch 50% of bugs (made up number). These kinds of tests are great for when:
- your app has many potential code-paths
- you are using interpreted languages like JavaScript or Python which often crash at runtime
- you don't know or can't predict what the output of your code will be
Here's a smoke test for a neural network. All it does is construct the network and feed it some random garbage data, making sure that it doesn't crash and that the outputs are the correct shape:
def test_processes_noise():
    input_shape = (1, 1, 80, 256)
    inputs = get_random_input(input_shape)
    outputs = MyNeuralNet(inputs)
    assert outputs.shape == (1, 1, 80, 256)
This is valuable because runtime errors due to stupid mistakes are very common when building a neural net. A mismatch in array dimensions somewhere in the network is common stumbling block. Typically it might take minutes of runtime before your code crashes due to all the data loading and processing that needs to happen before the broken code is executed. With smoke tests like this, you can check for stupid errors in seconds instead of minutes.
In a more web-development focused example, here's a Django smoke test that loops over a bunch of urls and checks that they all respond to GET requests with happy "200" HTTP status codes, without validating any of the data that is returned:
@pytest.mark.django_db
def test_urls_work(client):
    """Ensure all urls return 200"""
    for url in SMOKE_TEST_URLS:
        response = client.get(url)
        assert response.status_code == 200
Maybe you don't have time to write detailed tests for all your web app's endpoints, but a quick smoke test like this will at least exercise your code and check for stupid errors.
This crude style of testing is both fine and good. Don't let people shame you for writing smoke tests. If you do nothing but write smoke tests for your app, you'll still be getting a sizeable benefit from your test suite.
High level integration tests
To me, integration tests are when you test a whole feature, end-to-end. You are testing a system of components (functions, classes, modules, libraries) and the integrations between them. I think this style of testing can provide more bang-for-buck than a set of unit tests, because the integration tests cover a lot of different components with less code, and they check for behaviours that you actually care about. This is more "top down" approach to testing, compared to the "bottom up" style of unit tests.
Calling back to my earlier Django example, an integration test wouldn't test any independent behaviour of the the
PersonorPersonSerializerclasses. Instead, we would test them by exercising a code path where they are used in combination. For example, we would want to make sure that a GET request asking for a specific Person by their id returns the correct data. Here's the API code to be tested:# Data model class Person(models.Model): name = models.CharField(max_length=64) email = models.EmailField() # Maps data model to JSON string class PersonSerializer(serializers.ModelSerializer): class Meta: model = Person fields = ["name", "email"] # API endpoint for Person class PersonViewSet(viewsets.RetrieveAPIView): serializer_class = PersonSerializer queryset = Person.objects.all() # Attach API endpoint to a URL path router = routers.SimpleRouter() router.register("person", PersonViewSet) urlpatterns = [path("api", include(router.urls))]And here's a short integration test for the code above. It used Django's test client to simulate a HTTP GET request to our view and validate the data that is returned:
@pytest.mark.django_db
def test_person_get(client):
    """Ensure a user can retrieve a person's data by id"""
    p = Person.objects.create(name="Matt", email="mattdsegal@gmail.com")
    url = reverse("person-detail", args=[p.id])
    response = client.get(url)
    assert response.status_code == 200
    assert response.data == {
        "name": "Matt",
        "email": "mattdsegal@gmail.com",
    }
This integration test is exercising the code of the
Persondata model, thePersonSerializerdata mapping and thePersonViewSetAPI endpoint all in one go.A valid criticism of this style of testing is that if the integration test fails, it's not always clear why it failed. This is typically a non-issue, since you can get to the bottom of a failure by reading the error message and spending a few minutes poking the code with a debugger.
Next steps
Testing code is an art that requires you to apply judgement to your specific situation. There's a bunch of styles and methodologies for testing your code and your choice depends on your codebase, your app's risk profile and your time constraints. I think you can cultivate this judgement by trying out different techniques. If you haven't already, try a new style of testing on your codebase and see if you like it.
I've enjoyed poking around the Undertand Legacy Code blog, which suggests quite a few novel testing methods that I've never heard of. I've got my eye on the " approval test " for a codebase I'm currently working on.
If you're interested in reading more about automated testing with Python, then you might enjoy this post I wrote on how to automatically run your tests on every commit with GitHub Actions .
How to find what you want in the Django documentation
Published: 2020-06-26T12:00:00+10:00
Updated: 2020-06-26T12:00:00+10:00
UTC: 2020-06-26 02:00:00+00:00
URL: https://mattsegal.dev/how-to-read-django-docs.htmlMany beginner programmers find the Django documentation overwhelming. Let's say you want to learn how to perform a login for a user. Seems like it would be pretty simple: logins are a core feature of Django. If you google for "django login" or search the docs you see a few …Content Preview
Many beginner programmers find the Django documentation overwhelming.
Let's say you want to learn how to perform a login for a user. Seems like it would be pretty simple: logins are a core feature of Django. If you google for "django login" or search the docs you see a few options, with "Using the Django authentication system" as the most promising result. You click the link, happily anticipating that your login problems will soon be over, and you get smacked in the face with thirty nine full browser pages of text . This is way too much information!
Alternatively, you find your way to the reference page on django.contrib.auth , because that's where all the auth stuff is, right? If you browse this page you will see an endless enumeration of all the different authentication models and fields and functions, but no explanation of how they're supposed to fit together.
At this stage you may want to close your browser tab in despair and reconsider your decision to learn Django. It turns out the info that you wanted was somewhere in that really long page here and here . Why was it so hard to find? Why is this documentation so fragmented?
God forbid that you should complain to anyone about this struggle. Experienced devs will say things like "you are looking in the wrong place" and "you need more experience before you try Django". This response begs the question though: how does anyone know where the "right place" is? The table of contents in the Django documentation is unreadably long . Meanwhile, you read other people raving about how great Django docs are: what are they talking about? You may wonder: am I missing something?
Wouldn't it be great if you could go from having a question to finding the answer in a few minutes or less? A quick Google and a scan, and boom: you know how to solve your Django problem. This is possible. As a professional Django dev I do this daily. I rarely remember how to do anything from heart and I am constantly scanning the docs to figure out how to solve problems, and you can too.
In this post I will outline how to find what you want in the Django documentation, so that you spend less time frustrated and stuck, and more time writing your web app. I also include a list of key references that I find useful.
Experienced devs can be dismissive when you complain about documentation, but they're right about one thing: knowing how to read docs is a really important skill for a programmer, and being good at this will save you lots of time.
Find the right section
Library documentation is almost always written with distinct sections. If you do not understand what these sections are for, then you will be totally lost. If you have time, watch Daniele Procida's excellent talk how documentation should be structured. In the talk he describes four different sections of documentation:
- Tutorials : lessons that show you how to complete a small project ( example )
- How-to guides : guide with steps on how to solve a common problem ( example )
- API References : detailed technical descriptions of all the bits of code ( example )
- Explanations : high level discussion of design decisions ( example )
In addition to these, there's also commonly a Quickstart ( example ), which is the absolute minimum steps you need to to do get started with the library.
The Django Rest Framework docs use a structure similar to this

The ReactJS docs use a structure similar to this

The Django docs use a structure similar to this

Hopefully you see the pattern here: all these docs have been split up into distinct sections. Learn this structure once and you can quickly navigate most documentation. Now that you understand that library documentation is usually structured in a particular way, I will explain how to navigate that structure.
Do the tutorial first
This might seem obvious, but I have to say it. If there is a tutorial in the docs and you are feeling lost, then do the tutorial. It is a place where the authors may have decided to introduce concepts that are key to understanding everything else. If you're feeling like a badass, then don't "do" the tutorial, but at the very least skim read it.
Find an example, guide or overview
Avoid the API reference section, unless you already know exactly what you're looking for. You will recognise that you are in an API reference section because the title will have "reference" in it, and the content will be very detailed with few high-level explanations. For example, django.contrib.auth is a reference section - it is not a good place to learn how "Django login" works.
You need to understand how the bits of code fit together before looking at an API reference. This can be hard since most documentation, even the really good stuff, is incomplete. Still, the best thing to try is to look for overviews and explanations of framework features.
Find and scan the list of how-to guides , to see if they solve your exact problem. This will save you a lot of time if the guide directly solves your problem. Using our login example, there is no "how to log a user in" guide, which is bad luck.
If there is no guide, then quickly scan the topic list and try and find the topic that you need. If you do not already understand the topic well, then read the overview. Google terms that you do not understand , like "authentication" and "authorization" (they're different, specific things). In our login case, " User authentication in Django " is the topic that we want from the list.
Once you think you sort-of understand how everything should fit together, then you can move to the detailed API reference, so that you can ensure that you're using the code correctly.
Find and remember key references
Once you understand what you want to do, you will need to use the API reference pages to figure out exactly what code you should write. It's good to remember key pages that contain the most useful references. Here's my personal favourites that I use all the time:
- Settings reference : A list of all the settings and what they do
- Built-in template tags : All the template tags with examples
- Queryset API reference : All the different tools for using the ORM to access the database
- Model field reference : All the different model fields
- Classy Class Based Views : Detailed descriptions for each of Django's class-based views
I don't have any of these pages bookmarked, I just google for them and then search using
ctrl-fto find what I need in seconds.When using Django REST Framework I often find myself referring to:
- Classy DRF : Like Classy Class Based Views but for DRF
- Serializer reference : To make serializers work
- Serializer field reference : All the different serializer fields
- Nested relationships : How to put serializers inside of other serializers
Search insead of reading
Most documentation is not meant to be read linearly, from start to end, like a novel: most pages are too long to read. Instead, you should strategically search for what you want. Most documentation involves big lists of things, because they're so much stuff that the authors need to explain in a lot of detail. You cannot rely on brute-force reading all the content to find the info you need.
You can use your browser's build in text search feature (
ctrl-f) to quickly find the text that you need. This will save you a lot of scrolling and squinting at your screen. I use this technique all the time when browsing the Django docs. Here's a video of me finding out how to log in with Django usingctrl-f:Here's me struggling to get past the first list by trying to read all the words with my pathetic human eyes. I genuinely did miss the "auth" section several times when trying to read that list manually while writing this post:
Using search is how you navigate the enormous table of contents or the 39 browser pages of authentication overview . You're not supposed to read all that stuff, you're supposed to strategically search it. In our login example, good search terms would be "auth", "login", "log in" and "user".
In addition, most really long pages will have a sidebar summarising all the content. If you're going to read something, read that.

Read the source code
This is kind of the documentation equivalent of "go fuck yourself", but when you need an answer and the documentation doesn't have it, then the code is the authoratative source on how the library works. There are many library details that would be too laborious to document in full, and at some point the expectation is that if you really need to know how something works, then you should try reading the code. The Django source code is pretty well written, and the more time you spend immersed in it, the easier it will be to navigate. This isn't really advice for beginners, but if you're feeling brave, then give it a try.
Summary
The Django docs, in my opionion, really are quite good, but like most code docs, they're hard for beginners to navigate. I hope that these tips will make learning Django a more enjoyable experience for you. To summarise my tips:
- Identify the different sections of the documentation
- Do the tutorial first if you're not feeling confident, or at least skim read it
- Avoid the API reference early on
- Try find a how to guide for your problem
- Try find a topic overview and explanation for your topic
- Remember key references for quick lookup later
- Search the docs, don't read them like a book
- Read the source code if you're desperate
As good as it is, the Django docs do not, and should not, tell you everything there is to know about how to use Django. At some point, you will need to turn to Django community blogs like Simple is Better than Complex , YouTube videos, courses and books. When you need to deploy your Django app, you might enjoy my guide on Django deployment and my overview of Django server setups .
How to pull production data into your local Postgres database
Published: 2020-06-21T12:00:00+10:00
Updated: 2020-06-21T12:00:00+10:00
UTC: 2020-06-21 02:00:00+00:00
URL: https://mattsegal.dev/restore-django-local-database.htmlSometimes you want to write a feature for your Django app that requires a lot of structured data that already exists in production. This happened to me recently: I needed to create a reporting tool for internal business users. The problem was that I didn't have much data in my …Content Preview
Sometimes you want to write a feature for your Django app that requires a lot of structured data that already exists in production. This happened to me recently: I needed to create a reporting tool for internal business users. The problem was that I didn't have much data in my local database. How can I see what my reports will look like if I don't have any data?
It's possible to generate a bunch of fake data using a management command. I've written earlier about how to do this with FactoryBoy . This approach is great for filling web pages with dummy content, but it's tedious to do if your data is highly structured and follows a bunch of implcit rules. In the case of my reporting tool, the data I wanted involved hundreds of form submissions, and each submission has dozens of answers with many different data types. Writing a script to generate data like this would haven take ages! I've also seen situations like this when working with billing systems and online stores with many product categories.
Wouldn't it be nice if we could just get a copy of our production data and use that for local development? You could just pull the latest data from prod and work on your feature with the confidence that you have plenty of data that is structured correctly.
In this post I'll show you a script which you can use to fetch a Postgres database backup from cloud storage and use it to populate your local Postgres database with prod data. This post builds on three previous posts of mine, which you might want to read if you can't follow the scripting in this post:
- How to automatically reset your local Django database
- How to backup and restore a Postgres database
- How to automate your Postgres database backups
I'm going to do all of my scripting in bash, but it's also possible to write similar scripts in PowerShell, with only a few tweaks to the syntax.
Starting script
Let's start with the "database reset" bash script from my previous post . This script resets your local database, runs migrations and creates a local superuser for you to use. We're going to extend this script with an additional step to download and restore from our latest database backup.
#!/bin/bash
# Resets the local Django database, adding an admin login and migrations
set -e
echo -e "\n>>> Resetting the database"
./manage.py reset_db --close-sessions --noinput

# =========================================
# DOWNLOAD AND RESTORE DATABASE BACKUP HERE
# =========================================

echo -e "\n>>> Running migrations"
./manage.py migrate

echo -e "\n>>> Creating new superuser 'admin'"
./manage.py createsuperuser \
   --username admin \
   --email admin@example.com \
   --noinput

echo -e "\n>>> Setting superuser 'admin' password to 12345"
./manage.py shell_plus --quiet-load -c "
u=User.objects.get(username='admin')
u.set_password('12345')
u.save()
"

echo -e "\n>>> Database restore finished."
Fetching the latest database backup
Now that we have a base script to work with, we need to fetch the latest database backup. I'm going to assume that you've followed my guide on automating your Postgres database backups .
Let's say your database is saved in an AWS S3 bucket called
mydatabase-backups, and you've saved your backups with a timestamp in the filename, likepostgres_mydatabase_1592731247.pgdump. Using these two facts we can use a little bit of bash scripting to find the name of the latest backup from our S3 bucket:# Find the latest backup file S3_BUCKET=s3://mydatabase-backups LATEST_FILE=$(aws s3 ls $S3_BUCKET | awk '{print $4}' | sort | tail -n 1) echo -e "\nFound file $LATEST_FILE in bucket $S3_BUCKET"Once you know the name of the latest backup file, you can download it to the current directory with the
awsCLI tool:# Download the latest backup file aws s3 cp ${S3_BUCKET}/${LATEST_FILE} .The
.in this case refers to the current directory.Restoring from the latest backup
Now that you've downloaded the backup file, you can apply it to your local database with
pg_restore. You may need to install a Postgres client on your local machine to get access to this tool. Assuming your local Postgres credentials aren't a secret, you can just hardcode them into the script:pg_restore \ --clean \ --dbname postgres \ --host localhost \ --port 5432 \ --username postgres \ --no-owner \ $LATEST_FILEIn this case we use
--cleanto remove any existing data and we use--no-ownerto ignore any commands that set ownership of objects in the database.Look ma, no files!
You don't have to save your backup file to disk before you use it to restore your local database: you can stream the data directly from
aws s3 cptopg_restoreusing pipes.aws s3 cp ${S3_BUCKET}/${LATEST_FILE} - | \ pg_restore \ --clean \ --dbname postgres \ --host localhost \ --port 5432 \ --username postgres \ --no-ownerThe
-in this case means "stream to stdout", which we use so that we can pipe the data.Final script
Here's the whole thing:
#!/bin/bash
# Resets the local Django database,
# restores from latest prod backup,
# and adds an admin login and migrations
set -e
echo -e "\n>>> Resetting the database"
./manage.py reset_db --close-sessions --noinput

echo -e "\nRestoring database from S3 backups"
S3_BUCKET=s3://mydatabase-backups
LATEST_FILE=$(aws s3 ls $S3_BUCKET | awk '{print $4}' | sort | tail -n 1)
aws s3 cp ${S3_BUCKET}/${LATEST_FILE} - | \
    pg_restore \
        --clean \
        --dbname postgres \
        --host localhost \
        --port 5432 \
        --username postgres \
        --no-owner

echo -e "\n>>> Running migrations"
./manage.py migrate

echo -e "\n>>> Creating new superuser 'admin'"
./manage.py createsuperuser \
   --username admin \
   --email admin@example.com \
   --noinput

echo -e "\n>>> Setting superuser 'admin' password to 12345"
./manage.py shell_plus --quiet-load -c "
u=User.objects.get(username='admin')
u.set_password('12345')
u.save()
"

echo -e "\n>>> Database restore finished."
You should be able to to run this over and over and over to get the latest database backup working on your local machine.
Other considerations
When talking about using production backups locally, there are two points that I think are important.
First, production data can contain sensitive user information including names, addresses, emails and even credit card details. You need to ensure that this data is only be distributed to people who are authorised to access it, or alternatively the backups should be sanitized so the senitive data is overwritten or removed.
Secondly, It's possible to use database backups to debug issues in production. I think it's a great method for squashing hard-to-reproduce bugs, but it shouldn't be your only way to solve production errors. Before you move onto this technique, you should first ensure you have application logging and error monitoring set up for your Django app, so that you don't lean on your backups as a crutch.
Next steps
If you don't already have automated prod backups, I encourage you to set that up if you have any valuable data in your Django app. Once that's done, you'll be able to use this script to pull down prod data into your local dev environment on demand.
How to polish your GitHub projects when you're looking for a job
Published: 2020-06-17T12:00:00+10:00
Updated: 2020-06-17T12:00:00+10:00
UTC: 2020-06-17 02:00:00+00:00
URL: https://mattsegal.dev/github-resume-polish.htmlWhen you're going for your first programming job, you don't have any work experience or references to show that you can write code. You might not even have a relevant degree (I didn't). What you can do is write some code and throw it up on GitHub to demonstrate to …Content Preview
When you're going for your first programming job, you don't have any work experience or references to show that you can write code. You might not even have a relevant degree (I didn't). What you can do is write some code and throw it up on GitHub to demonstrate to employers that you can build a complete app all by yourself.
A lot of junior devs don't know how to show off their projects on GitHub. They spend hours and hours writing code and then forget to do some basic things to make their project seem interesting. In this post I want to share some tips that you can apply in a few hours to make an existing project much more effective at getting you an interview.
Remove all the clutter
Your project should only contain source code, plus the minimum files required to run it. It should not not contain:
- Editor config files (.idea, .vscode)
- Database files (eg. SQLite)
- Random documents (.pdf, .xls)
- Media files (images, videos, audio)
- Build outputs and artifacts (*.dll files, *.exe, etc)
- Bytecode (eg. *.pyc files for Python)
- Log files (eg. *.log)
Having these files in your repo make you look sloppy. Professional developers don't like finding random crap cluttering up their codebase. You can keep these files out of your git repo using a .gitignore file. If you already have these files inside your repo, make sure to delete them. If you're using
bashyou can usefindto delete all files that match a pattern, like Python bytecode files ending in.pyc.find -name *.pyc -deleteYou can achieve a similar result in Windows PowerShell, but it'll be a little more verbose.
Sometimes you do need to keep some media files, documents or even small databases in your source control. This is okay to do as long as it's an essential part of running, testing or documenting the code, as opposed to random clutter that you forgot to remove or gitignore. A good example of non-code files that you should keep in source control is website static files, like favicons and fonts.
Write a README
Your project must have a README file. This is a file in the root of your project's repository called
README.md. It's a text file written in Markdown that gives a quick overview of what your project is and what it does. Not having a README makes your project seem crappy, and many people, including me, may close the browser window without checking any code if there isn't one present.Here's one I prepared earlier , and here's another . They're not perfect, but I hope they give you a general idea of what to do.
One hour of paying attention to your project's README is worth 20 extra hours of coding, when it comes to impressing hiring managers. You know when people mindlessly write that they have "excellent communication skills" on their resume? No one believe that - it's far too easy to just say that. Don't tell them that you have excellent commuication skills, show them when you write an excellent README.
Enough of me waffling about why you should right a README, what do you put in it?
First, you should describe what your project does at a high level: what problem it solves. It is a command line tool that plays music? Is it a website that finds you low prices on Amazon? Is it a Reddit bot that reminds people? A reader should be able to read the first few sentences and decide if it's something they might want to use. You should summarize the main features of your project in this section.
A key point to remember is that the employer or recruiter reading your GitHub is both lazy and time-poor. They might not read past the first few sentences... they might not even read the code! They may well assume that your project works without checking anything. Before you rush to pack your README with features that don't exist, you scallywag, note that they may ask you more about your project in a job interview. So, uh... don't lie about anything.
Beyond a basic overview of your project, it's also good to outline the high-level architecture of your code - how it's structured. For example, in a Django web app, you could explain the different apps that you've implemented and their responsibilities.
If your project is a website, then you can also talk about the production infrastructure that your website runs on. For example:
This website is deployed to a DigitalOcean virtual machine. The Django app runs inside a Gunicorn WSGI app server and depends on a Postgres database. A seperate Celery worker process runs offline tasks. Redis is responsible for both caching and serving as a task broker.
Or for something a little more simple:
This project is a static webpage that is hosted on Netlify
Simply indicating that you know how to deploy your application makes you look good. "Isn't that obvious though?" - you may ask. No, it's not obvious and you need to be explicit.
A little warning on READMEs: they're for other people to read, not you. Do not include personal to-dos or notes to yourself in your README. Put those somewhere else, like Trello or Workflowy.
Add a screenshot
Add a screenshot of your website or tool and embed it in the README, it'll take you 10 minutes and it makes it look way better. Store the screenshot in a "docs" folder and embed it in your README using Markdown. If it's a command line app your can use asciinema to record the tool in action, if your project has a GUI then you can quickly record yourself using the website with Loom . This will make your project seem much more impressive for only a small amount of effort.
Give instructions for other developers
You should include instructions on how other devs can get started using your project. This is important because it demonstrates that you can document project setup instructions, and also because someone may actually try to run your code. These instructions should state what tools are required to run your project. For example:
- You will need Python 3 and pip installed
- You will need yarn and node v11+
- You will need docker and docker-compose
Next your should explain the steps, with explicit command line examples if possible, that are required to get the app built or running. If your project has external libraries that need to be installed, then you should have a file that specifies these dependencies, like a
requirements.txt(Python) orpackage.json(Node) orDockerfile/docker-compose.yaml(Docker).You should also include instructions on how to run your automated tests. You have some tests, right? More on that later.
If you've scripted your project's deployment, you can mention how to do it here, if you like.
Have a nice, readable commit history
If possible, your git commit history should tell a story about what you've been working on. Each commit should represent a distinct unit of work, and the commit message should explain what work was done. For example your commit messages could look like this:
- Added smoke tests for payment API
- Refactored image compression
- Added Windows compatibility
There are differing opions amongst devs on what exactly makes a "good" commit message, but it's very, very clear what bad commit messages look like:
- zzzz
- add code
- more code
- fuck
- remove shitty code
- fuckfuckfuckfuck
- still broken
- fuck Windows
- zzz
- adsafsf
- broken
I for one have written my fair share of "zzz"s. This tip is hard to implement if you've already written all your commits. If you're feeling brave, or if you need to remove a few "fucks", you can re-write your commit history with
git rebase. Be warned though, you can lose your code if you screw this up.Fix your formatting
If I see inconsistent indentation or other poor formatting in someone's code, my opinion of their programming ability drops dramatically. Is this fair? Maybe, maybe not, but that's how it is. Make sure all your code sticks to your language's standard styling conventions. If you don't know what those are, find out, you'll need to learn them eventually. Fixing bad coding style is much easier to do if you use a linter or auto-formatter.
Add linting or formatting
This one is a bonus, but it's reasonably quick to do. Grab your language community's favorite linter and run it over your code. Something like
eslintfor JavaScript orflake8for Python. For those not in the know, a linter is a program that identifies style issues in your code. You run it over your codebase and it yells at you if you do anything wrong. You think your impostor syndrome is bad? Try using a tool that screams at your about all your shitty style choices. These tools are quite common in-industry and using one will help you stand out from other junior devs.Even better than a linter, try using an auto-formatter. I prefer these personally. These tools automatically re-write your code so they conform with a standard style. Examples include gofmt for Go, Black for Python and Prettier for JavaScript. I've written more about getting started with Black here .
Whatever you choose, make sure you document how to run the linter or formatting tool in your README.
Write some tests
Automated code testing is an important part of writing reliable professional-grade software. If you want someone to pay you money to be a professional software developer, then you should demonstrate that you know what a unit test is and how to write one. You don't need to write 100s of tests or get a high test coverage, but write a few at least.
Needless to say, explain how to run your tests in your README.
Add automated tests
If you want to look super fancy then you can run your automated tests in GitHub Actions. This isn't a must-have but it looks nice. It'll take you 30 minutes if you've already written some tests and you can put a cool "tests passing" badge in your README that looks really good. I've written more on how to do this here
Deploy your project
If your project is a website then make sure it's deployed and available online. If you have deployed it, make sure there's a link to the live site in the README. This could be a large undertaking, taking hours or days, especially if you haven't done this before, so I'll leave it to you do decide if it's worthwhile.
If your project is a Django app and you want to get it online, then you might like my guide on simple Django deployments .
Add documentation
This is a high effort endeavour so I don't really recommend it if you're just trying to quickly improve the appeal of your project. That said, building HTML documentation with something like Sphinx and hosting it on GitHub Pages looks pretty pro. This only really makes sense if your app is reasonably complicated and requires documentation.
Next steps
I mention GitHub a lot in this post, but the same tips apply for projects hosted on Bitbucket and GitLab. All these tips also apply to employer-supplied coding tests that are hosted on GitHub, although I'd caution you not to spend too much time jazzing up coding tests: too many beautiful submissions end up in the garbage.
Now you should have a few things you can do to spiff up your projects before you show them to prospective employers. I think it's important to make sure that the code that you've spent hours on isn't overlooked or dismissed because you didn't write a README.
Good luck, and please don't hesitate to mail me money if this post helps you get a job.
How to generate lots of dummy data for your Django app
Published: 2020-06-14T12:00:00+10:00
Updated: 2020-06-14T12:00:00+10:00
UTC: 2020-06-14 02:00:00+00:00
URL: https://mattsegal.dev/django-factoryboy-dummy-data.htmlIt sucks when you're working on a Django app and all your pages are empty. For example, if you're working on a forum webapp, then all your discussion boards will be empty by default: Manually creating enough data for your pages to look realistic is a lot of work. Wouldn't …Content Preview
It sucks when you're working on a Django app and all your pages are empty. For example, if you're working on a forum webapp, then all your discussion boards will be empty by default:

Manually creating enough data for your pages to look realistic is a lot of work. Wouldn't it be nice if there was an automatic way to populate your local database with dummy data that looks real? Eg. your forum app has many threads:

Even better, wouldn't it be cool if there was an easy way to populate each thread with as many comments as you like?
In this post I'll show you how to use Factory Boy and a few other tricks to quickly and repeatably generate an endless amount of dummy data for your Django app. By the end of the post you'll be able to generate all your test data using a management command:
./manage.py setup_test_dataThere is example code for this blog post hosted in this GitHub repo .
Example application
In this post we'll be working with an example app that is an online forum. There are four models that we'll be working with:
# models.py

class User(models.Model):
    """A person who uses the website"""
    name = models.CharField(max_length=128)


class Thread(models.Model):
    """A forum comment thread"""
    title = models.CharField(max_length=128)
    creator = models.ForeignKey(User)


class Comment(models.Model):
    """A comment by a user on a thread"""
    body = models.CharField(max_length=128)
    poster = models.ForeignKey(User)
    thread = models.ForeignKey(Thread)


class Club(models.Model):
    """A group of users interested in the same thing"""
    name = models.CharField(max_length=128)
    member = models.ManyToManyField(User)
Building data with Factory Boy
We'll be using Factory Boy to generate all our dummy data. It's a library that's built for automated testing, but it also works well for this use-case. Factory Boy can easily be configured to generate random but realistic data like names, emails and paragraphs by internally using the Faker library.
When using Factory Boy you create classes called "factories", which each represent a Django model. For example, for a user, you would create a factory class as follows:
# factories.py
import factory
from factory.django import DjangoModelFactory

from .models import User

# Defining a factory
class UserFactory(DjangoModelFactory):
    class Meta:
        model = User

    name = factory.Faker("first_name")

# Using a factory with auto-generated data
u = UserFactory()
u.name # Kimberly
u.id # 51

# You can optionally pass in your own data
u = UserFactory(name="Alice")
u.name # Alice
u.id # 52
You can find the data types that Faker can produce by looking at the " providers " that the library offers. Eg. I found "first_name" by reviewing the options inside the person provider .
Another benefit of Factory boy is that it can be set up to generate related data using SubFactory , saving you a lot of boilerplate and time. For example we can set up the
ThreadFactoryso that it generates aUseras its creator automatically:# factories.py class ThreadFactory(DjangoModelFactory): class Meta: model = Thread creator = factory.SubFactory(UserFactory) title = factory.Faker( "sentence", nb_words=5, variable_nb_words=True ) # Create a new thread t = ThreadFactory() t.title # Room marriage study t.creator # <User: Michelle> t.creator.name # MichelleThe ability to automatically generate related models and fake data makes Factory Boy quite powerful. It's worth taking a quick look at the other suggested patterns if you decide to try it out.
Adding a management command
Once you've defined all the models that you want to generate with Factory Boy, you can write a management command to automatically populate your database. This is a pretty crude script that doesn't take advantage of all of Factory Boy's features, like sub-factories, but I didn't want to spend too much time getting fancy:
# setup_test_data.py
import random

from django.db import transaction
from django.core.management.base import BaseCommand

from forum.models import User, Thread, Club, Comment
from forum.factories import (
    UserFactory,
    ThreadFactory,
    ClubFactory,
    CommentFactory
)

NUM_USERS = 50
NUM_CLUBS = 10
NUM_THREADS = 12
COMMENTS_PER_THREAD = 25
USERS_PER_CLUB = 8

class Command(BaseCommand):
    help = "Generates test data"

    @transaction.atomic
    def handle(self, *args, **kwargs):
        self.stdout.write("Deleting old data...")
        models = [User, Thread, Comment, Club]
        for m in models:
            m.objects.all().delete()

        self.stdout.write("Creating new data...")
        # Create all the users
        people = []
        for _ in range(NUM_USERS):
            person = UserFactory()
            people.append(person)

        # Add some users to clubs
        for _ in range(NUM_CLUBS):
            club = ClubFactory()
            members = random.choices(
                people,
                k=USERS_PER_CLUB
            )
            club.user.add(*members)

        # Create all the threads
        for _ in range(NUM_THREADS):
            creator = random.choice(people)
            thread = ThreadFactory(creator=creator)
            # Create comments for each thread
            for _ in range(COMMENTS_PER_THREAD):
                commentor = random.choice(people)
                CommentFactory(
                    user=commentor,
                    thread=thread
                )
Using the
transaction.atomicdecorator makes a big difference in the runtime of this script, since it bundles up 100s of queries and submits them in one go.Images
If you need dummy images for your website as well then there are a lot of great free tools online to help. I use adorable.io for dummy profile pics and Picsum or Unsplash for larger pictures like this one: https://picsum.photos/700/500 .

Next steps
Hopefully this post helps you spin up a lot of fake data for your Django app very quickly. If you enjoy using Factory Boy to generate your dummy data, then you also might like incorporating it into your unit tests.
How to automatically reset your local Django database
Published: 2020-06-13T12:00:00+10:00
Updated: 2020-06-13T12:00:00+10:00
UTC: 2020-06-13 02:00:00+00:00
URL: https://mattsegal.dev/reset-django-local-database.htmlSometimes when you're working on a Django app you want a fresh start. You want to nuke all of the data in your local database and start again from scratch. Maybe you ran some migrations that you don't want to keep, or perhaps there's some test data that you want …Content Preview
Sometimes when you're working on a Django app you want a fresh start. You want to nuke all of the data in your local database and start again from scratch. Maybe you ran some migrations that you don't want to keep, or perhaps there's some test data that you want to get rid of. This kind of problem doesn't crop up very often, but when it does it's super annoying to do it manually over and over.
In this post I'll show you small script that you can use to reset your local Django database. It completely automates deleting the old data, running migrations and setting up new users. I've written the script in
bashbut most of it will also work inpowershellorcmdwith only minor changes.For those of you who hate reading, the full script is near the bottom.
Resetting the database
We're going to reset our local database with the django-extensions package, which provides a nifty little helper command called
reset_db. This command destroys and recreates your Django app's database../manage.py reset_dbI like to add the
--noinputflag so the script does not ask me for confirmation, and the--close-sessionsflag if I'm using PostgreSQL locally so that the command does not fail if my Django app is connected the database at the same time../manage.py reset_db --noinput --close-sessionsThis is is a good start, but now we have no migrations, users or any other data in our database. We need to add some data back in there before we can start using the app again.
Running migrations
Before you do anything else it's important to run migrations so that all your database tables are set up correctly:
./manage.py migrateCreating an admin user
You want to have a superuser set up so you can log into the Django admin. It's nice when a script guarantees that your superuser always has the same username and password. The first part of creating a superuser is pretty standard:
./manage.py createsuperuser \
   --username admin \
   --email admin@example.com \
   --noinput
Now we want to set the admin user's password to something easy to remember, like "12345". This isn't a security risk because it's just for local development. This step involves a little more scripting trickery. Here we can use
shell_plus, which is an enhanced Django shell provided by django-extensions. Theshell_pluscommand will automatically import all of our models, which means we can write short one liners like this one, which prints the number of Users in the database:./manage.py shell_plus --quiet-load -c "print(User.objects.count())" # 13Using this method we can grab our admin user and set their password:
./manage.py shell_plus --quiet-load -c "
u = User.objects.get(username='admin')
u.set_password('12345')
u.save()
"
Setting up new data
There might be a little bit of data that you want to set up every time you reset your database. For example, in one app I run, I want to ensure that there is always a
SlackMessagemodel that has aSlackChannel. We can set up this data in the same way we set up the admin user's password:./manage.py shell_plus --quiet-load -c " c = SlackChannel.objects.create(name='Test Alerts') SlackMessage.objects.create(channel=c) "If you need to set up a lot of data then there are options like fixtures or tools like Factory Boy (which I heartily recommend). If you only need to do a few lines of scripting to create your data, then you can include them in this script. If your development data setup is very complicated, then I recommend putting all the setup code into a custom management command.
The final script
This is the script that you can use to reset your local Django database:
#!/bin/bash
# Resets the local Django database, adding an admin login and migrations
set -e
echo -e "\n>>> Resetting the database"
./manage.py reset_db --close-sessions --noinput

echo -e "\n>>> Running migrations"
./manage.py migrate

echo -e "\n>>> Creating new superuser 'admin'"
./manage.py createsuperuser \
   --username admin \
   --email admin@example.com \
   --noinput

echo -e "\n>>> Setting superuser 'admin' password to 12345"
./manage.py shell_plus --quiet-load -c "
u=User.objects.get(username='admin')
u.set_password('12345')
u.save()
"

# Any extra data setup goes here.

echo -e "\n>>> Database restore finished."
Other methods
It's good to note that what I'm proposing is the "nuclear option": purge everything and restart from scratch. There are also some more precise methods available for managing your local database:
- If you just want to reverse some particular migrations, then you can use the
migratecommand as documented here .- If you just want to delete all your data and you don't care about re-applying the migrations, then the
flushmanagement command, documented here will take care of that.Docker environments
If you're running your local Django app in a Docker container via
docker-compose, then this process is a little bit more tricky, but it's not too much more complicated. You just need to add two commands to your script.First you want a command to kill all running containers, which I do because I'm superstitious and don't trust that
reset_dbwill actually close all database connections:function stop_docker { echo -e "\nStopping all running Docker containers" # Ensure that no containers automatically restart docker update --restart=no `docker ps -q` # Kill everything docker kill `docker ps -q` }We also want a shorthand way to run commands inside your docker environment. Let's say you are working with a compose file located at
docker/docker-compose.local.ymland your Django app's container is calledweb. Then you can run your commands inside the container as follows:function run_docker { docker-compose -f docker/docker-compose.local.yml run --rm web $@ }Now we can just prefix
run_dockerto all the management commands we run. For example:# Without Docker ./manage.py reset_db --close-sessions --noinput # With Docker run_docker ./manage.py reset_db --close-sessions --noinputI will note that this
run_dockershortcut can act a little weird when you're passing strings toshell_plus. You might need to experiment with different methods of escaping whitespace etc.Conclusion
Hopefully this script will save you some time when you're working on your Django app. If you're interested in more Django-related database stuff then you might enjoy reading about how to back up and restore a Postgres database and then how to fully automate your prod backup process .
How to automate your Postgres database backups
Published: 2020-06-05T12:00:00+10:00
Updated: 2020-06-05T12:00:00+10:00
UTC: 2020-06-05 02:00:00+00:00
URL: https://mattsegal.dev/postgres-backup-automate.htmlIf you've got a web app running in production, then you'll want to take regular database backups, or else you risk losing all your data. Taking these backups manually is fine, but it's easy to forget to do it. It's better to remove the chance of human error and automate …Content Preview
If you've got a web app running in production, then you'll want to take regular database backups , or else you risk losing all your data. Taking these backups manually is fine, but it's easy to forget to do it. It's better to remove the chance of human error and automate …