I saw this dodecahedron with an Islamic-inspired pattern
designed by Taj Ragoo. As soon as I saw it, I knew I had to make one. I
studied the pattern, wrote some Python, and made myself a PDF. I cut it out,
folded it, glued it together, and now I have one of my own:
Content Preview
I love that this elegantly combines two pure geometric forms: the Platonic
dodecahedron (12 uniform pentagons), and an Islamic pattern using five-pointed
stars.
Looking closely, details emerge:
Each face has ten small stars in a ring. I’ve lightened them a bit in the
front face here. At the center of each face is a ten-pointed star (highlighted
in red), made of two overlaid five-pointed stars.
The real genius of the pattern is at the corners. I’ve highlighted one in
blue. It’s a star made of the same parts as the central ten-pointed star, but
there are only nine points. It works because three pentagons lying flat touching
at a point occupy 324 degrees, leaving a 36-degree gap.
When the dodecahedron is folded together, the gap is closed. 36 degrees is
exactly one-tenth of a complete 360-degree circle, so exactly one point of the
ten-pointed star is missing, leaving a perfect nine-pointed star using the same
shapes, spread over the corners of three pentagons. Beautiful!
If this appeals to you,
follow Taj on Instagram
:
he’s got more Platonic/Islamic mashups to enjoy. The paper versions are just
prototypes of the final versions he makes in wood.
Of course, you can
get my PDF
and make one
for yourself:
The
Python code to draw the net
isn’t great: it
has no real parallels to the structure of each face. It’s a lot of math and
line drawing to get things in the right places. My ideal would be to have a
toolset that used a tile-placing abstraction, to be able to do more interesting
designs. Some day.
It was a joy to work on this though. It was a slow process of studying the
original, working out the math, then mulling over coding approaches. The code was developed in small
steps over weeks. Then printing initial versions, marking them up, working out the tab structure.
Some copies were colored to understand how the lines flowed across the whole dodecahedron.
It was good to be working in both the mental and physical worlds:
Perhaps because 64 is a power of two, and a square and a cube, but also for
other reasons, it pops up in lots of places. Here are some of the things I’ve
associated it with over the years:
Content Preview
Perhaps because 64 is a power of two, and a square and a cube, but also for
other reasons, it pops up in lots of places. Here are some of the things I’ve
associated it with over the years:
Crayola
64-crayon box
: as a kid, this box seemed like the ultimate luxury, the
Rolls-Royce of crayons. So many colors, and the box had a built-in sharpener.
Advanced technology!
¶ A chess board has 64 squares, and is used as the setting for the age-old
question about doubling: would you rather have one billion dollars, or a penny
on the first square, then double the number on each next square? It’s an
eye-opening demonstration of exponential growth and how big numbers can get.
Take the chess board: you’ll have 184 million times more money!
¶ I grew up in New York City too late to visit the
1964
World’s Fair
, but its aura hung over the city. I was always fascinated by
it, and still am. It epitomized the early 60’s optimism about the future. This
Love of Theme Parks
video
does a good job capturing the Fair’s original spirit and the current
state of the location, and explains the important part Walt Disney played in the
whole thing.
¶ As a power of 2, it appears in many tech things: Nintendo 64, Commodore 64,
base-64 encoding, 64-bit integers, 64-bit computing in general, and so on and so
on.
¶ The number famously appears in the Beatles’ song
When I’m
Sixty-Four
. A surprising fact about the song is that it’s one of the first
Paul McCartney ever wrote, when he was about 14 years old. It’s an old-fashioned
tune because he wasn’t aware of rock and roll yet, or maybe it hadn’t even
happened yet. It’s thought they put the song on Sgt Pepper because Paul’s
father was turning 64 that year.
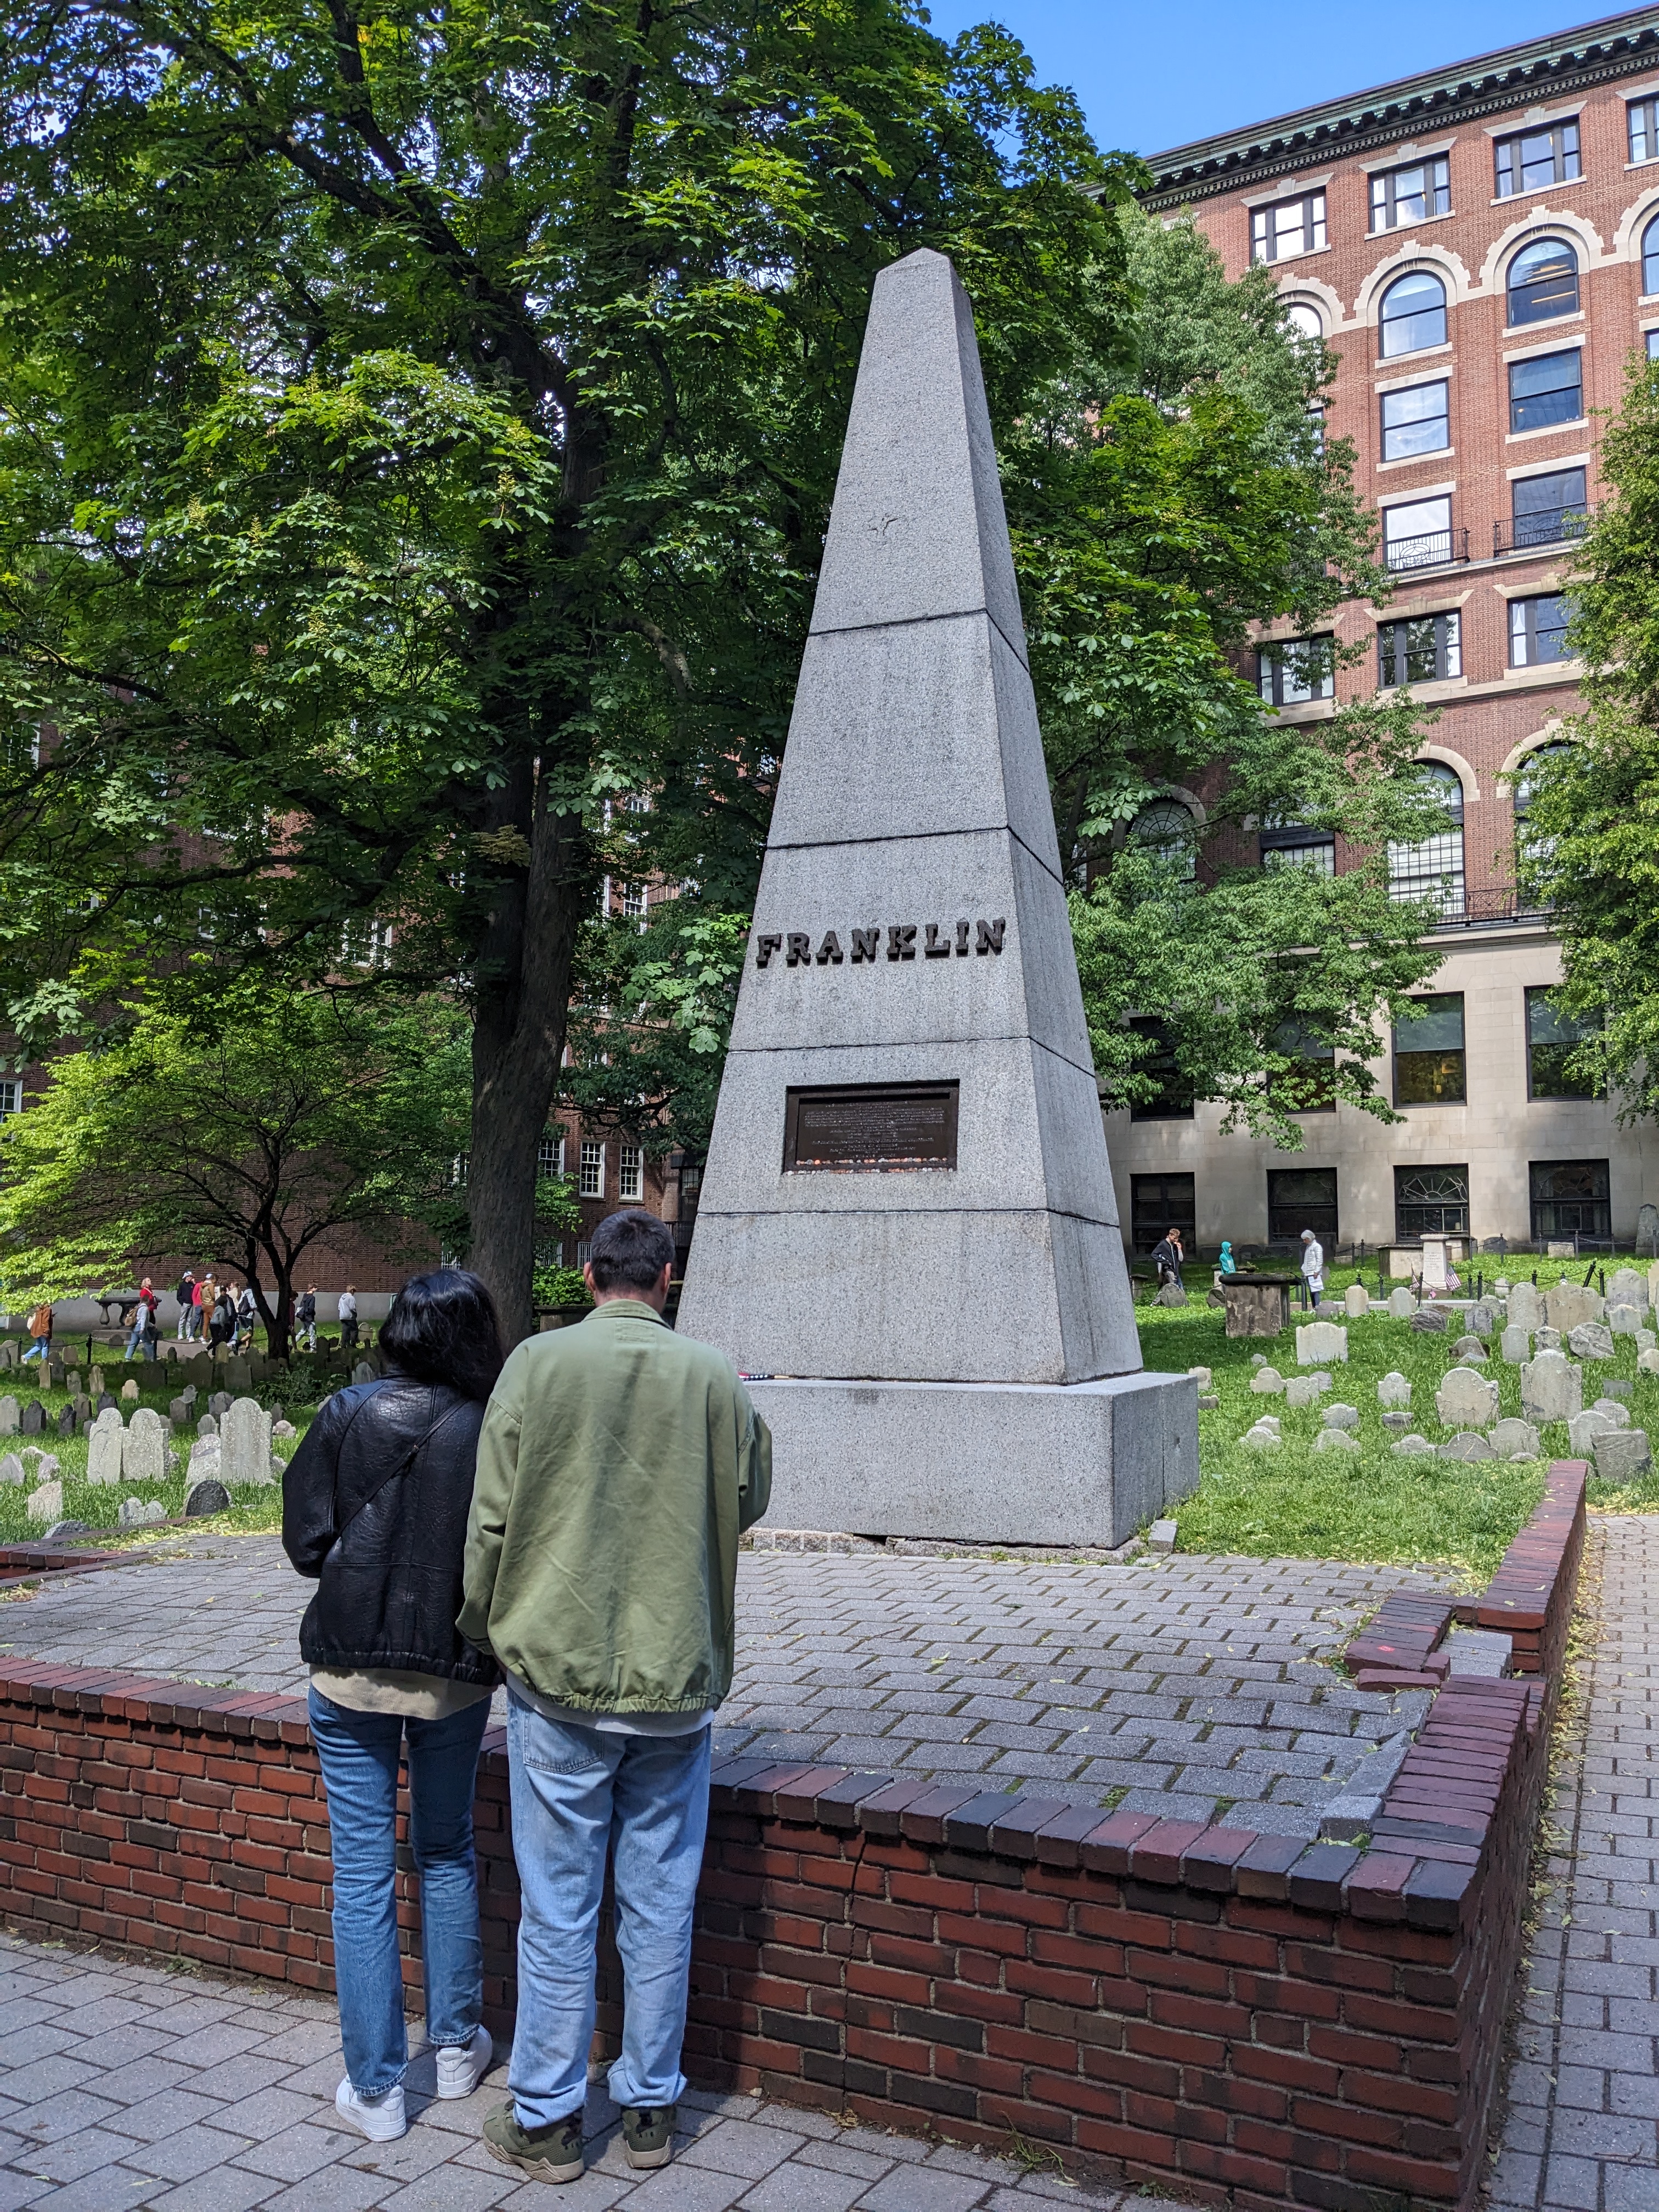
There are many historical artifacts and monuments in Boston. This is one of
my favorites:
Content Preview
There are many historical artifacts and monuments in Boston. This is one of
my favorites:
It’s in the center of the
Granary Burying
Ground
, the third-oldest cemetery in Boston. Casual tourists will assume the
monument marks Ben Franklin’s grave, but they are wrong: it is for his
parents.
Ben Franklin wrote an inscription for his parents’ grave. The marker
deteriorated and in 1827 was replaced with this large obelisk and a new
plaque.
The plaque is far from the walkway and hard to read even up close:
It reads:
JOSIAH FRANKLIN AND ABIAH HIS WIFE
lie here interred.
They lived lovingly together in wedlock fifty five years. And without an estate,
or any gainful employment, by constant labor and honest industry, maintained a large
family comfortably, and brought up thirteen children and seven grandchildren respectably.
From this instance, reader, be encouraged to diligence in thy calling, and distrust
not providence. He was a pious and prudent man; she a discreet and virtuous woman.
THEIR YOUNGEST SON,
in filial regard to their memory places this stone.
J.F. Born 1655 __ Died 1744, Æ. 89.
A.F. ___ 1667 _______ 1752, __ 85.
The original inscription having been nearly obliterated
A number of citizens erected this monument, as a mark of respect for the
ILLUSTRIOUS AUTHOR,
MDCCCXXVII
I love that neither the original inscription nor the re-dedication mentions
Ben Franklin by name. He wanted the focus to be on his parents, and the citizens
of 1827 understood and kept their words in his style. He writes lovingly about
his parents and their lifestyle, and keeps us thinking about them, not him.
I also like the word “reader” in there. Even when writing tombstones, Ben
couldn’t resist his Poor Richard’s Almanac pedagogical style.
A few blocks from the cemetery is a
plaque on Court St
marking the location of James Franklin’s printing shop where Ben was an apprentice:
You can see in the picture there’s a one-block-long narrow dingy alleyway
typical of downtown areas. It’s used for vans and dumpsters. I guess because
it’s the location of the Franklin printing shop, this unremarkable and
depressing passage is named “Franklin Avenue”. I would have expected something
grander based on the name.
This is the mascot for Boston Python.
It’s called Snake Way for Ducklings:
Content Preview
This is the mascot for
Boston Python
.
It’s called Snake Way for Ducklings:
My son Ben drew it, which makes me very happy. He also drew
Sleepy Snake
. Wearing this image on a
shirt
around PyCon, I had
to explain it a number of times. People in Boston understand it almost
immediately, but others need more background.
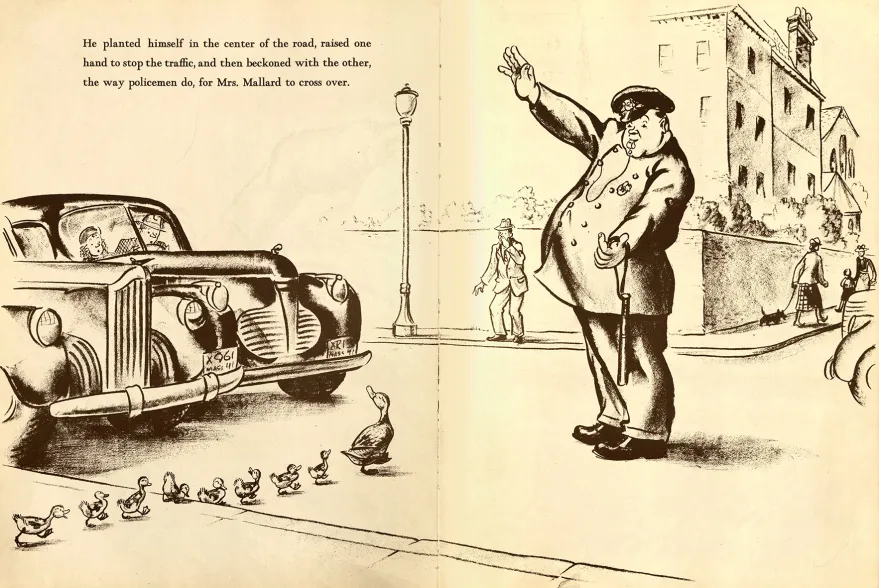
In 1941, Robert McCloskey wrote a children’s book called
Make Way for
Ducklings
. It’s a classic, selling millions of copies and never going out
of print. We read it to our own children growing up many times.
The book is the story of Mrs. Mallard making her way through Boston guiding
her eight ducklings (Jack, Kack, Lack, Mack, Nack, Oack, Pack, and Quack) to a
pond in Boston’s Public Garden. It has charming pencil illustrations:
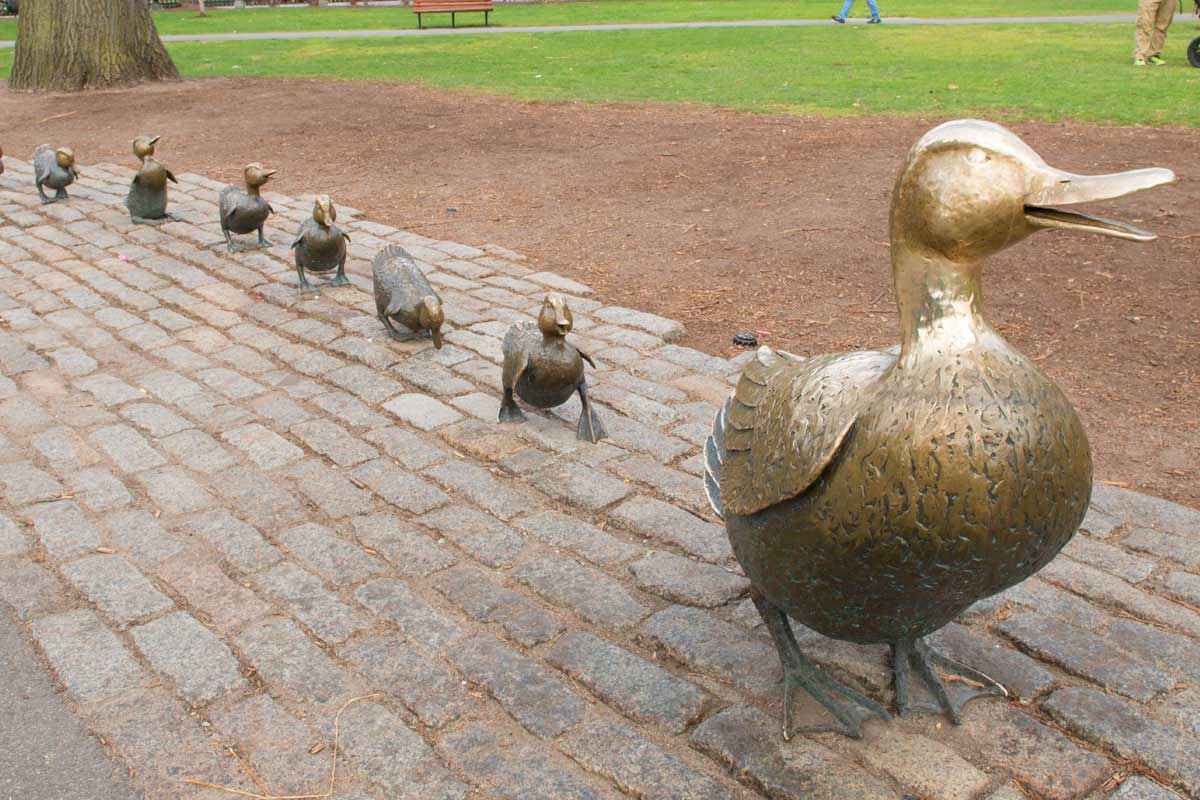
The book led to a
sculpture
in the Public Garden near the actual pond:
The sculpture is sized and placed for kids to play on, and is widely known
and beloved in Boston. The ducks
are
dressed in costumes
for all kinds of occasions: holidays, sports events,
even Star Wars day. On Mother’s Day, there’s a duckling parade: families bring
their children dressed as ducklings. In Boston, the ducklings are a big
deal.
So it seemed natural to Ben to riff on the ducklings for Boston Python. One
observer thought a snake eating the ducklings seemed kind of dark, but you can
see the ducklings are still quacking, so they are fine!
BTW, Boston also has
Duck Boat
tours
, but that’s completely different.
Last week was PyCon US in Long Beach California. As always, it was a
jam-packed intense time. I’ll try to report on my experience. The videos aren’t
uploaded yet, but I’ll link to them later when they are.
Content Preview
Last week was PyCon US in Long Beach California. As always, it was a
jam-packed intense time. I’ll try to report on my experience. The videos aren’t
uploaded yet, but I’ll link to them later when they are.
This recap is longer than I’ve done in the past. I don’t know why, it’s just
how it came out. I want to convey a sense of what I get out of PyCon and what
you can get out of PyCon.
Thursday
Opening reception
I came with five of my colleagues from Netflix. I got to the Thursday night
reception with Anika (first PyCon) and Josey (first PyCon with me). They said,
“we’re going to count how many people Ned says hi to!” They were at 16 after
five minutes and gave up. I don’t blame them. The reception is a very social
time, and I have lots of friends I really enjoy seeing there.
New friends and backpacks
Besides seeing old friends, one of the great things about unstructured time
like the opening reception is meeting new people. Tower Research Capital was
giving away full-size Osprey backpacks at their booth. This was easily the most
appreciated swag at PyCon. At the booth a clump of us were wondering what was
required to get one. While there I met
Maria
,
Camila
, and
Vinícius
. They are from Brazil, and
were very friendly. They will re-appear in this story a few times.
BTW: nothing was required to get a backpack, just ask and you get one.
Everyone was very impressed.
Volunteering
A good PyCon life-hack is to do some volunteer jobs. In particular, being a
session runner is great. Pick a talk you want to go see anyway. Volunteer to be
the session runner. Your duty is to go to the green room 15 minutes before the
talk, meet the speaker, and help them get to the room on time and get set up.
It’s a good way to make a connection with the speaker and help them at a
particularly stressful time. It helps PyCon run smoothly. Also: the green room
has coffee and snacks all day long!
As it happens Vinícius was doing a talk Friday about t-strings I wanted to
see, so I signed up to be his session runner.
Friday
(No) breakfast
Friday morning, I discovered that PyCon was not providing breakfast. This was
unfortunate because conference meals are one of those unstructured times you can
interact with lots of people. My strategy has usually been to look for a table
that has people that don’t seem like me (in whatever ways), and meet people.
Without a provided breakfast, I was instead eating a muffin in the quiet hotel
lobby by myself. I understand why we were on our own for breakfast (conference
food is expensive to provide), but I missed the congregating it encouraged.
Maybe next year there will be a way to get people to gather over breakfast
without paying conference-food prices.
Fireworks disaster
The opening plenary by Deb Nicholson pumped the room up with excitement. But
then came the opening “keynote” by Fireworks CEO Lin Qiao. I use the term
sarcastically because it was not a keynote. It was an undisguised sales pitch
for some kind of AI thing, complete with a QR code for discounts. It was a
tone-deaf disaster of epic proportions. People (including me) walked out in the
middle and were not shy about it.
To make it even worse, Fireworks isn’t a sponsor of the PSF or of PyCon.
Before the keynote, a few sponsors were given a chance to say a word. Anthropic
gave $1.5M and spoke for two minutes about the importance of Python to their
work. Then Fireworks had 45 minutes to sell products without giving anything!?
It was extremely distasteful.
The conference organizers were not at fault. Speaking to them afterwards, it
was clear they were as blindsided as the rest of us. I don’t think anyone blamed
PyCon for it, but it was definitely a missed opportunity. You want an opening
keynote to lift spirits and launch people into the conference. Not a good
start.
Brazilian energy
At Vinícius’ t-strings talk, his
friends were in the
front row
waving Brazilian flags and occasionally blowing an air horn. They
were also audible during large plenaries when Brazil was mentioned. I thought it
was great and would love to hear more groups making noise when their segments or
interests are in focus. It helps to give a sense of the breadth and scope of the
community, and the strong sub-groups you might not have been aware of.
Art open space
Mario Munoz ran an open space all Friday afternoon about Python and Art. I
don’t consider myself an artist, but I’ve enjoyed making math-generated image
projects. I got in touch beforehand to ask if
my
generative art projects
would be on-topic. He said they would, so I dropped
in.
I showed some things I had made like
truchet-tiled
images
or
harmonic pendulums
. The conversation
quickly turned to, “is it art?” and if so, “who is the artist?” I created the
programs, but then either a random number generator or the user clicking
squiggles was making the choices. In the resulting image, who is the artist?
I don’t have an answer, but it was interesting to hear people’s perspectives.
I loved that in the midst of a highly organized conference with lots of
“serious” topics like devops or security or AI, a few of us could sit quietly,
noodle on a guitar and ponder what makes art.
PyCon open spaces allow for all kinds of in-depth discussions and
interactions. This was a perfect example.
Mia’s docs change
At last year’s PyCon, I met Mia, who was very interested to make some
improvements to the Python docs. She landed one change, but then I didn’t hear
from her over the rest of the year. We ran into each other again in the art
open space, and we sat down afterwards to talk some more about contribution.
We settled on a
change to the docs home page
, and she
made that happen. Earlier this year I heard Jack Skinner on a podcast describe
conferences as “co-working spaces with interruptions called talks.” Sitting with
Mia was like a 30-minute sprint to find a change and get started on it enough so
that the rest of the work could happen afterwards.
Lightning talks
Some of my favorite parts of PyCon are the lightning talk sessions. These are
five-minute talks about anything, proposed and selected the day before. Because
they are short, people will talk about all kinds of things. Because they are
not “formal”, the selection process can select for variety rather than
Importance.
I keep coming back to the breadth of how Python is used and what it means to
people. Lightning talks are a concrete way to see that.
This year, some of the talks included:
Adam Silkey’s rousing oration about running for local political office
Choosing the ideal cat emoji
Yapping
Why you should run Python betas
Cumbuca.dev
, promoting diversity in tech in Brazil, run by my new friends Maria and Camila
A PyPI that installs from floppy disks(?)
Of course this is just a small sampling. I encourage you to find the
lightning talks and watch them all.
Lightning talk?
At dinner Friday I mentioned an idea I’d had for a while for a lightning
talk. I’d never given it because I was only excited about it during PyCon, and
didn’t feel like I had the time to do the slides well enough. Stay tuned.
Saturday
Lightning talk!
Saturday morning, I thought more about the lightning talk, and how making the
slides was the blocker. So I tried using Claude to make the slides. I wrote an
outline and tried a bit to get the slides built. When I saw that it seemed
likely to work out, I submitted the talk for consideration. By lunch, I got the
email saying I was on for Saturday night. Fun! I kept tweaking the slides over
the course of the day.
Pablo’s keynote
Pablo Galindo Salgado gave the morning keynote. He spoke in Spanish, with
simultaneous captioning in English. He spoke with heart and passion about the
collective effort to create Python. In particular he lamented the effects of the
AI onslaught on the Python core team and on open source projects in general.
Comparing open source work to building a cathedral, he took a long view on
the skill- and community-building that are natural by-products of open source
work. AI threatens to wash that all away, and maintainers aren’t sure what to do
about it. We want to maintain the interpersonal dynamics that underpin
everything we do, but AI makes it too easy to make all the wrong kinds of
contributions and interactions.
Pablo was emotional, personal, relevant, and inspirational. He connected with
everyone in the room. On Friday I was joking that everyone agreed on two
things: the backpack swag was great, and the Fireworks keynote was awful. Now
everyone agreed on three things, because Pablo’s keynote was a keeper, one for
the ages.
PSF Members lunch
The PSF Members lunch is a place to have a lunch in a smallish room, with
time for questions of the PSF. Two themes emerged from the questions: the first
is that running a conference is very expensive and getting worse. 2027 will be
in Long Beach again, but there’s no location chosen yet for 2028. I got the
sense that the PSF is re-thinking the conference to maybe reshape the costs.
The second theme was about non-US attendance. Many people chose not to travel
to the US because of the current political situation, and I don’t blame them.
When asked why we don’t do the main PyCon outside the US, Deb Nicholson pointed
out that some US people would not be comfortable leaving the US and then
trying to get back in. This is on top of the logistical problems of trying to
run a conference outside your own country.
Juggling
Saturday afternoon, I continued a PyCon tradition: running a juggling open
space. My strategy is to bring a couple dozen beanbags, camp out in a highly
trafficked hallway, and teach anyone who’s interested. This year I had beanbags
shipped to the hotel, and then gave most of those away at the end of the
session. We had a lot of fun, some people learned some basics, and some were
genuinely surprised to be gifted beanbags to take home.
Long walk
It took longer than I thought to wrap up the juggling open space, so I had to
hurry to the big stage for my lightning talk. But for some reason, we weren’t
allowed to walk through the venue as we had that morning. We had to go outside
and around a long block to walk back in a different entrance. That was bad
enough, but I was given the wrong directions, so walked about twice that
distance. I was very stressed and very thirsty, but did manage to get to the
stage in time to get ready.
Silence is Golden
My lightning talk was “Silence is Golden”. It was about leaving quiet time
during discussions so that reluctant speakers can find a place to insert
themselves. What made the talk fun to do was riffing on PyCon’s usual Pac-Man
rule, which says to leave a wedge open when standing in a circle so that new
people can join you. The riff is to make a similar rule for time: if you draw a
clock with a hand sweeping out the time that people are speaking, you can get a
Pac-Man shape, with an open mouth for the time to be quiet so that someone new
can speak.
Making the clock animation was the thing I didn’t know how to do myself but
Claude did for me. That let me focus on how to get the message across and not
get lost in the mechanics of SVG details.
I followed Simon Willison’s extremely energetic, fast-paced, loud lightning
talk summarizing a year of LLM progress in five minutes (pelicans on bicycles),
so it was an interesting contrast.
Afterward people told me they really liked the talk, including Eric Holscher
who had first formulated the Pac-Man rule. Nice. One of the Sunday morning
lightning talks mentioned “Silence is Golden”! That’s one of the great things
about lightning talks: they can be inspired, created, proposed, selected, and
presented all during the weekend.
Sunday
Sunday was low-key for me compared to the first days. Maybe I was really low
on sleep. No, I definitely was. I tend to sleep at most four hours a night at
PyCon.
We had more lightning talks. amanda casari did another good keynote tapping
into concern about AI and how it would affect our work. Rachell Calhoun and Tim
Schilling did a keynote about how they run Djangonauts, an upskilling program
for new contributors. All of the big-audience events helped to reinforce the
overarching themes that bind us together: working with each other, for each
other.
In the final closing session, I was really pleased to see my Boston
co-organizer Fay Shaw be awarded a PyLadies Award! She’s very energetic and
richly deserved it.
Reflections
What I didn’t do
There are always far too many things happening at once to do everything I’d
like. I didn’t attend any of the Security track, the Packaging Summit, the
Maintainers’ Summit, the organizers’ open space, the PyLadies auction, and so on
and so on. I didn’t do anything outside the conference center other than
dinners. Maybe next year I’ll walk over to take a look at the Queen Mary.
People there and people not
I can think of a number of people I didn’t see at PyCon that I expected to.
I know there were many from outside the US who stayed away. I think back to
PyCons of the last decade, and the visible people who seemed central to Python
and PyCon then, but who now no longer are and no longer attend. That’s OK, the
individuals change over time, but the community retains its essential nature.
Some of the visible faces now are actually quite new to PyCon. Someone who
attended for the first time this year might be one of the driving forces next
year.
We live and breathe, we grow and evolve. We remain the same.
One of the hard parts of moving from school to “the real world” is adjusting
to all the ways that school is artificial. It’s different from the real
world.
Content Preview
One of the hard parts of moving from school to “the real world” is adjusting
to all the ways that school is artificial. It’s different from the real
world.
I’ve been thinking about this because of questions I see young learners
commonly asking. Too often the questions are meaningless in the real world, and
even if you could get answers, the answers would use useless.
How long does it take to learn Python?
In school, learning is divided
into discrete labelled chunks. A class called “Beginning Python” might last four
months. Everyone in the class will be taught the same things at the same pace.
The objectives are laid out by the teacher, and at the end you will get a
grade.
Outside of school, learning happens as needed, at your own pace, guided by
your own goals. Only you will know if you have learned enough, deeply enough,
for what you want to do.
An answer will be useless to you anyway: will you feel bad if it’s taking you
longer than them? Maybe they started from a different point than you did.
Maybe they are learning different material, or to a finer degree of detail.
Comparison is the thief of joy: learn what you need, the way you need to.
What does “learn Python” even mean? There’s no end to what might be included
in a broad term like “Python”: there’s the language itself, the standard
library, and the enormous ecosystem of third-party packages. Add to that the
culture and conventions, and maybe even the community. Nobody knows all of it.
It doesn’t stay still, Python keeps changing, growing, and expanding. You have
to decide for yourself what’s important for you to learn. The point isn’t to
finish it. Classes in school can be finished; topics in the real world
cannot.
School gives you neatly labelled units with clear-cut criteria at the end.
The real world doesn’t work that way.
No, but how long did it take you?
It doesn’t matter. Everyone’s
situation is different. In school, your classmates are very similar to you:
you’ve been taking roughly the same classes with the same material all your
life. Outside of school, everyone is much more different. My pace, my learning
style, my needs are all different than yours. Comparing won’t help you
learn.
How will I know when I am not a beginner?
In school, classes have
labels like beginner and advanced, or remedial and gifted. Outside of school,
these labels are meaningless. Knowledge isn’t laid out conveniently in a
straight line. For example: I’ve been using Python for 25 years, and know more
about one particular dark corner of Python
(
sys.settrace
) than almost anyone. At the same time,
I know literally nothing about
tkinter
. Am I an expert
or a beginner?
If someone could tell you whether you were a beginner or not, what would you
do with the answer? In school, it tells you that you are ready to take the next
course. But in the real world, no one needs the answer. What’s important is
whether you understand the next concept, tool, or technique to make progress in
whatever you’re building. Focus on your own goals and path, and keep
moving forward. Labels are fake.
Why do I need to learn topic XYZ?
School curricula don’t always match
what you need to know. Your software engineering course may include theoretical
math that computer scientists want to teach you, but that math may be very hard
to use directly in the real world. Some of those concepts are good to know, some
might be artifacts of mismatched goals.
Schools need to deliver their packaged pathways to many students. You only
need to learn the things you need for your path. You won’t always know ahead of
time what you’ll need. School can be a good way to learn things that many people
like you learn. Once you are on your own, you get to (and have to) choose the
topics yourself.
Is it still worthwhile to learn programming?
Technology is moving very
fast these days, especially because of the rise of AI in programming. Schools
are much slower to adjust. A school’s course now may not match what employers
want to see in four years. At today’s pace of change, it’s impossible to guess
what employers will want to see in four years.
Learn how to learn, and stay flexible. Communication will always be key, so
keep talking to people.
Choose a goal. Move toward it. Do what you need to do.
BTW, I see now that this post is very similar to a post from six years ago:
How long did it take you to learn Python?
I guess people
are still asking, and I feel strongly about it!
I wrote a Sphinx extension to eliminate excessive links:
linklint. It started as a linter to check and modify
.rst files, but it grew into a Sphinx extension that works without changing the
source files.
Content Preview
I wrote a Sphinx extension to eliminate excessive links:
linklint
. It started as a linter to check and modify
.rst files, but it grew into a Sphinx extension that works without changing the
source files.
It all started with a topic in the discussion forums:
Should
not underline links
, which argued that the underlining was distracting from
the text. Of course we did not remove underlines, they are important for
accessibility and for seeing that there are links at all.
But I agreed that there were places in the docs that had too many links. In
particular, there are two kinds of link that are excessive:
Links within a section to the same section. These arise naturally when
describing a function (or class or module). Mentioning the function again in the
description will link to the function. But we’re already reading about the
function. The link is pointless and confusing.
A second (or third, etc) instance of the same link in a single paragraph.
The first mention of a referent should be linked, but subsequent ones don’t need
to be.
Linklint is a Sphinx extension that suppresses these two kinds of links
during the build process. It examines the doctree (the abstract syntax tree of
the documentation) and finds and modifies references matching our criteria for
excessiveness. It’s
running now in the CPython
documentation
, where it suppressed 3612 links. Nice.
I had another idea for a kind of link to suppress: “obvious” references. For
example, I don’t think it’s useful to link every instance of “str” to the
str() constructor
. Is there anyone who needs that link
because they don’t know what “str” means? And if they don’t know, is that the
right place to take them?
There are three problems with that idea: first, not everyone agrees that
“obvious” links should be suppressed at all. Second, even among those who do,
people won’t agree on what is obvious. Sure, int and str. But what about list,
dict, set? Third, there are some places where a link to str() needs to be kept,
like “See str() for details.” Sphinx has a syntax for references to suppress
the link, but there’s no syntax to force a link when linklint wants to suppress
it.
So linklint doesn’t suppress obvious links. Maybe we can do it in the future
once there’s been some more thought about it.
In the meantime, linklint is working to stop many excessive links. It was a
small project that turned out much better than I expected when I started on it.
A Sphinx extension is a really powerful way to adjust or enhance documentation
without causing churn in the .rst source files. Sphinx itself can be complex and
mysterious, but with a skilled code reading assistant, I was able to build this
utility and improve the documentation.
Human.json is a new
idea for asserting that a site is authored by a person, and for vouching for
other sites’ authorship. I’ve added one to this site.
Content Preview
Human.json
is a new
idea for asserting that a site is authored by a person, and for vouching for
other sites’ authorship. I’ve added one to this site.
It’s a fun idea, and I’ve joined in, but to be honest, I have some concerns.
When I made my human.json file, I looked through my browser history, and saw a
number of sites that were clearly personal sites that I liked. But if I list
one, am I claiming to know that there is no AI content on that site? I can’t
know that for sure.
I haven’t let this stop me from adding my own
/human.json
, and I’ll be interested to see what
comes of it.
Human.json isn’t a new idea. There have been a number of attempts to add
structured data to web pages:
<meta name="author">
tags
are a simple
way to claim authorship. I was surprised to see that this site didn’t have it,
so I added it.
JSON-LD
is a way to embed structured
metadata into a page.
FOAF
(Friend of a Friend)
was an earlier attempt to model interpersonal relationships with structured
data, as was
XFN
.
humans.txt
is not structured, it’s a
.txt file. This makes it all the stranger: if it’s free-form text to be read by
people, why not an HTML page?
These ideas are all appealing in their ways, but I don’t think the messy
complicated real world will yield to our desire for structure and
categories.
To get a sense of the current state, I wrote a
simple web
crawler
to explore human.json, meta tags, and JSON-LD. Currently it finds
214 vouched sites and 60 people’s names across 40 human.json files. This is a
very small number, but the proposal is only two weeks old.
Like any hand-edited files, human.json files are strict: four of the
human.json files I found had errors. But beyond simple editing mistakes, people
use structured data incorrectly. As an example,
Flickr
embeds JSON-LD that claims there’s a person named “Flickr”, right next to where
it says there’s a website named Flickr and an organization named Flickr.
Flickr’s goof about being a person isn’t such a big deal. But the goal of
human.json is to indicate human authorship. If I were using AI to generate web
content (ugh, “content”), I’d do whatever I could to mark it as human. The
vouching is meant to build a web of trust, but it will be easy for the network
to spring a leak and grant trust to sites that don’t deserve it.
Human.json wants to declare a binary categorization: your content is
AI-generated or it isn’t. What about a site with 100% human-written text and
also AI artwork? Should it be vouched for? The world doesn’t often provide us
with tidy yes/no distinctions.
There is already
discussion
about
how to address some of these issues, but I think at heart structured data like
this is trying to sweep back the sea of complex human reality.
I don’t mean to be overly negative. I love these “small web” touches. I like
anything that gets people talking to each other. When I found errors in
human.json files, I sent emails to the authors, and got nice emails in return.
Connection!
I like that human.json is simple; I don’t like that it is simplistic. But we
can’t blame human.json for that, it’s a common pitfall in
all attempts to organize the messy world
.
Pytest’s parametrize is a great feature for writing tests without repeating
yourself needlessly. (If you haven’t seen it before, read
Starting with pytest’s parametrize first).
When the data gets complex, it can help to use functions to build the
data parameters.
Content Preview
Pytest’s parametrize is a great feature for writing tests without repeating
yourself needlessly. (If you haven’t seen it before, read
Starting with pytest’s parametrize
first).
When the data gets complex, it can help to use functions to build the
data parameters.
I’ve been working on
a project
involving multi-line data
, and the parameterized test data was getting
awkward to create and maintain. I created helper functions to make it nicer.
The actual project is a bit gnarly, so I’ll use a simpler example to
demonstrate.
Here’s a function that takes a multi-line string and returns two numbers,
the lengths of the shortest and longest non-blank lines:
defnon_blanks(text:str)->tuple[int,int]: """Stats of non-blank lines: shortest and longest lengths.""" lengths=[len(ln)forlnintext.splitlines()ifln] returnmin(lengths),max(lengths)
We can test it with a simple parameterized test with two test cases:
importpytest fromnon_blanksimportnon_blanks
@pytest.mark.parametrize( "text, short, long", [ ("abcde\na\nabc\n",1,5), ("""\ A long line The next line is blank:
Short. Much much longer line, more than anyone thought. """,6,48), ] ) deftest_non_blanks(text,short,long): assertnon_blanks(text)==(short,long)
I really dislike how the multi-line string breaks the indentation flow, so I
wrap strings like that in
textwrap.dedent
:
@pytest.mark.parametrize( "text, short, long", [ ("abcde\na\nabc\n",1,5), (textwrap.dedent("""\ A long line The next line is blank:
Short. Much much longer line, more than anyone thought. """), 6,48), ] )
(For brevity, this and following examples only show the parametrize
decorator, the test function itself stays the same.)
This looks nicer, but I have to remember to use dedent, which adds a little
bit of visual clutter. I also need to remember that first backslash so that the
string won’t start with a newline.
As the test data gets more elaborate, I might not want to have it all inline
in the decorator. I’d like to have some of the large data in its own file:
@pytest.mark.parametrize( "text, short, long", [ ("abcde\na\nabc\n",1,5), (textwrap.dedent("""\ A long line The next line is blank:
Short. Much much longer line, more than anyone thought. """), 6,48), (Path("gettysburg.txt").read_text(),18,80), ] )
Now things are getting complicated. Here’s where a function can help us.
Each test case needs a string and three numbers. The string is sometimes
provided explicitly, sometimes read from a file.
We can use a function to create the correct data for each case from its
most convenient form. We’ll take a string and use it as either a file name or
literal data. We’ll deal with the initial newline, and dedent the multi-line
strings:
defnb_case(text,short,long): """Create data for test_non_blanks.""" if"\n"intext: # Multi-line string: it's actual data. iftext[0]=="\n":# Remove a first newline text=text[1:] text=textwrap.dedent(text) else: # One-line string: it's a file name. text=Path(text).read_text() return(text,short,long)
Now the test data is more direct:
@pytest.mark.parametrize( "text, short, long", [ nb_case("abcde\na\nabc\n",1,5), nb_case(""" A long line The next line is blank:
Short. Much much longer line, more than anyone thought. """, 6,48), nb_case("gettysburg.txt",18,80), ] )
One nice thing about parameterized tests is that pytest creates a distinct ID
for each one. The helps with reporting failures and with selecting tests to run.
But the ID is made from the test data. Here, our last test case has an ID using
the entire Gettysburg Address, over 1500 characters. It was
very short for a speech
, but it’s very long for an ID!
This is what the pytest output looks like with our current IDs:
test_non_blank.py::test_non_blanks[abcde\na\nabc\n-1-5] PASSED

test_non_blank.py::test_non_blanks[A long line\nThe next line is blank:\n\nShort.\nMuch much longer line, more than anyone thought.\n-6-48] PASSED

test_non_blank.py::test_non_blanks[Four score and seven years ago our fathers brought forth on this continent, a\nnew nation, conceived in Liberty, and dedicated to the proposition that all men\nare created equal.\n\nNow we are engaged in a great civil war, testing whether that nation, or any\nnation so conceived and so dedicated, can long endure. We are met on a great\nbattle-field of that war. We have come to dedicate a portion of that field, as a\nfinal resting place for those who here gave their lives that that nation might\nlive. It is altogether fitting and proper that we should do this.\n\nBut, in a larger sense, we can not dedicate \u2013 we can not consecrate we can not\nhallow \u2013 this ground. The brave men, living and dead, who struggled here, have\nconsecrated it far above our poor power to add or detract. The world will little\nnote, nor long remember what we say here, but it can never forget what they did\nhere. It is for us the living, rather, to be dedicated here to the unfinished\nwork which they who fought here have thus far so nobly advanced. It is rather\nfor us to be here dedicated to the great task remaining before us that from\nthese honored dead we take increased devotion to that cause for which they gave\nthe last full measure of devotion \u2013 that we here highly resolve that these dead\nshall not have died in vain that this nation, under God, shall have a new birth\nof freedom \u2013 and that government of the people, by the people, for the people,\nshall not perish from the earth.\n-18-80] PASSED
Even that first shortest test has an awkward and hard to use test name.
For more control over the test data, instead of creating tuples to use as
test cases, you can use
pytest.param
to create the
internal parameters object that pytest needs. Each of these can have an explicit
ID assigned. Pytest will still assign an ID if you don’t provide one.
Here’s an updated
nb_case()
function using pytest.param:
defnb_case(text,short,long,id=None): if"\n"intext: # Multi-line string: it's actual data. iftext[0]=="\n":# Remove a first newline text=text[1:] text=textwrap.dedent(text) else: # One-line string: it's a file name. id=idortext text=Path(text).read_text() returnpytest.param(text,short,long,id=id)
Now we can provide IDs for test cases. The ones reading from a file will use
the file name as the ID:
@pytest.mark.parametrize( "text, short, long", [ nb_case("abcde\na\nabc\n",1,5,id="little"), nb_case(""" A long line The next line is blank:
Short. Much much longer line, more than anyone thought. """, 6,48,id="four"), nb_case("gettysburg.txt",18,80), ] )
The exact details of my
case()
function aren’t important here. Your
tests will need different helpers, and you might make different decisions about
what to do for these tests. But a function like this lets you write your complex
test cases in the way you like best to make your tests as concise, expressive
and readable as you want.
I’ve long used
cog
to build documentation and HTML
presentations. Cog interpolates text from elsewhere, like source code or
execution output. Often I don’t want the full source file or all of the lines of
output. I want to be able to choose the lines, and sometimes I need to tweak the
lines with a regex to get the results I want.
Long ago I wrote my own
ad-hoc function
to include a
file and over the years it had grown “organically”, to use a positive word. It
had become baroque and confusing. Worse, it still didn’t do all the things I
needed.
The old function has 16 arguments (!), nine of which are for selecting the
lines of text:
Recently I started a new presentation, and when I couldn’t express what I
needed with these nine arguments, I thought of a better way: the
ed text editor
has concise mechanisms for addressing lines
of text. Ed addressing evolved into vim and sed, and probably other things too,
so it might already be familiar to you.
I wrote
edtext
to replace my ad-hoc function that I
was copying from project to project. Edtext lets me select subsets of lines
using ed/sed/vim address ranges. Now if I have a source file like this with
section-marking comments:
importpytest
# section1 defsix_divided(x): return6/x
# Check the happy paths
@pytest.mark.parametrize( "x, expected", [(4,1.5),(3,2.0),(2,3.0),] ) deftest_six_divided(x,expected): assertsix_divided(x)==expected # end
# section2 # etc....
then with an
include_file
helper that reads the file and gives me an
EdText
object, I can select just section1 with:
EdText allows slicing with a string containing an ed address range. Ed
addresses often (but don’t always) use regexes, and they have a similar powerful
compact feeling. “/# section1/” finds the next line containing that string, and
the “+” suffix adds one, so our range starts with the line after the section1
comment. The semicolon means to look for the end line starting from the start
line, then we find “# end”, and the “-” suffix means subtract one. So our range
ends with the line before the “# end” comment, giving us:
Most of ed addressing is implemented, and there’s a
sub()
method to
make regex replacements on selected lines. I can run pytest, put the output into
an EdText object, then use:
This slice uses two address ranges. The first selects just the first line,
the pytest command itself. The second range gets the lines from “collected” to
the second-to-last line. Slicing gives me a new EdText object, then I use
.sub()
to tweak the output: on any line containing “====”, change the
total time to “0.01s” so that slight variations in the duration of the test run
doesn’t cause needless changes in the output.
It was very satisfying to write
edtext
: it’s small in
scope, but useful. It has a full test suite. It might even be done!