The Tetris effect is one of psychology’s most easy to reproduce experiments.
Simply spend a bit of time playing the eponymous game every day for a few weeks.
After a little while, you’ll start recognizing familiar Tetromino shapes in clouds, buildings, and everyday objects.
You might even see them appear before your eyes when you start falling asleep.
Content Preview
The Tetris effect is one of psychology’s most easy to reproduce experiments.
Simply spend a bit of time playing the eponymous game every day for a few weeks.
After a little while, you’ll start recognizing familiar Tetromino shapes in clouds, buildings, and everyday objects.
You might even see them appear before your eyes when you start falling asleep.
There’s one lesson the Tetris effect teaches us: whatever you focus on long enough will end up shaping your thoughts.
This can be a good thing since it’s how we learn new skills and discover new ideas.
Sadly, less and less of our attention is focused intentionally.
Instead of picking what we want to see we let other people decide what is supposed to be good for us.
Do you want to watch a video?
YouTube knows you like cooking and art streams.
But why not also recommend a few clips about the stock market bubble, global warming, and the war in Iran.
Doomscrolling will make you stay longer and click on a few more ads.
Do you want to listen to music?
Just open a Spotify playlist and let the algorithm figure out what you like.
Please ignore the AI slop they will insert in between real songs to avoid paying royalties to real artists.
Do you want to know how your colleagues are doing?
Too bad, LinkedIn will bury any relevant career news between the opinion of complete strangers.
It is surely just a coincidence that those strangers happen to be shilling whatever Microsoft is invested in at the moment.
Do you want the opinion of strangers on a product?
Well those Redditors you wanted to ask are probably just a bunch of LLMs talking to a bunch of Russian trolls now.
I hope you didn’t value their opinion too much.
If, like me and most people, you spend the major part of your day focused on your device, there’s no doubt it’s affecting you.
And when you let someone else dictate what appears on your screen, it’s the same as giving them the key to your brain.
The internet wasn’t always like that.
Before recommendation algorithms were a thing, you had to decide what you would be doing on the computer.
You didn’t really have one big app that you could open and order it to entertain you.
Instead, you had a few dozen of bookmarks to websites, each with a specific idea in mind.
A site for video game news, that one website with lots of tutorials, a blog about anime that didn’t update often enough, a wiki about a TV show from the 90s…
Of course awful things existed on the web.
We had Encyclopedia Dramatica and Rotten.com, but you actually had to put the effort to go there if you wanted.
Nobody was going to put pictures of dead kids and far-right propaganda as a suggestion after a pancake recipe or a cat video.
The good thing is that this intentional internet is still around.
It has just been a bit buried below the corporate web, but it’s not very hard to find.
After all you’re on this blog, so you probably already have a good idea about it.
The main difference between this time and now is you.
When you want to get back to reading blogs, RSS feeds, and finish that tutorial instead of doomscrolling shorts, you have to get used to a slower internet.
One where content is not infinite and doesn’t get updated every click.
But like every habit, the only thing you have to do is to keep at it.
And if you pay enough attention to it, something will click in your brain.
In April, the Godot foundation organized a conference close to their home base: GodotCon Amsterdam.
It was a good occasion for us to showcase Paradox Tower and get some beta feedback from other developers.
Content Preview
In April, the Godot foundation organized a conference close to their home base: GodotCon Amsterdam.
It was a good occasion for us to showcase
Paradox Tower
and get some beta feedback from other developers.
Amsterdam North, under the sun
Most importantly it was two entire days of talks about game development in Godot.
Here are some of the ones I recommend checking out if you are into it.
1000 rigged AnimationPlayers in 3D, impossible?
Having a lot of animated 3D objects in Godot can seriously damage performance.
This is something to look for if you’re developing for systems with limited resources, which may rely on the Compatibility renderer (like Android or Switch).
Bertrand Bordage explains how to get around this limitation using Vertex Animation Textures.
It basically consists of baking an animation into a shader.
I had previously never heard of it and this talk really seems like a doable solution for Switch ports of 3D games.
The Clone Wars: Defending Godot Games From Reupload Scams
Godot games are very easy to reverse engineer.
Many developers assume this is not an issue and will only be used by modders and curious players.
Sadly, there’s a cottage industry of shady publishers who will take advantage of this to copy your game.
I’ve previously talked a bit about
technical countermeasures
you can use to make this process harder.
In this talk, Yasen Dinkov also explores the legal and marketing aspects of the problem.
He provides ideas that can make taking down illegal store pages much easier.
From model to gameplay in seconds: setting up your Blender Godot pipeline
Doing a lot of manual steps can kill your productivity.
A big source of this is manually importing 3D assets and setting them up as Godot scenes.
Godot comes with a set of tools to speed that up: post-import scripts.
Here, Marion Allard explains how to make the best use of it, with step-by-step examples using Blender objects:
Make your own fractal!
A more relaxed talk to finish, with a short and fun introduction to fractals by Marta Imke.
It explores visual math and the different ways you can build fractal images out of simple functions.
This is definitely something that can be useful if you want to create some
trippy visual effects
.
In the latest Steam client update, Valve unveiled major changes to its store’s home page.
One of the main difference is that the “Popular Upcoming” section, which shows upcoming games now shows a lot fewer titles.
This seems to worry indie developers who relied on this section as a major driver of visibility before launch.
I personally think this is will not change much to how indie games are marketed and might even be a positive for many niche developers.
Content Preview
In the latest Steam client update, Valve unveiled major changes to its store’s home page.
One of the main difference is that the “Popular Upcoming” section, which shows upcoming games now shows a lot fewer titles.
This seems to worry indie developers who relied on this section as a major driver of visibility before launch.
I personally think this is will not change much to how indie games are marketed and might even be a positive for many niche developers.
Popular upcoming is dead
Game development is more accessible than ever, and anyone can post their games on Steam and Epic.
All those new developers needing to market their games has created a cottage industry of game marketing influencers.
The strategy they teach is basically always a variant of:
Make a game (and a demo)
Get a lot of people to play the demo during Steam Next Fest
Get 6000+ wishlists
Appear in Popular Upcoming
???
Profit
Since everyone is running around with approximately the same strategy, it became a very crowded trade.
With demos getting more and more polished, Next Fest began to have diminishing returns for most developers.
In the same way Popular Upcoming was very impactful when maybe 1 or 2 games appeared in it every day,
but when it started showing a dozen game a day,
it stopped being a guarantee of success.
And let’s be honest, players have probably been paying less and less attention to this section of the store for a while.
Unless they were really interested in finding out what every shovelware publisher has been working on.
Long live the Personal Calendar
In the same update, Valve introduced a new feature: the Personal Calendar.
It’s a whole page which aims at making players discover games that are match their taste.
The recommendation algorithm seems to work somewhat decently.
I do not think it is entirely based on tags, since it seems to recommend me a lot of “Open World Survival Craft” games, which is not something I usually play.
It may be using wishlist behavior of similar players to make recommendations.
One of the major differences is that it shows a calendar for the next eight weeks, so games can have a much longer visibility window.
If a player of your target audience didn’t browse Steam on the day before your launch, it would miss you on popular upcoming,
while now they have six weeks to do that.
It also shows recently released games, in the past 7 days and past month.
Contrary to the homepage “Popular New Releases” tab (ex “New & Trending”), which requires a lot of active players, this section seems accessible even to unknown games.
Steam is currently recommending me
Imago Season
with (at the moment of writing) 0 review and only 2 concurrent players.
A new era for niche games?
Before this change, it was extremely difficult for developers to market niche games.
I know it from first-hand experience, since I have no doubt
Dice ‘n Goblins
would have been easier to market if it was not the weirdest combination of ideas possible.
Because of this, a lot of new indie game developers were advised to stick to a popular genre.
You love real-time strategy? Too bad, you’ll have to make an action roguelike instead.
This has caused a loss of creativity in the indie game world.
With many developers working on genres that do not interest them, using recycled ideas and aesthetics.
I do believe that this new version of Steam might swing the pendulum in the other way.
Now that players of niche games can get recommendation customized to their taste, making games for a non-mainstream audience can become viable again.
Lately, I’ve been experimenting with building games in Ebitengine.
It’s a 2D engine that lets you create games using the Go programming language.
To be able to iterate faster on visual effects, I have created a tool that lets me preview shaders: Luluka.
Content Preview
Lately, I’ve been experimenting with building games in
Ebitengine
.
It’s a 2D engine that lets you create games using the Go programming language.
To be able to iterate faster on visual effects, I have created a tool that lets me preview shaders:
Luluka
.
Kage Shaders
For those who feel like they missed an episode, shaders are small programs running on the GPU which can be used to modify the pixels of an image.
In games, they are used everywhere to control how a game looks.
They can be used create special effects like blurring an image or making your screen look like a CRT from the 90s.
Ebitengine has its own shader language called Kage.
It is very convenient because it has a syntax extremely close to Go.
Close enough that you can even run
go fmt
to format your Kage files.
Under the hood, Ebitengine will automatically convert Kage shaders into a format understandable by the GPU.
Moria Luluka from Star Detective Precure! by Toei Animation
Luluka
One of the main difference between Ebitengine and other game engines like Godot, is that it doesn’t have a visual editor.
This is generally fine, since I’ve spent most of my career avoiding What-You-See-Is-What-You-Get tools in favor of staying inside
NeoVim
.
But for shaders, you can end up spending a lot of time tweaking a few variables until you get them to look right.
That’s why I decided to build my own tool that would let me work on a shader in isolation, and quickly change the variables we give it.
You can install Luluka using the following command:
go install github.com/Tsukumogami-Software/luluka@v1.0.0
Run a shader by pointing it straight to the file, passing textures with
-i
and uniform values with
-u
:
For more convenience, you can use a YAML file to pass your uniform values.
This is especially practical when working with arrays or matrices, since commands can get very long:
Godot games are known to be easy to reverse engineer.
Simple tools can extract assets and source code from the packaged files.
If you are making commercial games you probably want to take some steps to avoid this.
Content Preview
Godot games are known to be easy to reverse engineer.
Simple tools can extract assets and source code from the packaged files.
If you are making commercial games you probably want to take some steps to avoid this.
The most popular Godot reverse engineering software is
gdsdecomp
aka Godot RE Tools.
It’s very multi-platform, simple to use, and even comes with a GUI.
In a few clicks, you can “Recover” a project from an executable or .pck file.
Gdsdecomp is able to find back the file structure of the project, every asset you exported, and the source code with full variable and function names.
This is actually really well-made software.
It even comes with convenient utilities for people who want to patch translations (one of the many use cases of reverse engineering games).
Encrypting .pck files
First let’s preface this section with a warning.
There’s no way to 100% guarantee that it’s going to be impossible to decompile a game, aside from never distributing the executable.
The only thing we can do is make reverse engineering more difficult and time-consuming.
Anyway, the recommended way of protecting Godot games against reverse engineering is to encrypt the files inside it.
This is done using AES-256, and requires compiling custom export templates.
You can find the details in the
official docs
,
but the general idea is this:
Set the new templates as custom templates in your export:
In your export encryption settings, check “Encrypt Exported PCK”, “Encrypt Index”, and do not forget to put the files and folders you want to encrypt in “Filters to include”:
Generate an IV (you should use a new one every export):
openssl rand -hex 16
Last but not least, set your AES key and IV in the encryption settings page.
If you did everything correctly, your exported .pck should not be readable by gdsdecomp without knowing the key.
At the same time, players should still be able to play the game as usual without issues or needing to know what AES-256 means.
Sadly, the key is stored in plain text in memory, and it is not very hard to find it there.
According to an estimate I just made up, it would take a 12 years-old with an hex editor and a YouTube tutorial around 15 minutes to get the key.
There’s even a tool that promises it can find it in only
50 ms
.
Godot-Secure
To solve this problem, we need to obfuscate the decryption process a little bit.
For those that feel this sounds terribly complicated, there’s a script called
Godot-Secure
that was built to help you with that.
It will modify Godot source code to significantly alter the decryption process.
Instead of directly using the key we store in memory, it will use it and a secret token to derivate a second key and decipher the files with it.
In addition, to that, it will change a few magic numbers and can switch the algorithm from AES-256 to Camellia-256.
Once you have run the script, you will need to recompile both the export templates and the editor.
This is because the editor is responsible for encrypting the files during export.
After exporting a file with the secured Godot, the attackers can still easily obtain our key from the binary files.
However, this key is useless by itself.
They will also need to find the secret token, work through the key derivation method and re-implement the decryption algorithm.
This can take a lot of time and requires actual programming knowledge.
Improving the obfuscation
Of course, if you want to play around with some C++, you can make this a bit more robust by adding custom logic of your own.
There are two files that will be relevant to you.
First one is
core/io/file_access_encrypted.cpp
.
It contains the encryption logic in the function
FileAccessEncrypted::open_and_parse
and the decryption logic in the function
FileAccessEncrypted::_close
.
CryptoCore::AESContextctx;ctx.set_encode_key(key.ptrw(),256);// Due to the nature of CFB, same key schedule is used for both encryption and decryption!ctx.decrypt_cfb(ds,iv.ptrw(),data.ptrw(),data.ptrw());
The second is
core/io/file_access_pack.cpp
.
This one contains how the key is loaded from memory in the
PackedSourcePCK::try_open_pack
function and
FileAccessPack
constructor.
Be careful when modifying this part, as changes with how you load the key will need to be reflected in how you set the key from the editor.
Vector<uint8_t>key;#ifdef TOOLS_ENABLED
if(!p_decryption_key.is_empty()){ERR_FAIL_COND_MSG(p_decryption_key.size()!=32,"Decryption key must be 256-bit.");constexpruint8_tempty_key[32]={};if(memcmp(script_encryption_key,empty_key,sizeof(empty_key))==0){key=p_decryption_key;}}else#endif
{key.resize(32);memcpy(key.ptrw(),script_encryption_key,32);}
The
script_encryption_key
variable itself is set at compile time by the script
core/core_builders.py
.
Like a lot of people, you may be using Go at work to develop backend applications or create infrastructure tools.
But you may not be aware that you can actually make video games in Go using Ebitengine.
Content Preview
Like a lot of people, you may be using Go at work to develop backend applications or create infrastructure tools.
But you may not be aware that you can actually make video games in Go using
Ebitengine
.
Ebitengine aims at being dead simple.
It was explicitly designed to have the most minimalistic API possible and still let people make the games they want.
Of course, it has some limitations, for example it doesn’t handle 3D (at least,
not officially
).
But it is still functional enough that many commercial indie games have been made with it.
Switching to Ebitengine from Unity or Godot is a bit like switching from Spring Framework to a micro-framework like Gin or Chi.
At first, you’ll feel like you’re spending all your time re-inventing the wheel,
but when you start getting used to it,
you realize that the increased flexibility and reliability makes your life easier in the long run.
Graphics
The core of Ebitengine is its ability to display and manipulate images.
The screen itself is considered an image, on which we are going to draw the rest of our game.
Each time we display an image using
DrawImage
, we can give it options.
Those allow us to change its position, scale, rotation, color or filtering.
Source code
packagemainimport("bytes"_"embed""image/png""log""math/rand""github.com/hajimehoshi/ebiten/v2")vargame*Game//go:embed logo.pngvarlogoFile[]byteconst(maxSpeed=3minSpeed=1scale=2)funcrandomColor()ebiten.ColorScale{scale:=ebiten.ColorScale{}scale.Scale(rand.Float32(),rand.Float32(),rand.Float32(),1,)returnscale}funcrandomSpeed()float64{returnminSpeed+rand.Float64()*(maxSpeed-minSpeed)}// Game implements ebitengine Game interface and represents our game looptypeGamestruct{image*ebiten.Imagegeometryebiten.GeoMdirection[2]float64colorebiten.ColorScalewidthintheightint}// Update is called every frame to update the current game statefunc(g*Game)Update()error{g.geometry.Translate(g.direction[0],g.direction[1],)// bounce and change color if out of screenx:=g.geometry.Element(0,2)x2:=x+float64(g.image.Bounds().Dx())*scaleifx<0{g.direction[0]=randomSpeed()g.color=randomColor()}elseifx2>float64(g.width){g.direction[0]=-1*randomSpeed()g.color=randomColor()}y:=g.geometry.Element(1,2)y2:=y+float64(g.image.Bounds().Dy())*scaleify<0{g.direction[1]=randomSpeed()g.color=randomColor()}elseify2>float64(g.height){g.direction[1]=-1*randomSpeed()g.color=randomColor()}returnnil}// Draw is called every frame to display images on the screenfunc(g*Game)Draw(screen*ebiten.Image){screen.DrawImage(g.image,&ebiten.DrawImageOptions{GeoM:game.geometry,ColorScale:g.color,})}// Layout is called every frame to indicate the window/screen sizefunc(g*Game)Layout(outsideWidth,outsideHeightint)(int,int){g.width=outsideWidthg.height=outsideHeightreturnoutsideWidth,outsideHeight}funcinit(){reader:=bytes.NewReader(logoFile)png,err:=png.Decode(reader)iferr!=nil{log.Panicf("Failed to decode image:\n%v",err)}image:=ebiten.NewImageFromImage(png)geom:=ebiten.GeoM{}geom.Scale(2,2)direction:=[2]float64{randomSpeed(),randomSpeed(),}color:=randomColor()game=&Game{image:image,geometry:geom,direction:direction,color:color,}}funcmain(){iferr:=ebiten.RunGame(game);err!=nil{log.Fatal(err)}}
Input
Like any proper engine, Ebitengine helps you handle player input.
Basic functions like
IsKeyPressed
or
IsMouseButtonPressed
are directly found inside the main ebiten module.
More advanced functions are placed in the
inpututil
module.
Those can be very useful if you need to work with controllers or touchscreens.
Source code (main.go)
packagemainimport("bytes"_"embed""image/color""image/png""log""github.com/hajimehoshi/ebiten/v2""github.com/hajimehoshi/ebiten/v2/inpututil")vargame*Gameconst(screenWidth=160screenHeight=240)// Game is our top level structuretypeGamestruct{egg*Eggnests[]*Nestscrollfloat64touchIDs[]ebiten.TouchID}// Update handles the user input, movement and scrollingfunc(g*Game)Update()error{ifg.scroll>0{g.HandleScrolling()returnnil// the rest of the game logic is blocked during scrolling}g.touchIDs=inpututil.AppendJustPressedTouchIDs(g.touchIDs[:0])ifinpututil.IsMouseButtonJustPressed(ebiten.MouseButtonLeft)||inpututil.IsKeyJustPressed(ebiten.KeySpace)||len(g.touchIDs)!=0{g.egg.Jump()}g.egg.UpdatePosition()for_,nest:=rangeg.nests{nest.UpdatePosition()ifg.egg.IsFalling(){ifnest.CheckLanding(g.egg){g.nests=append(g.nests,NewMovingNest())g.scroll=screenHeight/3}}}returnnil}// HandleScrolling smoothly moves the elements by a third of the screen and removes old nestsfunc(g*Game)HandleScrolling(){distance:=float64(screenHeight)/30g.scroll-=distanceg.egg.Scroll(distance)visibleNests:=[]*Nest{}for_,nest:=rangeg.nests{nest.Scroll(distance)if!nest.IsOutOfScreen(){visibleNests=append(visibleNests,nest)}}g.nests=visibleNests}// Draw displays the background, egg and nestsfunc(g*Game)Draw(screen*ebiten.Image){screen.Fill(color.RGBA{R:77,G:186,B:233,A:255,})g.egg.Draw(screen)for_,nest:=rangeg.nests{nest.Draw(screen)}}// Layout returns a constant screen width and heightfunc(g*Game)Layout(outsideWidth,outsideHeightint)(int,int){returnscreenWidth,screenHeight}funcloadImage(file[]byte)*ebiten.Image{reader:=bytes.NewReader(file)png,err:=png.Decode(reader)iferr!=nil{log.Panicf("Failed to decode image:\n%v",err)}returnebiten.NewImageFromImage(png)}funcinit(){eggImage=loadImage(eggFile)nestImage=loadImage(nestFile)game=&Game{egg:NewEgg(),nests:[]*Nest{NewBottomNest(),NewTopNest()},touchIDs:[]ebiten.TouchID{},scroll:0,}}funcmain(){iferr:=ebiten.RunGame(game);err!=nil{log.Fatal(err)}}
Source code (egg.go)
packagemainimport(_"embed""github.com/hajimehoshi/ebiten/v2")const(eggWidth=16eggHeight=16)//go:embed egg.pngvareggFile[]bytevareggImage*ebiten.Image// Egg represents our playertypeEggstruct{geomebiten.GeoMvelocityfloat64gravityfloat64}// NewEgg creates an egg at the beginning of the gamefuncNewEgg()*Egg{eggGeom:=ebiten.GeoM{}eggGeom.Translate(screenWidth/2-eggWidth/2,screenHeight*2/3,)return&Egg{geom:eggGeom,velocity:0,gravity:0,}}// Draw draws the egg sprite on the screenfunc(e*Egg)Draw(screen*ebiten.Image){screen.DrawImage(eggImage,&ebiten.DrawImageOptions{GeoM:e.geom,})}// Jump triggers the start of a jumpfunc(e*Egg)Jump(){ife.velocity<0{return// we're already jumping}e.velocity=-10e.gravity=0.5}// UpdatePosition moves the egg during jumps / fallsfunc(e*Egg)UpdatePosition(){e.velocity+=e.gravitye.geom.Translate(0,e.velocity,)}// GetPosition returns the egg X/Yfunc(e*Egg)GetPosition()(float64,float64){eggX:=e.geom.Element(0,2)eggY:=e.geom.Element(1,2)returneggX,eggY}// Stop cancels any jump / fallfunc(e*Egg)Stop(){e.gravity=0e.velocity=0}// IsFalling returns true if the egg is currently fallingfunc(e*Egg)IsFalling()bool{returne.velocity>0}// Scroll moves the egg during scrolligfunc(e*Egg)Scroll(distancefloat64){e.geom.Translate(0,distance)}
Source code (nest.go)
packagemainimport(_"embed""math/rand""github.com/hajimehoshi/ebiten/v2")const(nestWidth=32nestHeight=16)//go:embed nest.pngvarnestFile[]bytevarnestImage*ebiten.Image// Nest represents the platformstypeNeststruct{geomebiten.GeoMlandedboolvelocityfloat64}// NewBottomNest creates the starting pointfuncNewBottomNest()*Nest{nestGeom:=ebiten.GeoM{}nestGeom.Translate(screenWidth/2-nestWidth/2,screenHeight*2/3+eggHeight/2,)return&Nest{geom:nestGeom,landed:true,velocity:0,}}// NewTopNest creates the second (fixed) nestfuncNewTopNest()*Nest{nestGeom:=ebiten.GeoM{}nestGeom.Translate(screenWidth/2-nestWidth/2,screenHeight/3+eggHeight/2,)return&Nest{geom:nestGeom,landed:false,velocity:0,}}// NewMovingNest creates a moving platformfuncNewMovingNest()*Nest{nestGeom:=ebiten.GeoM{}nestGeom.Translate(screenWidth/2-nestWidth/2,0,)velocity:=0.5+rand.Float64()ifrand.Intn(2)==1{velocity*=-1}return&Nest{geom:nestGeom,landed:false,velocity:velocity,}}// Draw displays the nest on the screenfunc(n*Nest)Draw(screen*ebiten.Image){screen.DrawImage(nestImage,&ebiten.DrawImageOptions{GeoM:n.geom,})}// UpdatePosition moves the nestfunc(n*Nest)UpdatePosition(){n.geom.Translate(n.velocity,0)x:=n.geom.Element(0,2)ifx<0||x+nestWidth>screenWidth{n.velocity*=-1}}// CheckLanding returns true if the egg has landed in a new nestfunc(n*Nest)CheckLanding(egg*Egg)bool{eggX,eggY:=egg.GetPosition()nestX:=n.geom.Element(0,2)nestY:=n.geom.Element(1,2)ifeggX>=nestX&&eggX+eggWidth<=nestX+nestWidth&&eggY+eggHeight>=nestY+5&&eggY+eggHeight<=nestY+15{// landing in a nestegg.Stop()if!n.landed{// we landed in a new nestn.velocity=0n.landed=truereturntrue}returnfalse}returnfalse}// Scroll moves the nest during scrollingfunc(n*Nest)Scroll(distancefloat64){n.geom.Translate(0,distance)}// IsOutOfScreen returns true if the nest is not displayed anymorefunc(n*Nest)IsOutOfScreen()bool{y:=n.geom.Element(1,2)returny>screenHeight}
Audio
Ebitengine’s
audio
module contains everything you need to play sound effects or music.
On top of providing the usual
Play
/
Pause
/
Rewind
functions, it handles decoding of mp3, ogg, and wav audio files.
Low-level management of audio stream is available through the
oto
library, which is also part of the Ebitengine project.
Source code (sample.go)
packagemainimport("bytes""embed""image/png""io/fs""log""path/filepath""github.com/hajimehoshi/ebiten/v2""github.com/hajimehoshi/ebiten/v2/audio""github.com/hajimehoshi/ebiten/v2/audio/wav")const(sampleWidth=36sampleHeight=36)//go:embed imagesvarimagesembed.FS//go:embed soundsvarsoundsembed.FS// Sample represents a sound sample and its icontypeSamplestruct{image*ebiten.Imagegeomebiten.GeoMplayer*audio.Player}// IsTargeted returns true if the mouse or touch position is on the samplefunc(s*Sample)IsTargeted(x,yint)bool{sampleX:=int(s.geom.Element(0,2))sampleY:=int(s.geom.Element(1,2))returnx>=sampleX&&x<sampleX+sampleWidth&&y>=sampleY&&y<sampleY+sampleWidth}// Play rewinds and plays the samplefunc(s*Sample)Play(){err:=s.player.Rewind()iferr!=nil{log.Panicf("Failed to rewind player: %v",err)}s.player.Play()}// Draw displays the sample iconfunc(s*Sample)Draw(screen*ebiten.Image){screen.DrawImage(s.image,&ebiten.DrawImageOptions{GeoM:s.geom,})}funccreatePlayer(context*audio.Context,filenamestring)*audio.Player{file,err:=fs.ReadFile(sounds,filepath.Join("sounds",filename),)iferr!=nil{log.Panicf("Failed to read embedded sounds fs: %v",err)}reader:=bytes.NewReader(file)stream,err:=wav.DecodeWithSampleRate(sampleRate,reader)iferr!=nil{log.Panicf("Failed to decode sample: %v",err)}player,err:=context.NewPlayer(stream)iferr!=nil{log.Panicf("Failed to create player: %v",err)}returnplayer}funcloadImage(filenamestring)*ebiten.Image{file,err:=fs.ReadFile(images,filepath.Join("images",filename),)iferr!=nil{log.Panicf("Failed to read embedded images fs: %v",err)}reader:=bytes.NewReader(file)png,err:=png.Decode(reader)iferr!=nil{log.Panicf("Failed to decode image:\n%v",err)}returnebiten.NewImageFromImage(png)}// Skull creates our skull sample (top left)funcSkull(context*audio.Context)*Sample{return&Sample{image:loadImage("skull.png"),player:createPlayer(context,"skull.wav"),geom:ebiten.GeoM{},}}// Alert creates our alert sample (top right)funcAlert(context*audio.Context)*Sample{geom:=ebiten.GeoM{}geom.Translate(36,0)return&Sample{image:loadImage("alert.png"),player:createPlayer(context,"alert.wav"),geom:geom,}}// Question creates our question sample (bottom left)funcQuestion(context*audio.Context)*Sample{geom:=ebiten.GeoM{}geom.Translate(0,36)return&Sample{image:loadImage("question.png"),player:createPlayer(context,"question.wav"),geom:geom,}}// Heart creates our heart sample (bottom right)funcHeart(context*audio.Context)*Sample{geom:=ebiten.GeoM{}geom.Translate(36,36)return&Sample{image:loadImage("heart.png"),player:createPlayer(context,"heart.wav"),geom:geom,}}
Source code (main.go)
packagemainimport("log""github.com/hajimehoshi/ebiten/v2""github.com/hajimehoshi/ebiten/v2/audio""github.com/hajimehoshi/ebiten/v2/inpututil")const(screenWidth=72screenHeight=72sampleRate=44100)vargame*Game// Game contains a collection of samplestypeGamestruct{samples[]*Sample}// Update plays a sample when it is clicked or touchedfunc(g*Game)Update()error{ifinpututil.IsMouseButtonJustPressed(ebiten.MouseButtonLeft){for_,sample:=rangeg.samples{ifsample.IsTargeted(ebiten.CursorPosition()){sample.Play()}}}touchIDs:=inpututil.AppendJustPressedTouchIDs(nil)for_,touchID:=rangetouchIDs{for_,sample:=rangeg.samples{ifsample.IsTargeted(ebiten.TouchPosition(touchID)){sample.Play()}}}returnnil}// Draw displays every sample's iconfunc(g*Game)Draw(screen*ebiten.Image){for_,sample:=rangeg.samples{sample.Draw(screen)}}// Layout returns a fixed 72 * 72 layoutfunc(g*Game)Layout(outsideWidth,outsideHeightint)(int,int){returnscreenWidth,screenHeight}funcinit(){context:=audio.NewContext(sampleRate)game=&Game{samples:[]*Sample{Skull(context),Alert(context),Question(context),Heart(context),},}}funcmain(){iferr:=ebiten.RunGame(game);err!=nil{log.Fatal(err)}}
Shaders
Go code usually runs on the CPU.
Sometimes if your game needs faster processing for animations or effects, you may want to use shaders.
Shaders are small pieces of software that will be executed on the GPU.
This allows you to execute a function over every pixel of an image in parallel.
Ebitengine comes with its own shader language called Kage.
It is very similar to Go.
So much, that syntax highlighting tools that work with Go should not have any problems working with Kage.
If you want to learn more about this, I recommend checking out
tinne26’s Kage’s desk
Source code (main.go)
packagemainimport(_"embed""log""time""github.com/hajimehoshi/ebiten/v2")//go:embed shader.kagevarshaderFile[]byteconst(screenWidth=512screenHeight=512)vargame*Game// Game contains the compiled shader and keeps track of the timetypeGamestruct{shader*ebiten.ShaderstartTimetime.Time}// Draw displays the shader on the entire screenfunc(g*Game)Draw(screen*ebiten.Image){screen.DrawRectShader(screenWidth,screenHeight,g.shader,&ebiten.DrawRectShaderOptions{Uniforms:map[string]any{"Center":[]float32{float32(screenWidth)/2,float32(screenHeight)/2,},"Time":time.Now().Sub(g.startTime).Seconds(),},},)}// Update does nothing herefunc(g*Game)Update()error{returnnil}// Layout returns a fixed width/heightfunc(g*Game)Layout(outsideWidth,outsideHeightint)(int,int){returnscreenWidth,screenHeight}funcinit(){shader,err:=ebiten.NewShader(shaderFile)iferr!=nil{log.Panicf("Failed to create shader: %f",err)}game=&Game{shader:shader,startTime:time.Now(),}}funcmain(){iferr:=ebiten.RunGame(game);err!=nil{log.Fatal(err)}}
Source code (shader.kage)
//kage:unit pixelspackagemain// Center is the coordinates of the center of the screenvarCentervec2// Time allows us to update the shader over timevarTimefloat// Fragment is the main shader function, run over every pixelfuncFragment(targetCoordsvec4,sourceCoordsvec2,colorvec4)vec4{//delta is the vector from the center to our pixeldelta:=targetCoords.xy-Centerdistance:=length(delta)angle:=atan2(delta.y,delta.x)//band is going to generate alternate bands based on distance and anglespiralValue:=distance+Time*50.0-10.0*angleband:=mod(spiralValue,63.0)ifband<32.0{returnvec4(1,0,0,1)// red}else{returnvec4(0,0,0,1)// black}}
More than just PC games
Go natively works well on Windows, Mac, and Linux.
As you can see above, it can also run in your browser with WebAssembly.
Thanks to some pretty
clever tricks
,
you can actually compile go for basically any system that implements a libc.
For example, you can compile Ebitengine games for the Nintendo Switch (as long as you have access to the required SDK and hardware).
Since Ebitengine is pretty flexible, it can be used for other things than games.
Guigui
is a GUI Framework that makes use of it.
It is currently in alpha, and is being very actively developed by the same people who made Ebitengine.
Afraid of GitHub suddenly enshittifying their product?
The best way to shield yourself from that is to start self-hosting your code repositories.
I have been running a self-hosted instance of Gitea for around two months,
and so far the process has been pretty close to painless.
Content Preview
Afraid of GitHub suddenly enshittifying their product?
The best way to shield yourself from that is to start self-hosting your code repositories.
I have been running a self-hosted instance of
Gitea
for around two months,
and so far the process has been pretty close to painless.
To install Gitea, all you need is a server with 2 GB RAM and 2 CPU cores.
The official documentation even says a single GB of RAM is enough, which
I can believe
, but a bit of margin will not hurt.
Once your server is started and configured as you like, you’ll need to prepare a database.
Gitea supports both MySQL and PostgreSQL.
Personally, I like MySQL a lot, so I decided to go with that.
Using docker-compose, you can launch a MySQL container like this:
It will write files and other unstructured data to
gitea-data
and read its configuration file from
gitea-config
.
HTTP traffic will be received on the port 80 and forwarded to 3000, while SSH traffic (used by git itself) will use port 2222.
We do not use port 22 to avoid conflicts with the server’s own SSH daemon.
As soon as the container is ready, you can head connect to Gitea with your web browser at your server’s IP/domain.
It will open an installation wizard, and you just have to follow the instructions.
Through this installation wizard, you should be able to connect to the previously configured MySQL server using the address
mysql:3306
and the user you created earlier.
Setting up TLS
Just because we are self-hosting doesn’t mean we have to forgo basic security rules.
Using Traefik is, in
my opinion
, the simplest way to set up TLS on your own server.
Lastly, if you didn’t do it during installation, you should indicate the proper domain and URL in Gitea’s config.
It is found in the
gitea-config/app.ini
file.
After restarting everything, crossing fingers and waiting a bit, you should receive a valid TLS certificate and be able to use Gitea safely.
Importing repositories from GitHub
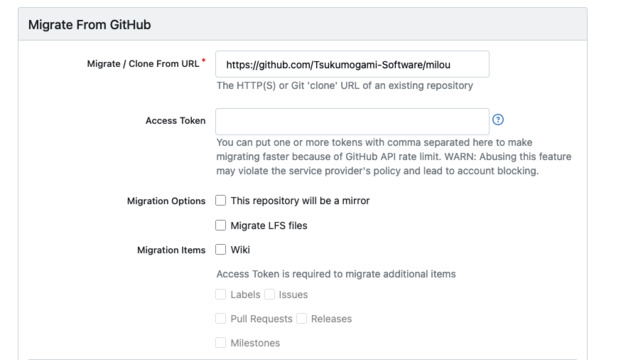
You can automatically import repositories from GitHub into Gitea.
You can find the import tool on the + button located in the top right corner of your screen.
In addition to importing the code, Gitea can automatically retrieve existing labels, issues, pull requests, releases, and milestones using a Personal Access Token.
Compared to alternatives like GitLab, the killer feature of Gitea is that you do not need to rewrite your GitHub Action workflows.
So you can just leave your YAML files untouched in
.github/workflows
.
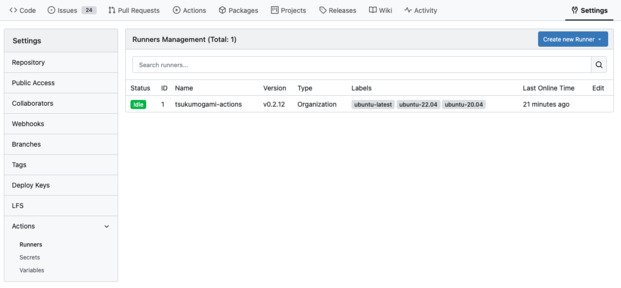
You will need to start some Runner processes to run your Actions.
First, you’ll have to generate a Runner registration token from your instance, organization or repository setting.
As you may have guessed, a Runner with a registration token created from a repository will only be able to access this repository, while a runner created from the instance settings will be able to access every repository.
When you have a token, you can launch a runner container like this:
Alternatively, you should be able to back up the MySQL database using
mysqldump
and make zip of Gitea local volumes.
Backups have to be copied to a service you trust, and that is independent of where your server is hosted.
Every major cloud provider offers reasonably cheap object storage that can be used for this.
Building Itako: an investment tracking application
Around 2 years ago, I had some time on my hands and got really interested into investing and playing with stock market data.
After reading way too many books on the subject, I started building my own tools which led me to creating Itako.
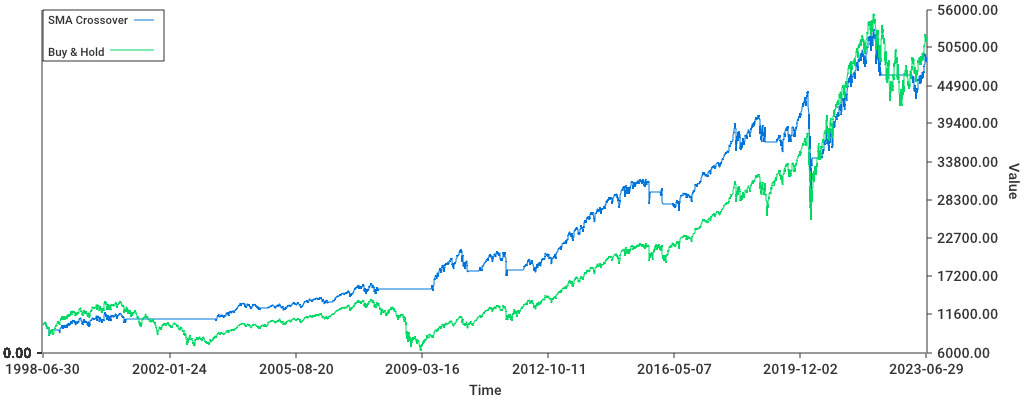
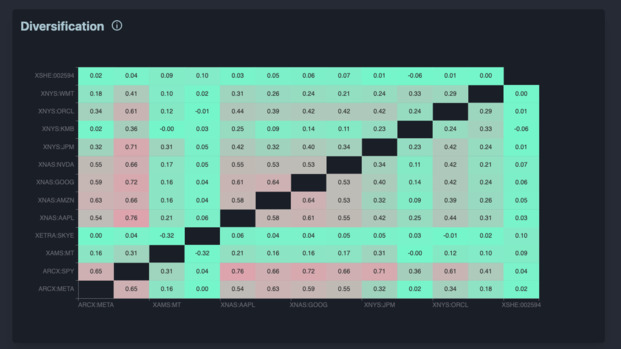
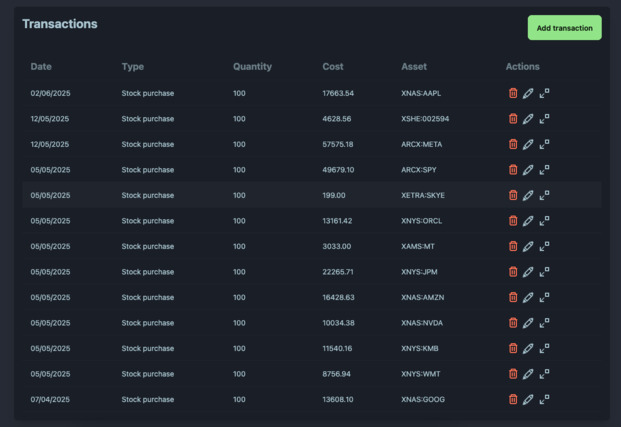
It’s a portfolio tracking and data visualization software that lets user journal their stock market transactions, and learn about their portfolio performance and diversification.
Content Preview
Around 2 years ago, I had some time on my hands and got really interested into investing and playing with stock market data.
After reading way too many books on the subject, I started building my own tools which led me to creating
Itako
.
It’s a portfolio tracking and data visualization software that lets user journal their stock market transactions, and learn about their portfolio performance and diversification.
Itako is now in a stable state, with enough features, so I felt like it was a good time to summarize this project.
A prototype
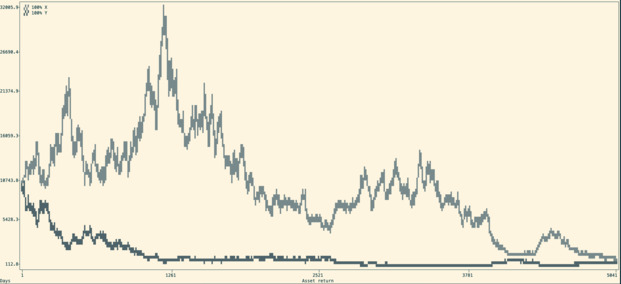
The very first thing I did was to create a script that could generate random walks to simulate investment returns over time, and return the graph in the CLI.
This was fairly simple, and 250 lines of Python later, I could visualize those random walks going up and down.
It allowed me to write my
Shannon’s demon
article, which explains the non-intuitive advantage of diversification and regular re-balancing.
Of course, you can’t really go that far with random walks.
Soon after this first step was finished, I decided to integrate real data from the stock market.
Once my little script was able to fetch stock quotes from an API, I was able to do some fun things like compute the correlations between different tickers, or evaluate
different strategies
.
Edelfelt
As I started building more and more stuff, I got tired of playing with a bunch of Python scripts.
I decided to consolidate my project in the form of a CLI that would act as a Swiss-army knife for my experiments.
I called it Edelfelt.
For this iteration, I also switched from Python to Go.
Since the project was growing, Go allows me to really easily create robust and maintainable code that I can still painlessly work with years after.
Edelfelt was able to read a list of transactions, turn this into a portfolio which is made up of different positions over time.
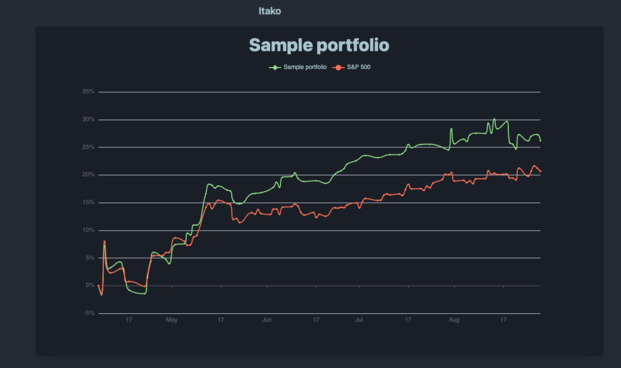
From this portfolio, it generates a graph, but also output metrics such as the portfolio’s Sharpe ratio (basically the return/risk), compounded returns, total returns, and standard deviation.
It could quickly be used to get a portfolio correlation matrix (showing if any 2 positions behave similarly), and weights vector (the % each position is taking in your portfolio).
Lastly, you could use it to compare the portfolio to a benchmark (like the S&P500 or the 10-year US treasuries) and determine the excess returns from our strategies.
Alpha
To make this useable by other people I decided to turn this into a web application, named Itako.
I decided to re-use
Mikochi
’s stack, which is Go and Gin for the backend with a Preact frontend.
For a database, I decided to go with MySQL, because it is the only major database system that I have never seen catastrophically fail in production.
The data visualization got a serious upgrade, thanks to Echarts (which is really
awesome
).
I also decided to use DaisyUI to get some shiny looking CSS.
The backend used the previous code from Edelfelt as a module.
This avoided me from having to re-develop everything from scratch.
The main improvement is that now, we could cache stock prices in our database.
I didn’t expect that to be complicated, sadly cache invalidation is a pain.
When I had a decent bunch of features to work with, I pushed the application to production and got around a dozen people to try it.
People liked the visualizations, but also found a lot of bugs.
Most were pretty minor UI issues, but some were more tricky.
I hadn’t planned for some situations, like stock splits and delistings.
Beta
Aside from fixing the bugs noticed during the Alpha testing, the next step was to handle currency conversions.
The aim of this was to let people have stocks from different countries in their portfolios.
Getting currencies data is relatively simple since there’s a lot of APIs offering that.
However, it completely changes how investment returns are calculated.
This led me to refactoring Itako’s business logic and completely getting rid of the dependency to Edelfelt.
I decided to go a bit more public about the project and made a Reddit post about it.
Around 100 users decided to try Itako and I received plenty of feedback.
The main point I learned from this was that I needed to focus on making the application a bit easier to use, and give more actionable data.
Release
To be honest, the project sat abandoned for a long while after this round of Beta testing.
Nothing bad about it, I just really had to focus on shipping our
Dice’n Goblins
in time.
After the game release, I manage to find a bit of time to work on Itako again.
I shipped quite a few improvements.
Users can now use a simplified input form and abstract away handling cash.
Those who do not like this can head to their settings and change it back.
I also added a bit of polish, and added a much needed rebalancing feature.
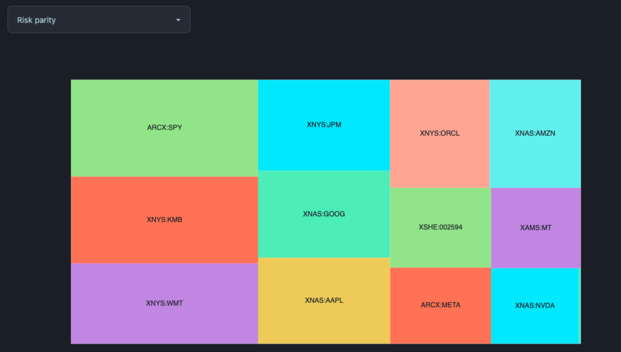
This feature shows you the output of different rebalancing strategies on your portfolio.
Currently, it implements two very common strategies: equal weights and
risk parity
.
Quite recently, Itako removed its “Beta” badge.
The project has most of the features I wanted to build when I created it.
It feels weird saying it because I spent way too much time on this, but it is finished.
If you want to try it out, just head to
itako.app
.
If you have questions, feedback, or encountered any issues while using Itako, don’t hesitate to
email me
about it.
Every 6 months or so, I decide to leave my cave and check out what the cool kids are doing with AI.
Apparently the latest trend is to use fancy command line tools to write code using LLMs.
This is a very nice change, since it suddenly makes AI compatible with my allergy to getting out of the terminal.
Content Preview
Every 6 months or so, I decide to leave my cave and check out what the cool kids are doing with AI.
Apparently the latest trend is to use fancy command line tools to write code using LLMs.
This is a very nice change, since it suddenly makes AI compatible with my allergy to getting out of the terminal.
Me, browsing HN from my cave (by Stable Diffusion)
The most popular of these tools seems to be Claude Code.
It promises to be able to build in total autonomy, being able to use search code, write code, run tests, lint, and commit the changes.
While this sounds great on paper, I’m not keen on getting locked into vendor tools from an unprofitable company.
At some point, they will either need to raise their prices, enshittify their product, or most likely do both.
So I went looking for what the free and open source alternatives are.
Picking a model
There’s a large amount of open source large language models on the market, with new ones getting released all the time.
However, they are not all ready to be used locally in coding tasks, so I had to try a bunch of them before settling on one.
deepseek-r1:8b
Deepseek is the most popular open source model right now.
It was created by the eponymous Chinese company.
It made the news by beating numerous benchmarks while being trained on a budget that is probably lower than the compensation of some OpenAI workers.
The 8b variant only weights 5.2 GB and runs decently on limited hardware, like my three years old Mac.
This model is famous for forgetting about world events from 1989, but also seems to have a few issues when faced with concrete coding tasks.
It is a reasoning model, meaning it “thinks” before acting, which should lead to improved accuracy.
In practice, it regularly gets stuck indefinitely searching where it should start and jumping from one problem to the other in a loop.
This can happen even on simple problems, and made it unusable for me.
mistral:7b
Mistral is the French alternative to American and Chinese models.
I have already talked about their 7b model
on this blog
.
It is worth noting that they have kept updating their models, and it should now be much more accurate than two years ago.
Mistral is not a reasoning model, so it will jump straight to answering.
This is very good if you’re working with tasks where speed and low compute use are a priority.
Sadly, the accuracy doesn’t seem good enough for coding.
Even on simple tasks, it will hallucinate functions or randomly delete parts of the code I didn’t want to touch.
qwen3:8b
Another model from China, qwen3 was created by the folks at Alibaba.
It also claims impressive benchmark results, and can work as both a reasoning or non-thinking model.
It was made with modern AI tooling in mind, by supporting MCPs and a
framework for agentic development
.
This model actually seems to work as expected, providing somewhat accurate code output while not hanging in the reasoning part.
Since it runs decently on my local setup, I decided to stick to that model for now.
Setting up a local API with Ollama
Ollama is now the default way to download and run local LLMs.
It can be simply installed by downloading it from
their website
.
Once installed, it works like Docker for models, by giving us access to commands like
pull
,
run
, or
rm
.
Ollama will expose an API on
localhost
which can be used by other programs.
For example, you can use it from your Python programs through
ollama-python
.
My new pet (by Stable Diffusion)
Pair programming with aider
The next piece of software I installed is
aider
.
I assume it’s pronounced like the French word, but I could not confirm that.
Aider describes itself as a “pair programming” application.
Its main job is to pass context to the model, let it write the output to files, run linters, and commit the changes.
Getting started
It can be installed using
the official Python package
or via
Homebrew
if you use Mac.
Once it is installed, just navigate to your code repository and launch it:
The CLI should automatically create some configuration files and add them to the repo’s
.gitignore
.
Usage
Aider isn’t meant to be left alone in complete autonomy.
You’ll have to guide the AI through the process of making changes to your repository.
To start, use the
/add
command to add files you want to focus on.
Those files will be passed entirely to the model’s context and the model will be able to write in them.
You can then ask questions using the
/ask
command.
If you want to generate code, a good strategy can be to starting by requesting a plan of actions.
When you want it to actually write to the files, you can prompt it using the
/code
command.
This is also the default mode.
There’s no absolute guarantee that it will follow a plan if you agreed on one previously, but it is still a good idea to have one.
The
/architect
command seems to automatically ask for a plan, accept it, and write the code.
The specificity of this command is that it lets you use different models to plan and write the changes.
Refactoring
I tried coding with aider in a few situations to see how it performs in practice.
First, I tried making it do a simple refactoring on
Itako
, which is a project of average complexity.
When pointed to the exact part of code where the issues happened, and explained explicitly what to do, the model managed to change the target struct according to the instructions.
It did unexpectedly change a function that was outside the scope of what I asked, but this was easy to spot.
On paper, this looks like a success.
In practice, the time spent crafting a prompt, waiting for the AI to run and fixing the small issue that came up immensely exceeds the 10 minutes it would have taken me to edit the file myself.
I don’t think coding that way would lead me to a massive performance improvement for now.
Greenfield project
For a second scenario, I wanted to see how it would perform on a brand-new project.
I quickly set up a Python virtual environment, and asked aider to work with me at building a simple project.
We would be opening a file containing Japanese text, parsing it with
fugashi
, and counting the words.
To my surprise, this was a disaster.
All I got was a bunch on hallucination riddled python that wouldn’t run under any circumstances.
It may be that the lack of context actually made it harder for the model to generate code.
Troubleshooting
Finally, I went back to Itako, and decided to check how it would perform on common troubleshooting tasks.
I introduced a few bugs to my code and gathered some error messages.
I then proceeded to simply give aider the files mentioned by the error message and just use
/ask
to have it explain the errors to me, without requiring it to implement the code.
This part did work very well.
If I compare it with Googling unknown error messages, I think this can cut the time spent on the issue by half
This is not just because Google is getting worse every day, but the model having access to the actual code does give it a massive advantage.
I do think this setup is something I can use instead of the occasional frustration of scrolling through StackOverflow threads when something unexpected breaks.
What about the Qwen CLI?
With everyone jumping on the trend of CLI tools for LLMs, the Qwen team released its own
Qwen Code
.
It can be installed using npm, and connects to a local model if configured like this:
Compared to aider, it aims at being fully autonomous.
For example, it will search your repository using
grep
.
However, I didn’t manage to get it to successfully write any code.
The tool seems optimized for larger, online models, with context sizes up to 1M tokens.
Our local qwen3 context only has a 40k tokens context size, which can get overwhelmed very quickly when browsing entire code repositories.
Even when I didn’t run out of context, the tool mysteriously failed when trying to write files.
It insists it can only write to absolute paths, which the model doesn’t seem to agree with providing.
I did not investigate the issue further.
Kubernetes is not exactly the most fun piece of technology around.
Learning it isn’t easy, and learning the surrounding ecosystem is even harder.
Even those who have managed to tame it are still afraid of getting paged by an ETCD cluster corruption, a Kubelet certificate expiration, or the DNS breaking down (and somehow, it’s always the DNS).
Content Preview
Kubernetes is not exactly the most fun piece of technology around.
Learning it isn’t easy, and learning the surrounding ecosystem is even harder.
Even those who have managed to tame it are still afraid of getting paged by an ETCD cluster corruption, a Kubelet certificate expiration, or the DNS breaking down (and somehow, it’s always the DNS).
If you’re like me, the thought of making your own orchestrator has crossed your mind a few times.
The result would, of course, be a magical piece of technology that is both simple to learn and wouldn’t break down every weekend.
Sadly, the task seems daunting.
Kubernetes is a multi-million lines of code project which has been worked on for more than a decade.
The good thing is someone wrote a book that can serve as a good starting point to explore the idea of building our own container orchestrator.
This book is named
“Build an Orchestrator in Go”
, written by Tim Boring, published by Manning.
The tasks
The basic unit of our container orchestrator is called a “task”.
A task represents a single container.
It contains configuration data, like the container’s name, image and exposed ports.
Most importantly, it indicates the container state, and so acts as a state machine.
The state of a task can be Pending, Scheduled, Running, Completed or Failed.
Each task will need to interact with a container runtime, through a client.
In the book, we use
Docker (aka Moby)
.
The client will get its configuration from the task and then proceed to pull the image, create the container and start it.
When it is time to finish the task, it will stop the container and remove it.
The workers
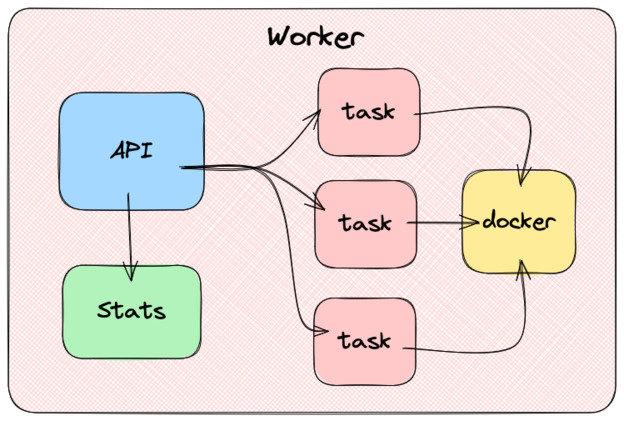
Above the task, we have workers.
Each machine in the cluster runs a worker.
Workers expose an API through which they receive commands.
Those commands are added to a queue to be processed asynchronously.
When the queue gets processed, the worker will start or stop tasks using the container client.
In addition to exposing the ability to start and stop tasks, the worker must be able to list all the tasks running on it.
This demands keeping a task database in the worker’s memory and updating it every time a task change’s state.
The worker also needs to be able to provide information about its resources, like the available CPU and memory.
The book suggests reading the
/proc
Linux file system using
goprocinfo
, but since I use a Mac, I used
gopsutil
.
The manager
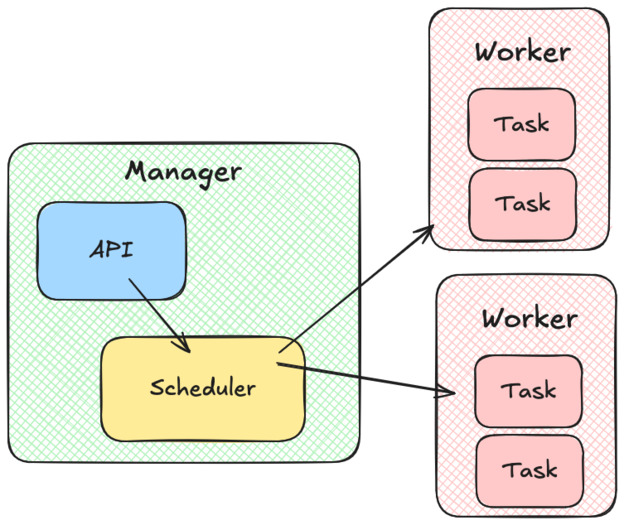
On top of our cluster of workers, we have the manager.
The manager also exposes an API, which allows us to start, stop, and list tasks on the cluster.
Every time we want to create a new task, the manager will call a scheduler component.
The scheduler has to list the workers that can accept more tasks, assign them a score by suitability and return the best one.
When this is done, the manager will send the work to be done using the worker’s API.
In the book, the author also suggests that the manager component should keep track of every tasks state by performing regular health checks.
Health checks typically consist of querying an HTTP endpoint (i.e.
/ready
) and checking if it returns 200.
In case a health check fails, the manager asks the worker to restart the task.
I’m not sure if I agree with this idea.
This could lead to the manager and worker having differing opinions about a task state.
It will also cause scaling issues: the manager workload will have to grow linearly as we add tasks, and not just when we add workers.
As far as I know, in Kubernetes, Kubelet (the equivalent of the worker here) is responsible for performing health checks.
The CLI
The last part of the project is to create a CLI to make sure our new orchestrator can be used without having to resort to firing up curl.
The CLI needs to implement the following features:
start a worker
start a manager
run a task in the cluster
stop a task
get the task status
get the worker node status
Using
cobra
makes this part fairly straightforward.
It lets you create very modern feeling command-line apps, with properly formatted help commands and easy argument parsing.
Once this is done, we almost have a fully functional orchestrator.
We just need to add authentication.
And maybe some kind of DaemonSet implementation would be nice.
And a way to handle mounting volumes…