Feed: Rock Your Code
Entries found: 25
Use Anubis to Firewall AI Scraping
Published: 2025-08-23
Updated: 2025-08-23
UTC: 2025-08-23 00:00:00+00:00
URL: https://www.rockyourcode.com/use-anubis-to-firewall-ai-scraping/I have been using a self-hosted Redlib as an alternative front-end for Reddit. I like Redlib better than the original UI, as it is quite simple and doesn’t bother me with any popups.Content Preview
I have been using a self-hosted Redlib as an alternative front-end for Reddit. I like Redlib better than the original UI, as it is quite simple and doesn’t bother me with any popups.
My instance is not private, so in theory, everyone can use it. As I do not advertise my instance, the traffic on my server was negligible.
However, lately AI scrapers seem to have discovered my instance. That has led to my instance being rate-limited .
One of the suggested solutions to this problem is using Anubis as a firewall to discourage scrapers from abusing your website.
Anubis is a Web AI Firewall Utility that weighs the soul of your connection using one or more challenges in order to protect upstream resources from scraper bots. This program is designed to help protect the small internet from the endless storm of requests that flood in from AI companies. Anubis is as lightweight as possible to ensure that everyone can afford to protect the communities closest to them.
Setup Anubis with Docker Compose
I use Traefik with Docker Swarm to deploy to a VPS.
Adding Anubis was straightforward and very similar to the docs :
version: '3.8'
services:
 anubis:
 image: ghcr.io/techarohq/anubis:latest
 environment:
 BIND: ":8080"
 DIFFICULTY: "5"
 METRICS_BIND: ":9090"
 SERVE_ROBOTS_TXT: "true"
 TARGET: "http://redlib:8080"
 POLICY_FNAME: "/data/cfg/botPolicy.yaml"
 OG_PASSTHROUGH: "true"
 OG_EXPIRY_TIME: "24h"
 volumes:
 - "/home/$SERVER_USER/anubis/botPolicy.yaml:/data/cfg/botPolicy.yaml:ro"
 deploy:
 labels:
 - traefik.enable=true
 - traefik.constraint-label=public
 - traefik.http.routers.anubis.entrypoints=websecure
 - traefik.http.routers.anubis.rule=<your URL>
 - traefik.http.services.anubis.loadbalancer.server.port=8080
 # other labels, e.g. tls options, rate-limiting, etc.
 networks:
 - public
 depends_on:
 - redlib

 redlib:
 container_name: redlib
 image: quay.io/redlib/redlib
 environment:
 REDLIB_ROBOTS_DISABLE_INDEXING: on
 # No Traefik labels - accessed internally through Anubis only
 networks:
 - public

networks:
 public:
 external: true
Now Redlib is not accessible publicly, because Traefik will route the URL to Anubis instead of Redlib.
Configuration via botPolicy.yaml
The documentation has a minimal configuration example that you can use:
bots:
 - name: cloudflare-workers
 headers_regex:
 CF-Worker: .*
 action: DENY
 - name: well-known
 path_regex: ^/.well-known/.*$
 action: ALLOW
 - name: favicon
 path_regex: ^/favicon.ico$
 action: ALLOW
 - name: robots-txt
 path_regex: ^/robots.txt$
 action: ALLOW
 - name: generic-browser
 user_agent_regex: Mozilla
 action: CHALLENGE
Alternatively, you can dowload the default policy and comment/uncomment what’s needed.
I found the configuration a bit confusing, to be honest.If you use docker compose/Docker Swarm, make sure to copy the file to your VPS and use volume binding to make the yaml file accessible to your container.
Links
Use Local LLMs With Zed Dev Editor
Published: 2025-08-15
Updated: 2025-08-15
UTC: 2025-08-15 00:00:00+00:00
URL: https://www.rockyourcode.com/use-local-llms-with-zed-dev-editor/Lately, I wanted to see if I can run a local LLM on my Macbook Air M2 and to use it as a provider for the Zed editor.Content Preview
Lately, I wanted to see if I can run a local LLM on my Macbook Air M2 and to use it as a provider for the Zed editor .
tldr; it works but is slow. You probably need a more powerful machine.
(I have since moved to OpenRouter as my provider, however that is not a local option.)Run a Local LLM
I use LM Studio . Make sure to install the binary into the standard
/Applications/-folder if you’re using a Mac. In that case, the installer will also install the necessary CLIlms.Download a model. You can do that via the GUI, see the docs of LM Studio .
I have tried:
- deepseek/deepseek-r1-0528-qwen3-8b
- all-hands_openhands-lm-7b-v0.1
Others didn’t work at all on my Macbook Air. Even those two are sluggish.
Now make sure that the desired model is loaded. The CLI is the easiest way to make sure:
lms load <model of choice>
# e.g., lms load deepseek/deepseek-r1-0528-qwen3-8b
Don’t forget to start the server! I was missing this step originally:
lms server startZed Editor
This is an example of how you could configure zed.dev (in
settings.json):{ "agent": { "default_profile": "ask", "default_model": { "provider": "lmstudio", "model": "deepseek/deepseek-r1-0528-qwen3-8b" }, "inline_assistant_model": { "provider": "lmstudio", "model": "all-hands_openhands-lm-7b-v0.1" }, "commit_message_model": { "provider": "lmstudio", "model": "all-hands_openhands-lm-7b-v0.1" }, "thread_summary_model": { "provider": "lmstudio", "model": "all-hands_openhands-lm-7b-v0.1" } }, }The above example shows feature-specific models for the different AI-powered features in the Zed editor .
Testcontainers With Orbstack
Published: 2024-09-05
Updated: 2024-09-05
UTC: 2024-09-05 00:00:00+00:00
URL: https://www.rockyourcode.com/testcontainers-with-orbstack/Lately, I needed to run testcontainers with Orbstack. Unfortunately, running my integration tests with dotnet test yielded the following error: System.AggregateException One or more errors occurred. (Docker is either not running or misconfigured. Please ensure that Docker is running and that the endpoint is properly configured. You can customize your configuration using either the environment variables or the ~/.testcontainers.properties file. For more information, visit: In the end, I used the same solution for Orbstack as I did for using testcontainer with colima. I overrode the docker host detection by setting environment variables in my (Fish) shell: set -x TESTCONTAINERS_DOCKER_SOCKET_OVERRIDE /var/run/docker.sock set -x DOCKER_HOST unix://{$HOME}/.orbstack/run/docker.sock Unfortunately, this does not seem to work within Rider. That’s why I am running those tests in my shell right now instead of my IDE. Links Testcontainers With ColimaContent Preview
Lately, I needed to run testcontainers with Orbstack .
Unfortunately, running my integration tests with
dotnet testyielded the following error:System.AggregateException One or more errors occurred. (Docker is either not running or misconfigured. Please ensure that Docker is running and that the endpoint is properly configured. You can customize your configuration using either the environment variables or the ~/.testcontainers.properties file. For more information, visit:In the end, I used the same solution for Orbstack as I did for using testcontainer with colima . I overrode the docker host detection by setting environment variables in my (Fish) shell:
set -x TESTCONTAINERS_DOCKER_SOCKET_OVERRIDE /var/run/docker.sock
set -x DOCKER_HOST unix://{$HOME}/.orbstack/run/docker.sock
Unfortunately, this does not seem to work within Rider. That’s why I am running those tests in my shell right now instead of my IDE.
Links
I Use Devbox and Direnv for Local Development Now
Published: 2024-07-15
Updated: 2024-07-15
UTC: 2024-07-15 00:00:00+00:00
URL: https://www.rockyourcode.com/i-use-devbox-and-direnv-for-local-development-now/I am currently developing a Go REST API. I need an environment variable in my shell for the database connection string. I also need to install a Golang package for SQL migrations.Content Preview
I am currently developing a Go REST API . I need an environment variable in my shell for the database connection string. I also need to install a Golang package for SQL migrations.
However, I do not want to pollute my machine. I hate to install the package globally just for this one use case.
Do I want to set my env variable globally? No!
But if I only set it temporarily, I need to repeat that every time.
What a hassle!Is there a way to isolate my local dev environment?
There is!
We built Devbox to make isolated shell environments easy to learn, use, and configure. The combination of easy shell environments with Devbox, combined with convenient environment switching with Direnv makes it simple to manage multiple projects without having their setups interfere or leak into one another.
After installing both packages for MacOS, it was easy to create my environment.
- Run
devbox initin my shell ( fish shell works!)- Add dependencies:
devbox add go@latest golangci-lint@latest go-migrate@latest- Create an
.envfile with my environment variiables.- Run
devbox generate direnvThe last command creates a pre-filled
.envrcfile.# Automatically sets up your devbox environment whenever you cd into this # directory via our direnv integration: eval "$(devbox generate direnv --print-envrc)" # check out https://www.jetpack.io/devbox/docs/ide_configuration/direnv/ # for more detailsAdd the following to the command:
--env-file .env# Automatically sets up your devbox environment whenever you cd into this # directory via our direnv integration: + eval "$(devbox generate direnv --print-envrc --env-file .env)" # check out https://www.jetpack.io/devbox/docs/ide_configuration/direnv/ # for more detailsNow
direnvwill also read from the environment file.I can also use the
.envfile in my Go program via GoDotEnv .Now I can use my database connection string both in my shell as well as in my Go project.
Further Reading
Scheduled Deploys for Netlify Builds
Published: 2024-03-18
Updated: 2024-03-18
UTC: 2024-03-18 00:00:00+00:00
URL: https://www.rockyourcode.com/scheduled-deploys-for-netlify-builds/I want to trigger a re-deploy of my Hugo blog which is hosted on Netlify.Content Preview
I want to trigger a re-deploy of my Hugo blog which is hosted on Netlify .
In the past, I’ve successfully used ifttt with a webhook.
Unfortunately, they’ve stopped supporting the webhook feature on the free tier.What’s the solution?
Netlify has a tutorial on how to use serverless functions for automatic deploys.
Here is the concise tutorial with a few steps added which weren’t clear to me.
How to schedule deploys on Netlify using serverless functions
You’ll need Node.js on your machine.
Create a new
npmproject in your current directory (Hugo folder) by runningnpm init -y.Install the dependencies by running the following command in your terminal:
npm install @netlify/functions
npm install node-fetch
- Add the required configuration in
netlify.toml:[functions] node_bundler = "esbuild"
- Get your build hook URL .
The name doesn’t matter much. I’ve called mine “netlify serverless function”.
- Set the URL as environment variable (replace with yours, below is a placeholder example):
npx netlify-cli env:set BUILD_HOOK_URI https://api.netlify.com/build_hooks/<xxxxxxxx>
- Create a file
/netlify/functions/scheduled-deploy.mjs. It’s important that you choose the correct path (inside the/netlify/functionsdirectory).(You can choose a different location, but in that case you’ll need to configure it in
netlify.toml. I didn’t want to bother with that.)import fetch from 'node-fetch' export default async () => { try { const BUILD_HOOK = Netlify.env.get('BUILD_HOOK_URI') const response = await fetch(BUILD_HOOK, { method: 'POST', }) return new Response('Build triggered') } catch (error) { console.error('Error triggering build hook:', error) return new Response('Error triggering build hook', { status: error.response?.status ? error.response.status : 500, statusText: error.response?.message ?? "Uh oh, this didn't work" }) } } // Schedules the handler function to run every day at 19h UTC export const config = { schedule: '0 19 * * *', }Check crontab.guru for a different schedule.
If you want to know more about scheduled functions, you can check the docs .
- Test locally
npx netlify-cli devThe command will start a new local server. Open your webbrowser on
http://localhost:8888/.netlify/functions/serverless-deploy.This will trigger the function and you should see that you’ve started a new deploy successfully in your Netlify dashboard.
- Source control and commit
I use git and GitLab/GitHub for my blog, so I’ve commited my changes and pushed them to my repository. The remote repo is connected to Netlify. Netlify should pick up the changes automatically.
Further Reading
How to Set a Vite Proxy to Your Backend
Published: 2024-03-03
Updated: 2024-03-03
UTC: 2024-03-03 00:00:00+00:00
URL: https://www.rockyourcode.com/how-to-set-a-vite-proxy-to-your-backend/I’m currently working on a Vite React application with a Nest.js backend.Content Preview
I’m currently working on a Vite React application with a Nest.js backend.
The React app runs on
localhost:3000and the backend onlocalhost:4000.
When I query the backend from React, I get a CORS error.After unsucessfully trying to enable cors for local development, I’ve gone back to using a Proxy setting in my vite config .
This behavior is similar to Create React App’s proxy setting .In the
viteconfig.tsfile, add the following to your configuration:// https://vitejs.dev/config/ export default defineConfig({ server: { port: 3000, proxy: { '/api': { target: 'http://localhost:4000', rewrite: (path) => path.replace(/^\/api/, ''), }, }, }, })The setting re-routes all traffic on
localhost:3000/apito the backend urllocalhost:4000and then removes the/apisuffix.In your application, target your backend API via
localhost:3000/apiinstead of the “real” URLlocalhost:4000.For example:
import { ApolloClient, InMemoryCache } from '@apollo/client'
import { API_URL } from './urls'

export const client = new ApolloClient({
 uri: `localhost:3000/api/graphql`,
 credentials: 'include',
 cache: new InMemoryCache(),
})
Underneath the hood, the proxy will route to
localhost:4000/graphql. And you won’t have CORS errors.
Neat!Further Reading
I Want to Like Helix, But...
Published: 2023-10-27
Updated: 2023-10-27
UTC: 2023-10-27 00:00:00+00:00
URL: https://www.rockyourcode.com/i-want-to-like-helix-but/I’ve been using the Helix editor for a while now. At first I was confused by how the word motions worked but overall it was a good experience. Helix’s biggest selling point is that it works right away. Setting up LSP support is very easy since no plugins are needed. Helix also has multiple cursors which I’ve come to like for editing multiple lines comfortably. In Vim you can work around it but I prefer how Helix makes it easy. However… Helix can’t beat Vim for me. There are many things I love about Vim like ranges, inserting the result of a command as text and other small things. Vim has thousands of little tricks that make it really powerful. While the learning curve is steep, once you master it you have a powerful tool at your hand. I haven’t reached that level with Helix and don’t think I will. That’s not to say Helix is a bad editor. It just isn’t right for my needs.Content Preview
I’ve been using the Helix editor for a while now.
At first I was confused by how the word motions worked but overall it was a good experience.
Helix’s biggest selling point is that it works right away. Setting up LSP support is very easy since no plugins are needed.
Helix also has multiple cursors which I’ve come to like for editing multiple lines comfortably. In Vim you can work around it but I prefer how Helix makes it easy.
However…
Helix can’t beat Vim for me .
There are many things I love about Vim like ranges , inserting the result of a command as text and other small things.
Vim has thousands of little tricks that make it really powerful. While the learning curve is steep, once you master it you have a powerful tool at your hand.
I haven’t reached that level with Helix and don’t think I will.
That’s not to say Helix is a bad editor. It just isn’t right for my needs.
Working With C# on Macos M1 (Helix, Rider)
Published: 2023-08-09
Updated: 2023-08-09
UTC: 2023-08-09 00:00:00+00:00
URL: https://www.rockyourcode.com/working-with-c-sharp-on-macos-m1-helix-rider/I want to get into C# development, because my future project will likely be in C#.Content Preview
I want to get into C# development, because my future project will likely be in C#.
I wanted to use Rider , a JetBrains product. I am using IntelliJ (the flagship JetBrains IDE) at my day job, and I find it more powerful than VS Code.
I had a bit of difficulties to get Rider working on macOs.My alternative editor right now is Helix , a terminal editor.
There were also some small hiccups with setting up a language server support for Helix.
So here’s how I solved my problems with C# on macOs.
Install Dot.Net & Mono
I normally use homebrew to install my dependencies. Unfortunately, this doesn’t seem to play well with Rider.
So, instead, I manually downloaded the official installers for both Dot.net and Mono .
Don’t forget to add Mono to your
$PATH:export PATH=$PATH:/Library/Frameworks/Mono.framework/Versions/Current/bin/If you know how to get Rider working with homebrew, please let me know .
Rider
Follow this guide to set your toolchain.
Rider seems to have problems finding the installation folder, so head over the Rider settings under “Build, Execution, Deployment > Toolset and Build” .
You can find out your installation directory by running the following commands in your terminal:
which dotnet&
which monoHelix
The documentation has a guide on how to add OmniSharp as the language server fo C# .
But first we need to install OmniSharp.
Find the newest release on the official website .
I install my user packages into
~/.local/bin:# download & extract archive curl -sSL https://github.com/OmniSharp/omnisharp-roslyn/releases/download/v1.39.8/omnisharp-linux-arm64.tar.gz | tar xvzf - -C ~/.local/bin/ # make sure that we have the correct permissions chmod 744 ~/.local/bin/omnisharp/*Now, add the language server in
~/.config/helix/languages.toml:[[language]] name = "c-sharp" language-server = { command = "dotnet", args = [ "dotnet", "/Users/me/.local/bin/omnisharp/Omnisharp.dll", "--languageserver" ] }You need to use the absolute path as Helix can’t yet expand
~to your home folder .Recap
The biggest hurdle was the Rider setup as I’ve been sifting through the support forum for JetBrains to find out why Rider doesn’t find mono or dotnet.
There were some issues for Linux users, but nothing about homebrew.
I think the underlying issue is that Rider just doesn’t work well without any folders that are not “standard”.
And it seems not to recognize the packages installed via homebrew into/opt/homebrew/bin.
Nextjs 13 With Prisma (MySQL) Planetscale and Vercel
Published: 2023-08-07
Updated: 2023-08-07
UTC: 2023-08-07 00:00:00+00:00
URL: https://www.rockyourcode.com/nextjs-13-with-prisma-mysql-planetscale-and-vercel/In the last two weeks I’ve been hacking away on a Next.js 13 application to learn more about React server components.Content Preview
In the last two weeks I’ve been hacking away on a Next.js 13 application to learn more about React server components.
I have used Prisma with a local Postgres database for development. I normally spin up my databases via docker.
When it came to deployment, it was easy enough to throw my app on Vercel, but I have been trouble finding a good free offering for Postgres.
In the past, I have used Heroku for such toy projects, but they’ve stopped their free tier. There have been new companies stepping up, for example, Railway, Render.com, Fly.io or Supabase.
Unfortunately, most of them have also placed limits on their free usages. Take Supabase: their Postgres instance only lives for 90 days, then it will be paused if the database doesn’t receive any requests. For a hobby project, that was not a good option for me. I don’t want to resume the Postgres database manually via the Supabase web interface.
I had high hopes for Fly.io. They offer a usage-based plan with a generous free threshold.
Turns out that you need a dedicated ipv4 address for the database for it to play nicely with Vercel’s edge functions .
This costs USD $2/month, which I don’t want to pay for a pet project. Sorry, folks.In the end, I’ve switched my database to MySQL and used Planetscale as my production database. The experience was seemless.
In the following article I’ll explain how I would set up a new project with Next.js and MySQL.
This guide assumes that you have Node.js, Docker and docker compose installed and working.
Local Development
- Create a new Next.js application
npx create-next-appAdd prisma:
npm i -D prisma
- Setup MySQL via docker compose & Docker
Create a folder for the database:
mkdir dbAdd Dockerfile to it (
db/Dockerfile):FROM bitnami/mysql:8.0.34 ADD local-init.sql /docker-entrypoint-initdb.dWe need an initialization script:
db/local-init.sql:CREATE USER 'user'@'%' IDENTIFIED BY 'password'; GRANT ALL PRIVILEGES ON * . * TO 'user'@'%';Why?
We want to reach the database on
localhoston our machine. By default, MySQL and MariaDB restrict connections other than to the local machine. The Docker container runs on a separate network. To connect from your local machine, you’ll need to use the % wildcard as the host.Now we need a
docker-compose.ymlin the root folder of our project:services: db: build: context: ./db dockerfile: Dockerfile ports: - 33306:3306 environment: - MYSQL_DATABASE=<database name> volumes: - db-data:/var/lib/mysql:delegated volumes: db-data:Replace the
<database name>with the name you want for your project.Now you should be able to use the database for local development via Docker and docker compose:
docker compose up -dThe connection string for MysQL would be:
DATABASE_URL="mysql://user:password@localhost:33306/<database-name>?schema=public"(Replace the database name.)
Prisma Schema
Create a database schema .
Planetscale has some differences to other databases which we need to take care of. For instance, you cannot use foreign key constraints, but need to emulate relations .
Here is how an example database schema would look like:
datasource db {
 provider = "mysql"
 url = env("DATABASE_URL")
 relationMode = "prisma" // use this to emulate relations
}

generator client {
 provider = "prisma-client-js"
}

model User {
 id Int @id @default(autoincrement())
 createdAt DateTime @default(now())
 email String @unique
 name String?
 role Role @default(USER)
 posts Post[]
}

model Post {
 id Int @id @default(autoincrement())
 createdAt DateTime @default(now())
 updatedAt DateTime @updatedAt
 published Boolean @default(false)
 title String @db.VarChar(255)
 author User @relation(fields: [authorId], references: [id])
 authorId Int

 @@unique([authorId, title]) // important
 @@index([authorId, author]) // important
}

enum Role {
 USER
 ADMIN
}
It’s important to use indexes because Prisma won’t do it for you implicitly when using the relation mode.
Deployment
Planetscale
Create new database and click on the button “Get connection strings” .
There’s an option for Prisma which you can use.
You need one admin account to run the migrations and one read-write one for the actual application. I have simply used the “main” branch for my production database.
Planetscale offers branching strategies (like git) for your database. I didn’t need those, as my development only happens locally, and I need Planetscale only for the final production deployment.
For that, I use a hacky technique.
I temporarily change my connection string in my local
.envfile to the admin connection string of my Planetscale DB:DATABASE_URL="mysql://xxxxx:xxxxxx@aws.connect.psdb.cloud/<database-name>?schema=public&sslaccept=strict"Please replace with your admin connection string. Important : add
sslaccept=strict.Then run migrations:
npx prisma migrate deployFor an alternative solution, you can read the blog post by shadcn .
Vercel
If you use GitHub or GitLab, it’s easy to deploy your Next.js application to Vercel.
You can import the project and are good to go.
As we’re using Prisma, there’s a little workaround needed for caching the Prisma client . Add the following postinstall script to
package.json:{ "scripts": { "postinstall": "prisma generate" } }Add the database connection string for your normal read/write account to the Vercel environment variables :
DATABASE_URL="mysql://xxxxx:xxxxxx@aws.connect.psdb.cloud/<database-name>?sslaccept=strict"Deploy and done.
Recap
Using Planetscale with Vercel is a dream combo. The integration is very easy. I was pleasantly surprised by Planetscale.
Especially in comparison to Fly.io it was very straightforward to spin up a database and connect it to external services (local machine and Vercel). They don’t even require a credit card for their hobby plan.Links
Update Gulp to Use ESM
Published: 2023-08-04
Updated: 2023-08-04
UTC: 2023-08-04 00:00:00+00:00
URL: https://www.rockyourcode.com/update-gulp-to-use-esm/I built my personal website in Eleventy a few years ago.Content Preview
I built my personal website in Eleventy a few years ago.
For this, I followed a course called Learn Eleventy From Scratch . A couple of years ago, Eleventy made a big splash as a simple JavaScript framework to build static websites.
Nowadays, Astro is probably more popular, but I have been happy with Eleventy so far.My Eleventy site has a Gulp pipeline to optimize images, get fonts, and transform sass.
I used Common JS syntax:
const { src, dest } = require('gulp')

const images = () => {
 // more code
}

module.exports = images
One of the packages in the pipeline is gulp-imagemin , which helps to minify PNG, JPG and other images.
The author has made the package pure ESM in its latest version, thus you cannot use it in a gulp pipeline that uses CommonJS.
In the following blog post, I’ll write down how to transfer the gulp pipeline to ESM.
This article follows the excellent guide Moving gulpfile from CommonJS (CJS) to ECMAScript Modules(ESM) .
How I updated my gulp pipeline to ESM
1. Update packages
I updated my packages to the latest versions. Here is the excerpt from
package.json:{ "devDependencies": { "get-google-fonts": "^1.2.2", "gulp": "^4.0.2", "gulp-clean-css": "^4.3.0", "gulp-imagemin": "^8.0.0", "gulp-sass": "^5.1.0", "sass": "^1.64.1" } }2. Update gulp to use ESM
I changed the file endings of all gulp files to
.mjs:
- gulp-tasks/fonts.mjs
- gulp-tasks/images.mjs
- gulp-tasks/sass.mjs
- gulpfile.mjs
3. Change syntax
Now comes the tedious part where you have to adjust how to import and export your modules correctly.
gulpfile.mjs:import gulp from 'gulp' const { parallel, watch: gulpWatch } = gulp // Pull in each task import fonts from './gulp-tasks/fonts.mjs' import images from './gulp-tasks/images.mjs' import sass from './gulp-tasks/sass.mjs' // Set each directory and contents that we want to watch and // assign the relevant task. `ignoreInitial` set to true will // prevent the task being run when we run `gulp watch`, but it // will run when a file changes. const watcher = () => { gulpWatch('./src/images/**/*', { ignoreInitial: true }, images) gulpWatch('./src/scss/**/*.scss', { ignoreInitial: true }, sass) } // The default (if someone just runs `gulp`) is to run each task in parallel export default parallel(fonts, images, sass) // This is our watcher task that instructs gulp to watch directories and // act accordingly export const watch = watcher
gulp-tasks/fonts.mjs:import GetGoogleFonts from 'get-google-fonts' const fonts = async () => { // Setup of the library instance by setting where we want // the output to go. CSS is relative to output font directory const instance = new GetGoogleFonts({ outputDir: './dist/fonts', cssFile: './fonts.css', }) // Grabs fonts and CSS from google and puts in the dist folder const result = await instance.download( 'https://fonts.googleapis.com/css2?family=Literata:ital,wght@0,400;0,700;1,400&family=Red+Hat+Display:wght@400;900' ) return result } export default fonts
gulp-tasks/images.mjs:import gulp from 'gulp' import imagemin, { mozjpeg, optipng } from 'gulp-imagemin' // Grabs all images, runs them through imagemin // and plops them in the dist folder const images = () => { // We have specific configs for jpeg and png files to try // to really pull down asset sizes return gulp .src('./src/assets/images/**/*') .pipe( imagemin( [ mozjpeg({ quality: 60, progressive: true }), optipng({ optimizationLevel: 5, interlaced: null }), ], { silent: true, } ) ) .pipe(gulp.dest('./dist/assets/images')) } export default images
gulp-tasks/sass.mjs:import gulp from 'gulp' import cleanCSS from 'gulp-clean-css' import * as dartSass from 'sass' import gulpSass from 'gulp-sass' const sassProcessor = gulpSass(dartSass) // Flags whether we compress the output etc const __prod__ = process.env.NODE_ENV === 'production' // An array of outputs that should be sent over to includes const criticalStyles = [ 'critical.scss', 'home.scss', 'page.scss', 'project.scss', ] // Takes the arguments passed by `dest` and determines where the output file goes const calculateOutput = ({ history }) => { // By default, we want a CSS file in our dist directory, so the // HTML can grab it with a <link /> let response = './dist/css' // Get everything after the last slash const sourceFileName = /[^/]*$/.exec(history[0])[0] // If this is critical CSS though, we want it to go // to the css directory, so nunjucks can include it // directly in a <style> if (criticalStyles.includes(sourceFileName)) { response = './src/css' } return response } // The main Sass method grabs all root Sass files, // processes them, then sends them to the output calculator const sass = () => { return gulp .src('./src/scss/*.scss') .pipe(sassProcessor().on('error', sassProcessor.logError)) .pipe( cleanCSS( __prod__ ? { level: 2, } : {} ) ) .pipe(gulp.dest(calculateOutput, { sourceMaps: !__prod__ })) } export default sassRecap
While a boring task, it’s actually pretty straightforward to support ESM for gulp and it works fine with Eleventy as a build pipeline.
Check out the links below for more info:
TIL: Insert Macros for the Helix Editor
Published: 2023-07-25
Updated: 2023-07-25
UTC: 2023-07-25 00:00:00+00:00
URL: https://www.rockyourcode.com/til-insert-macros-for-the-helix-editor/I’ve been using the Helix editor for two weeks now as my daily driver in my personal coding projects. Helix is a modern terminal text editor that’s quite capable as a tool for writing code.Content Preview
I’ve been using the Helix editor for two weeks now as my daily driver in my personal coding projects.
Helix is a modern terminal text editor that’s quite capable as a tool for writing code.A Kakoune / Neovim inspired editor, written in Rust.
Features
- Vim-like modal editing
- Multiple selections
- Built-in language server support
- Smart, incremental syntax highlighting and code editing via tree-sitter
After some initial bumps in the road due to my Vim muscle memory, I have grown quite fond of Helix. For my pet projects (TypeScript) it works well.
The language server support is great. It offers me the convenience I am used to from other editors (IntelliJ) - auto-complete functionality, hover information and so forth.
Helix is not a fully-fledged IDE, but it doesn’t aim to be one. It is supposed to be an alternative to Kakoune or Vim/NeoVim.Insert Macros
My NeoVim config sports an “insert macro” for the fat arrow (=>). When I type ‘hsr’ in insert mode, the editor automatically replaces these three characters with a fat arrow (hashrocket).
Here is how the key mapping looks in Vim:
# custom/keymappings.vim
inoremap hsr =>
And the same config in lua (NeoVim):
vim.api.nvim_set_keymap('i', 'hsr', '=>', { silent = true, noremap = true }),This can also be achieved in Helix:
# ~/.config/helix/config.toml
h = { s = { r = ["normal_mode", ":insert-output echo '=>'", "collapse_selection", "insert_at_line_end"] } }
Links
Kickstart Your Neovim Journey With kickstart.nvim
Published: 2023-07-06
Updated: 2023-07-06
UTC: 2023-07-06 00:00:00+00:00
URL: https://www.rockyourcode.com/kickstart-your-neovim-journey-with-kickstart-nvim/I’ve been curating my Vim config for several years and it has blown up to several files and a lot of obscure settings. My Vim config is my own, a very individual piece of software that fits my preferences when it comes to text editing.Content Preview
I’ve been curating my Vim config for several years and it has blown up to several files and a lot of obscure settings.
My Vim config is my own , a very individual piece of software that fits my preferences when it comes to text editing.Since NeoVim 0.8, the Vim fork has introduced new groundbreaking features that allow for smarter autocompletion and language server support.
Lua has also become the preferred way of configuring NeoVim, letting VimScript fall out of favor.
I’ve been grudglingly spending some time to partly port my config to lua to take advantage of the new NeoVim features. But I wasn’t happy with my clobbled-together setup anymore.
A friend on Discord suggested LazyVim to me. LazyVim is a fully-fledged config that transforms the barebones NeoVim config into a powerful IDE.
I tried it out a few weeks ago, but it was a little too much magic for me.
If you are looking for a “one-size-fits-all”-solution, look no further. If you are coming from a different editor like VS Code, LazyVim offers a nice experience out of the box.But for me, it felt as if I had to “learn a new editor” again. There are many plugins and configurations and you have to spend some time figuring out what’s going on.
This weekend I discovered kickstart.nvim which solves (almost) all my problems.
kickstart.nvim is a minimal configuration that sets some defaults, installs the language server and a few other plugins, adds several key mappings. That’s it.
The configuration is much more digestable than the more fully-fledged LazyVim and I felt that I was able to understand easily what was going on.kickstart.nvim is meant as a starting point and it excells at that. Out of the box you get an agreeable NeoVim experience, but it doesn’t overwhelm you.
Adding your preferred plugins and keybindings is also quite easy.I’m pretty happy that I stumbled over this GitHub repo . Maybe it’s worth a look, if you’re interested in a minimal but sufficient NeoVim config.
Links
How to Download HTML Elements as PDF
Published: 2023-06-22
Updated: 2023-06-22
UTC: 2023-06-22 00:00:00+00:00
URL: https://www.rockyourcode.com/how-to-download-html-elements-as-pdf/As software developers, we often come across situations where we need to provide users with the option to download HTML content as a PDF document. This capability can be especially valuable when we want to enable users to save web pages, reports, or other dynamically generated content for offline use or easy sharing. In this article, we will explore how to accomplish this using jsPDF, a widely used JavaScript library for generating PDF files, along with SVG.Content Preview
As software developers, we often come across situations where we need to provide users with the option to download HTML content as a PDF document. This capability can be especially valuable when we want to enable users to save web pages, reports, or other dynamically generated content for offline use or easy sharing. In this article, we will explore how to accomplish this using jsPDF, a widely used JavaScript library for generating PDF files, along with SVG.
Example in Angular
Let’s consider a practical code example in Angular that demonstrates how to download an HTML element as a PDF with the help of jsPDF and svg rendering.
However, the code can be used in other web frameworks like React.js, Svelte or vanilla JavaScript.
import { elementToSVG } from 'dom-to-svg'
import { Canvg } from 'canvg'
import { jsPDF } from 'jspdf'

// Angular component code
@Component({
 selector: 'my-app',
 standalone: true,
 imports: [CommonModule],
 styles: [
 `
 .save-as-pdf {
 margin: 0;
 padding: 0;
 background-color: lightblue;
 }
 `,
 ],
 template: `
 <button (click)="onSaveAsPdf()">Save as PDF</button>
 <div class="save-as-pdf">
 <h1>Hello from {{ name }}!</h1>
 <a target="_blank" href="https://angular.io/start">
 <p>Learn more about Angular</p>
 </a>
 <p>Save HTML with jsPDF</p>
 </div>
 `,
})
export class App {
 name = 'Angular'

 async onSaveAsPdf() {
 // Find the HTML element to convert to PDF
 const element = <HTMLElement>document.querySelector('.save-as-pdf')

 const width = element.clientWidth
 const height = element.clientHeight

 // Create SVG
 const svgDoc = elementToSVG(element)
 const svgString = new XMLSerializer().serializeToString(svgDoc)

 // Create a canvas
 const canvas = document.createElement('canvas')
 canvas.height = height
 canvas.width = width
 const ctx = canvas.getContext('2d')

 if (!ctx) {
 throw new Error('Error creating the HTML canvas with 2D context')
 }

 // Render the SVG onto the canvas
 const canvg = await Canvg.from(ctx, svgString)
 await canvg.render()

 // Determine PDF orientation and create a PDF document
 const isLandscape = width > height
 const orientation = isLandscape ? 'landscape' : 'portrait'
 const doc = new jsPDF(orientation, 'px', [width, height])

 // Add the rendered canvas as a JPEG image to the PDF and save
 doc.addImage(canvas, 'JPEG', 0, 0, width, height)
 doc.save('Hello from Angular.pdf')
 }
}
To begin, we have an Angular component that includes a button labeled “Save as PDF” and an HTML element designated with the CSS class
.save-as-pdf. When users click the button, it triggers theonSaveAsPdf()method.Inside the
onSaveAsPdf()method, the following steps are performed to download the HTML element as a PDF:
The HTML element is identified using
document.querySelector('.save-as-pdf'). This allows us to target the specific element we want to convert to a PDF.We calculate the width and height of the element to determine the dimensions of the canvas and the resulting PDF.
The HTML element is transformed into an SVG document using the
elementToSVG()function. This step is essential.The SVG document is serialized into a string using
XMLSerializer(). This conversion prepares the SVG for rendering onto a canvas.We create a canvas element with the calculated dimensions and obtain its 2D context. The canvas will serve as the rendering surface for the SVG.
Using the
Canvglibrary, we render the SVG onto the canvas. This process ensures that the visual representation of the HTML element is accurately captured.Based on the dimensions of the element, we determine the orientation of the resulting PDF (landscape or portrait). Then, using jsPDF, we create a new PDF document with the appropriate orientation.
The rendered canvas is added to the PDF as a JPEG image using the
doc.addImage()method. This step embeds the visual representation of the HTML element into the PDF.Finally, we save the PDF with a specified filename using the
doc.save()method.Summary
You have seen a practical approach to enable users to download HTML content as a PDF document using jsPDF in conjunction with SVG rendering. The provided code example in Angular illustrates the step-by-step process of converting an HTML element into a PDF.
By following the outlined steps, you can easily capture and save dynamic web content.
Source/Links
Thanks go to Manuel Navarro for the original implementation using similar libraries .
If you want to see a live example of the article, you can check this Stackblitz .
Use CSS Grid for Decorative Elements
Published: 2023-03-09
Updated: 2023-03-09
UTC: 2023-03-09 00:00:00+00:00
URL: https://www.rockyourcode.com/use-css-grid-for-decorative-elements/I learned this trick in Rachel Andrew’s workshop.Content Preview
I learned this trick in Rachel Andrew’s workshop .
HTML:
<h1>My heading</h1>CSS:
h1 {
 display: grid;
 grid-template-columns: 1fr auto 1fr;
 gap: 1em;
}

h1::before,
h1::after {
 content: '';
 border-top: 1px solid black;
 align-self: center;
}
In the code example provided, we can see how CSS Grid is used to style a heading. The “h1” element is selected in the CSS, and then the “grid” property is applied. This tells the browser to use CSS Grid to create a layout for the heading.
The “grid-template-columns” property specifies the number and width of the columns in the grid. In this case, there are three columns, with the center column set to “auto”. This means that the width of the center column will adjust automatically to fit the content within it.
The “gap” property sets the spacing between the columns and rows in the grid. In this example, there is a 1em gap between each column.
In addition to using CSS Grid to create the layout, the code also demonstrates how generated content can be used to add visual elements to the design. The “::before” and “::after” pseudo-elements are used to create horizontal lines above and below the heading. The “content” property is set to an empty string, so the pseudo-elements do not actually generate any content. Instead, they are used purely for styling purposes.
Links
- CSS Layout Workshop by Rachel Andrew
- YouTube
Use @Hostbinding to Access CSS Variables in an Angular Component
Published: 2023-03-07
Updated: 2023-03-07
UTC: 2023-03-07 00:00:00+00:00
URL: https://www.rockyourcode.com/use-hostbinding-to-access-css-variables-in-an-angular-component/Last week, I needed to access a CSS variable in an Angular template to configure a Chart.js chart.Content Preview
Last week, I needed to access a CSS variable in an Angular template to configure a Chart.js chart.
You can use
@HostBindingto achieve this.What is
@HostBinding?
@HostBindingis an Angular decorator that allows developers to bind a directive property to a host element property. It is used to set a property value on the host element of a component, in this case the component’s root element. This decorator is used in conjunction with the host property of the@Directivedecorator to define a host element.Here’s an example of how to use @HostBinding to access a CSS variable in your Angular component.
Define your CSS variable in your
.cssfile::root { --primary-color: #007bff; }In your component, create a @HostBinding property to bind the value of your CSS variable to a CSS custom property:
@HostBinding('style.--primary-color')
primaryColor = getComputedStyle(document.documentElement)
 .getPropertyValue('--primary-color');
This code binds the value of the
--primary-colorCSS custom property to theprimaryColorproperty of your component.Now you can access the variable in your Angular component to style your chart:
datasets = [
 {
 label: 'Dataset 1',
 data: Utils.numbers(NUMBER_CFG),
 borderColor: this.primaryColor,
 }
 // more datasets
 ]
 //
If you change your styles in the
.cssfile, your Angular component will pick it up and use the correct color.Further Reading
Angular Workspaces as Alternative to Nx Monorepo
Published: 2023-02-18
Updated: 2023-02-18
UTC: 2023-02-18 00:00:00+00:00
URL: https://www.rockyourcode.com/angular-workspaces-as-alternative-to-nx-monorepo/Today I learned that you can create monorepo workspaces with Angular. I’ve always used nx, but if you don’t want to use a third-party tool, the built-in Angular capabilities might be enough.Content Preview
Today I learned that you can create monorepo workspaces with Angular .
I’ve always used nx , but if you don’t want to use a third-party tool, the built-in Angular capabilities might be enough.Angular Workspaces
ng new my-workspace --no-create-application
cd my-workspace
If you use pnpm :
pnpm dlx @angular/cli new my-workspace --no-create-application --package-manager pnpm
cd my-workspace
This creates the following directory structure:
.
├── README.md
├── angular.json
├── node_modules
├── package.json
├── pnpm-lock.yaml
└── tsconfig.json
Now you can create new applications like so:
ng generate application my-first-appFor pnpm:
pnpm dlx @angular/cli g application my-first-appOr libraries:
pnpm dlx @angular/cli g lib my-first-libHere is an example folder structure with a
dashboardapp and ashared-uilibrary:. ├── README.md ├── angular.json ├── package.json ├── pnpm-lock.yaml ├── projects │ ├── dashboard │ │ ├── src │ │ │ ├── app │ │ │ ├── assets │ │ │ ├── favicon.ico │ │ │ ├── index.html │ │ │ ├── main.ts │ │ │ └── styles.scss │ │ ├── tsconfig.app.json │ │ └── tsconfig.spec.json │ └── shared-ui │ ├── README.md │ ├── ng-package.json │ ├── package.json │ ├── src │ │ ├── lib │ │ └── public-api.ts │ ├── tsconfig.lib.json │ ├── tsconfig.lib.prod.json │ └── tsconfig.spec.json └── tsconfig.jsonNow you can easily import components from the
shared-uiin yourdashboardapp.Another option is to use npm workspaces or pnpm workspaces . I found a good tutorial for creating a workspace with pnpm , so I won’t rehash it here.
If you use an npm/pnpm workspace together with Angular workspaces, you should take care to let Angular handle the Angular parts and npm/pnpm to handle the parts.
Why?
npm expects that the output of the build folder is in the same folder as the library. But if you create an Angular library, the output of the build will be in the main dist folder. This confuses npm.
Links
Creating a Smooth Fade in Fade/Out Animation Effect With CSS
Published: 2023-02-16
Updated: 2023-02-16
UTC: 2023-02-16 00:00:00+00:00
URL: https://www.rockyourcode.com/creating-a-smooth-fade-in-fade-out-animation-effect-with-css/Have you ever wanted to gradually float a toast message into your screen?Content Preview
Have you ever wanted to gradually float a toast message into your screen?
One way to do this is by adding an animation effect, and a fade-in/fade-out transition is just the thing I needed.
In this article, I want to show you how to create a smooth fade-in/fade-out effect using CSS, with a faster fade-in time and a slower fade-out time.
To create this effect, we can use the following code:
.fade-in-out {
 opacity: 0;
 animation: fade-in 1s ease-in forwards, fade-out 4s 1s ease-out forwards;
}

@keyframes fade-in {
 100% {
 opacity: 1;
 }
}

@keyframes fade-out {
 0% {
 opacity: 1;
 }
 100% {
 opacity: 0;
 }
}
Here’s how it works: we start by defining a class called “fade-in-out” and apply it to the element we want to animate. We set the initial opacity to 0 to make the element invisible.
Next, we define two keyframe animations: “fade-in” and “fade-out”. The “fade-in” animation gradually increases the opacity of the element from 0 to 1, while the “fade-out” animation gradually decreases the opacity from 1 to 0.
The “fade-in” animation has a single keyframe at 100% that sets the opacity to 1. It runs for 1 second and uses the “ease-in” timing function to start slowly and speed up.
The “fade-out” animation has two keyframes: one at 0% and one at 100%. The first keyframe sets the opacity to 1, so the element is fully visible at the start of the animation. The second keyframe sets the opacity to 0, so the element is fully invisible at the end. This animation runs for 4 seconds and uses the “ease-out” timing function, which means it starts quickly and slows down.
Finally, we apply both animations to the “fade-in-out” class using the “animation” property. The “forwards” keyword means that the final state of the animation will be retained after it’s finished.
To use this effect, simply apply the “fade-in-out” class to the element you want to animate. You can customize the duration and timing functions of the animations to create different effects.
Links
Maximize Learning at Conferences and Meetups
Published: 2022-12-23
Updated: 2022-12-23
UTC: 2022-12-23 00:00:00+00:00
URL: https://www.rockyourcode.com/maximize-learning-at-conferences-and-meetups/Here are some notes from the Youtube video Maximize Learning At Conferences & Meetups with Joe Eames with Brooke Avery and Joe Eames.Content Preview
Here are some notes from the Youtube video Maximize Learning At Conferences & Meetups with Joe Eames with Brooke Avery and Joe Eames.
What do community gatherings offer?
The atmosphere creates a zeal that cannot be replicated from home.
If you want to get better at something, get involved in the community.
This creates opportunity.Some Tips:
- leave work at home
- stay and engage until they kick you out
- be involved
- showing up is 90% of the work
What should you do if you’re an introvert?
- try 1-on-1
- participate in the activity (which can act as a frame for the social interaction)
- put down your phone
- be available
- other people will approach you, if you show up
- “think and share”
Note Taking
- take analog notes of keywords, so you can look it up later
- don’t use digital tools (to avoid distractions)
- take home new ideas
Learn Topics
- talk about what you want to learn, so others can help you
Meetups
- if you can, attend in person (offline)
- a good place to “learn to teach”, as the barrier is low
Links
Verify Your Online Accounts With Keyoxide
Published: 2022-11-16
Updated: 2022-11-16
UTC: 2022-11-16 00:00:00+00:00
URL: https://www.rockyourcode.com/verify-your-online-accounts-with-keyoxide/Keyoxide is a privacy-friendly t1. ool to create and verify decentralized online identities.Content Preview
Keyoxide is a privacy-friendly t1. ool to create and verify decentralized online identities.
Just like passports for real life identities, Keyoxide can be used to verify the online identity of people to make sure one is interacting with whom they are supposed to be and not imposters. Unlike real life passports, Keyoxide works with online identities or “personas”, meaning these identities can be anonymous and one can have multiple separate personas to protect their privacy, both online and in real life.
The tool helps you to verify your online profiles like GitHub, Mastodon, dev.to and others.
Here is my profile .
Acknowledgements :
I used Bill Rawlinson’s guide as a reference.
During setup, I encountered some pitfalls. This article is an attempt to clarify and document the process by rewriting the original source.In this article you’ll learn:
- how to setup a GPG key and what to do to use it with keyoxide
- how to verify your Mastodon, dev.to & GitHub account
- how to setup a keyoxide account
What Do I Need?
Keyoxide is a weird beast.
It wasn’t clear to me how to get a keyoxide account.
Do I need to sign up somewhere?The answer is: No, you don’t need to sign up for keyoxide.
But you need to create a GPG key pair and you need to upload it to keys.openpgp.org .
You’ll also need a valid email address.
This email address will be public on the Keyoxide website.The GPG key pair needs a secure passphrase, so a password manager is recommended.
GPG Setup
First, we need GnuPGP on our local machine.
On macOs, you can install it via homebrew .
In your terminal, type:
brew install gnupgArch Linux (with yay ):
yay -S gnupgCreate a Key Pair
Again, you need to use the terminal:
macOs:
gpg --full-generate-key(Arch) Linux:
gpg --full-gen-key
- Choose
RSA and RSA(option 1).- Keysize: 4096
- Expiration date: 2y (2 years, you can extend the expiration)
- Real name: you don’t need to use your real name, but this is the handle which will appear on your keyoxide side
- email: use an email address that works and that you have access to (you can also add more email addresses later)
- optional comment: leave blank
- secure passphrase: use your password manager to create a password (and save it in your password manager together with the email address!)
You’ll be asked to generate some randomness, so you can move your cursor to help GPG to create your key.
Get Your Fingerprint
In your terminal, run the following command:
gpg -kThe answer will look like similar to this:
pub rsa4096 2020-07-01 [SC]
 <HERE IS YOUR FINGERPRINT>
uid [ultimate] My name <valid@email.address>
Your keyoxide URL will be
https://keyoxide.org/FINGERPRINT. It will not work right now, but we’ll come back to it later.I know, it is confusing.
More info on the Keyoxide website .
Add Your Accounts
Mastodon
For Mastodon, you’ll need to set profile metadata .
- go to your profile in Mastodon (
https://<your instance url>/profile/settings/profile)- edit your profile
- scroll down to “Profile metadata”
- add a label “keyoxide”
- as content add your keyoxide URL (
https://keyoxide.org/FINGERPRINT)Read more about Mastodon on the keyoxide docs .
GitHub
Create a new public GitHub gist .
Important : The file name must be
openpgp.md!The description for the file can be whatever you like.
As content for the file, add the following:
[Verifying my cryptographic key:openpgp4fpr:FINGERPRINT]Read more about GitHub on the keyoxide docs .
dev.to
Make a new blog post. The title does not matter, I chose “Keyoxide Proof” (see example ).
The content of the post is the following:
[Verifying my keyoxide cryptographic key: https://keyoxide.org/FINGERPRINT]Yes, it’s a public post which will look strange.
Add All Your Proofs to Your Gpg Key
Now we need to go back to the command-line.
gpg --edit-key YOUR_EMAIL_ADDRESSor
gpg --edit-key FINGERPRINTReplace with your email address.
This will open a command prompt.
- type:
uid 1(to select your user ID)- type:
notation- enter the notation:
proof@ariadne.id=https://URL_TO_YOUR_GIST(replace with your Gist URL)- you will be asked for your passphrase, enter it now (you used a password manager, right?)
- repeat the process for your other accounts, type
notationagain- enter the notation:
proof@ariadne.id=https://dev.to/YOUR_USERNAME/BLOG_POST_URL(replace with your dev.to blog post URL)- same again for all other accounts
For example, the notation for Mastodon is:
proof@ariadne.id=https://YOUR_MASTODON_INSTANCE/@YOUR_USERNAMEExample:
proof@ariadne.id=https://hachyderm.io/@sbrHow to Show Your Notations for a Key?
gpg --edit-key FINGERPRINTShow a list of user IDs to find the index, select it:
list
uid N # for example: uid 1
Show a list of notations:
showprefHow to Delete a Notation?
What happens if you made a mistake?
To delete an existing notation, you need to add it again, but with a minus symbol:
-key=valueUpload Your GPG Key
Finally, you need to upload your public key to the OpenPGP.org .
First, we’ll need to find a way to export our public key for upload. In your terminal, type the following:
gpg --armor --export YOUR_EMAIL_ADRESS > pubkey.ascReplace with your email address. Don’t forget the greater than sign (
>).Open the OpenPGP website and upload the
pubkey.asc.Now you can go to your keyoxide URL and check if it works.
It might take a few minutes, but the process is reasonably fast.What Happens if I Want to Add More Accounts?
If you later want to add more accounts, you can go through the process again.
First, find a way to way to create a proof , then edit the GPG key.
Upload the key .Keyoxide will pick up the changes.
How Can I Export My Key Pair?
If you want to backup your key pair, you can read this article on how to export both the public and private key .
Links
Use Environment Variables With VuePress 2
Published: 2022-11-07
Updated: 2022-11-07
UTC: 2022-11-07 00:00:00+00:00
URL: https://www.rockyourcode.com/use-environment-variables-with-vuepress-2/For $DAYJOB I had to build a new feature for our internal VuePress 2 documentation.Content Preview
For
$DAYJOBI had to build a new feature for our internal VuePress 2 documentation.I needed to fetch data from an API that needs an API token. That’s why I wanted to use environment variables to store the token, both locally as well in our CI pipeline .
Surprisingly this was hard to figure out. It didn’t help that I’ve never worked with Vue.js or VuePress. The documentation was of limited help.
For example, I stumbled upon the famous error when trying to use
process.envin a Vue component:process is not definedI’ll show you how you can use environment variables in VuePress in the following article.
Goal
We want to be able to use a local file called
.env(or something similar like.env.local) to store sensitive data.Example content of the
.envfile:GOOGLE_API_TOKEN='abcdefghi12345'We want to be able to use this token in the JavaScript part of Vue .
Example:
<script>
import fetch from 'cross-fetch'

async function fetchData() {
 const response = await fetch('some-url', {
 method: 'GET',
 headers: {
 // here we need our token 👇
 Authorization: `Token token=`,
 },
 })
 return response.json()
}
</script>
Note about cross-fetch
I've installed this library to be able to use the fetch API in Node.js during VuePress's generate step.
In the generate phase Node.js builds all pages, so we don't have the fetch API (browser-only until Node 18) at our disposal.
Problem
I couldn’t find a guide in the VuePress documentation , the top StackOverflow question seems outdated, and the GitHub issue only got me 90% to the solution.
Solution
There is one library we need to install:
npm i dotenv
dotenvis a popular JavaScript library which allows us to load environment variables from files. Exactly our use case!Now we need to adjust the configuration for VuePress. You can read more about the Config file in the docs .
Add
dotenvto the Vue config file (config.js):// all other imports, e.g. // import { registerComponentsPlugin } from '@vuepress/plugin-register-components'; import * as dotenv from 'dotenv' dotenv.config()The above code allows us to read our API token from the environment file. But how can we pass the variable to our frontend Vue component?
You cannot do this:
<script>
const TOKEN = process.env.GOGGLE_API_TOKEN
</script>
The Vue component in VuePress can be a client-side component. The browser can’t access
process, that’s Node.js-only.You’ll see this error:
process is not definedVuePress has a hook to define global constants for the client code .
Add the following to your config object in
config.js:export default defineUserConfig({ // previous configuration // dest: 'public', // lang: 'de-DE', define: { __TOKEN__: process.env.GOOGLE_API_TOKEN, }, })Now you can do the following in your Vue component:
<script>
import fetch from 'cross-fetch'

async function fetchData() {
 const response = await fetch('some-url', {
 method: 'GET',
 headers: {
 // here we can access the global constant 👇
 Authorization: `Token token=${__TOKEN__}`,
 },
 })
 return response.json()
}
</script>
The
__TOKEN__variable will “magically” work.Summary
Here we have a working solution. Maybe there’s a better way.
I don’t like to use global constants. If you work with the Vue component it’s not clear where the variable comes from.But that’s at least a working solution.
Links
Notes on “Building a Pragmatic Unit Test Suite”
Published: 2022-10-30
Updated: 2022-10-30
UTC: 2022-10-30 00:00:00+00:00
URL: https://www.rockyourcode.com/notes-on-building-a-pragmatic-unit-test-suite/Here are some notes on the course “Building a Pragmatic Unit Test Suite” by Vladimir Khorikov.Content Preview
Here are some notes on the course “Building a Pragmatic Unit Test Suite” by Vladimir Khorikov.
Goals and Guidelines
Unit tests help with confidence : you know that changes don’t break functionality.
Not all unit tests are equal.
Coverage metrics are problematic: you can work around them, for example, by writing assertion-free unit tests.
Coverage metrics are a good negative indicator, but 100% test coverage is impractical.Test are code, and you also have to pay a maintenance cost for your tests.
What makes a unit test valuable?
- carefully choose code to test
- use the most valuable tests only
A good unit test:
- has a high chance of catching a regression error
- has a low chance of producing a false positive
- provides fast feedback
- has low maintenance cost
Testing trivial code is not worth the cost.
Decouple tests from implementation details as much as possible.
Spend most of the time on testing business logic.
Styles of Unit Testing
- output-based verification (functional style)
- state verification
- collaboration verification (uses test doubles )
Hexagonal Architecture
_image from Wikipedia _
Implementation Detail
Public API is the surface area that you can access from outside a class.
What are the requirements?
- address an immediate goal of the client code
- address that goal completely
Look at the client code: if it uses more than 1 operation to achieve a single goal, the class is leaking implementation details.
Note: Neighboring classes might be aware of implementation details.
Example: the Root Entity of an Aggregate (Domain Driven Design) might know about implementation details of the Entities.Communication inside a hexagon is implementation detail.
Between hexagons a public API of the hexagon exist (contract).Styles
- functional style: has no state, easy to maintain, offers the best protection against false positive
- state verification: should verify through public API, reasonable maintenance cost
- collaboration verification: within the hexagon lots of false positives; between hexagons more stable
Black-Box Testing Vs. White-Box Testing
- black-box testing: testing without knowing the internal structure
- white-box testing: testing the internal structure
Adhere to black-box testing as much as possible.
Business Requirements
Does the test verify a business requirement?
- view your code from the end user’s perspective
- verify its observable behavior
Integration Tests
- test data cleanup: wipe out all data before test execution
Unit Testing Anti-Patterns
- private methods: if needed expose the hidden abstraction by extracting a new concept
- expose state getters: test the observable behavior only
- leaking domain knowledge to tests: use property-paced testing, or verify end result
- code pollution (introduce additional code just to enable unit testing)
- overriding methods in classes-dependencies: violates single-repository-principle, instead split functionality into different pieces
- non-determinism in tests: try to avoid testing async code (separate code into async/sync), use Tasks
Links
My First T3 App
Published: 2022-10-25
Updated: 2022-10-25
UTC: 2022-10-25 00:00:00+00:00
URL: https://www.rockyourcode.com/my-first-t3-app/tRPC is the hottest new thing in the TypeScript ecosystem: build end-to-end type-safe APIs without the overhead of GraphQL.Content Preview
tRPC is the hottest new thing in the TypeScript ecosystem: build end-to-end type-safe APIs without the overhead of GraphQL.
tRPC is a protocol to expose a function of your backend to your frontend using TypeScript type definitions.
No code generation required. You write both your backend and your frontend with TypeScript and share the types.tRPC is framework-agnostic.
Create-t3-app is build on top of tRPC. It offers an opinionated starter template that helps with building a complete web application with Next.js and Prisma.
This blog post chronicles my journey in creating my first T3 app. Let’s see how the T3 stack works!
Create Application
pnpm dlx create-t3-app@latestThe command guides you through the installation process and allows you to choose a few options (trpc, prisma, next-auth, tailwind).
I am happy to see that the command also works with pnpm out of the box.
The command bootstraps the application. At the end of the process, there is a hint on what commands to run:
cd my-t3-app
pnpm install
pnpm prisma db push
pnpm dev
The project also offers a
READMEfile with minimal information to get you started.Prisma
My application should show cat pictures because the internet loves cats.
Let’s adjust the Prisma schema:
generator client {
 provider = "prisma-client-js"
}

datasource db {
 provider = "sqlite"
 url = env("DATABASE_URL")
}

+model Cat {
+ id String @id @default(cuid())
+ createdAt DateTime @default(now())
+ updatedAt DateTime @updatedAt
+ imageUrl String
+}
This looks like a minimal example for a first application. Run
pnpm exec prisma migrate dev --name add_cat_model.tRPC Router
My next instinct is to hook up the trpc router. The project comes with an example router in
src/server/router/example.ts. I’ll adjust that to be a cat router.The router uses zod , a schema-validation library, to build a router.
The example query has an input parameter of the String type.
For my case, I want a random cat picture, so no input is needed. Can I just delete the input parameter and return a random cat?Before:
import { createRouter } from './context'
import { z } from 'zod'

export const exampleRouter = createRouter()
 .query('hello', {
 input: z
 .object({
 text: z.string().nullish(),
 })
 .nullish(),
 resolve({ input }) {
 return {
 greeting: `Hello ${input?.text ?? 'world'}`,
 }
 },
 })
 .query('getAll', {
 async resolve({ ctx }) {
 return await ctx.prisma.example.findMany()
 },
 })
After:
import { createRouter } from './context'
import { Cat } from '@prisma/client'

export const catRouter = createRouter()
 .query('random', {
 async resolve({ ctx }) {
 const randomCats = await ctx.prisma.$queryRaw<Cat[]>`SELECT id, imageUrl
 FROM Cat
 ORDER BY RANDOM()
 LIMIT 1`
 return randomCats[0]
 },
 })
 .query('getAll', {
 async resolve({ ctx }) {
 return await ctx.prisma.cat.findMany()
 },
 })
I use a raw SQL query to retrieve a random cat from the database and add a typing for
Cat[].
That’s not pretty and does not give me the advantage of using the schema validator, but Prisma doesn’t implement getting a random record . So raw SQL it is!The raw query returns an array in any case, so we select the first element and return it.
Seed Script
Before I try to hook up the frontend, I remember that I don’t have any example data in my database.
Luckily, the Prisma documentation can help me .
Add a new entry to
package.json:{ "prisma": { "seed": "ts-node --compiler-options {\"module\":\"CommonJS\"} prisma/seed.ts" } }Create a new seed script in the
prismafolder (prisma/seed.ts):import { PrismaClient } from '@prisma/client' import { fetch } from 'next/dist/compiled/@edge-runtime/primitives/fetch' const prisma = new PrismaClient() async function main() { const requests = Array(10) .fill('https://aws.random.cat/meow') .map((url) => fetch(url)) Promise.all(requests) // map array of responses into an array of response.json() to read their content .then((responses) => Promise.all(responses.map((r) => r.json()))) // insert all responses as imageUrl .then((cats) => cats.forEach( async (cat) => await prisma.cat.create({ data: { imageUrl: cat.file } }) ) ) } main() .then(async () => { await prisma.$disconnect() }) .catch(async (e) => { console.error(e) await prisma.$disconnect() process.exit(1) })I fetch ten image URLs from an API that offers random cat images and insert them into the database. Quite ugly, but it works.
In my terminal, I run type the following command:
pnpm exec prisma db seedSuccess!
Hook Up the Client
Finally, we can try to show this data on the browser.
After ripping out the example router and replacing it with my cat router, I check
src/pages/index.tsx.It has some boilerplate which I adjust to my needs:
import type { NextPage } from 'next'
import Head from 'next/head'
import Image from 'next/image'
import { trpc } from '../utils/trpc'

const Home: NextPage = () => {
 const { data: cat } = trpc.useQuery(['cat.random'])

 return (
 <div style={{ display: 'grid', placeItems: 'center' }}>
 <Head>
 <title>T3 Cats</title>
 <meta name="T3 cats" content="Generated by create-t3-app" />
 <link rel="icon" href="/favicon.ico" />
 </Head>
 <div>
 <h1 style={{ textAlign: 'center' }}>
 Create <span>T3</span> App
 </h1>

 <section>
 <div>
 {cat ? (
 <Image
 src={cat.imageUrl}
 alt={`random cat ${cat.id}`}
 layout={'fixed'}
 width={300}
 height={300}
 />
 ) : (
 <p>Loading...</p>
 )}
 </div>
 </section>
 </div>
 </div>
 )
}

export default Home
That was surprisingly easy, especially if you are familiar with Prisma.
First Impressions
The starter template does a good job on guiding you through the process.
The examples are enough to paint a broad picture on how trpc with Next.js works. Familiarity with prisma is assumed.
You might need to consult the Prisma documentation, trpc is almost self-declaratory, Prisma is not.
Links
Write Better in Neovim With Languagetool
Published: 2022-10-02
Updated: 2022-10-02
UTC: 2022-10-02 00:00:00+00:00
URL: https://www.rockyourcode.com/write-better-in-neovim-with-languagetool/LanguageTool is a grammar tool and spell checker with an open-source core.Content Preview
LanguageTool is a grammar tool and spell checker with an open-source core.
I have used grammarly for a while, but the browser extension was crap.
A colleague recommended LanguageTool (LT), and I’ve been a happy user of the browser extension ever since.LT has superior support for other languages than English. It also features decent suggestions for improving your grammar. The free tier of LT has been a better experience for me than grammarly.
Did you know that you can use LT as a language server for NeoVim and other editors?
Install ltex-ls
LT has no direct support for the language server protocol , but fear not – a clever programmer has included the LT server in his LSP implementation.
The tool is called ltex-ls , and it’s free software.
You can find the installation instructions on the ltex-ls website .
For macOS, you can use homebrew :
brew install ltex-lsThe command installs the server as
ltex-lsin your standard homebrew location and thus adds it to your$PATH.If you manually install the program, make sure to add the binary to your
$PATH, for example withfish_add_path.Integration With nvim-lsp
Check the recommended configuration on the nvim-lsp GitHub and add the following configuration:
require('lspconfig')['ltex']({
 on_attach = on_attach,
 cmd = { "ltex-ls" },
 filetypes = { "markdown", "text" },
 flags = { debounce_text_changes = 300 },
})
You should add the server command into the
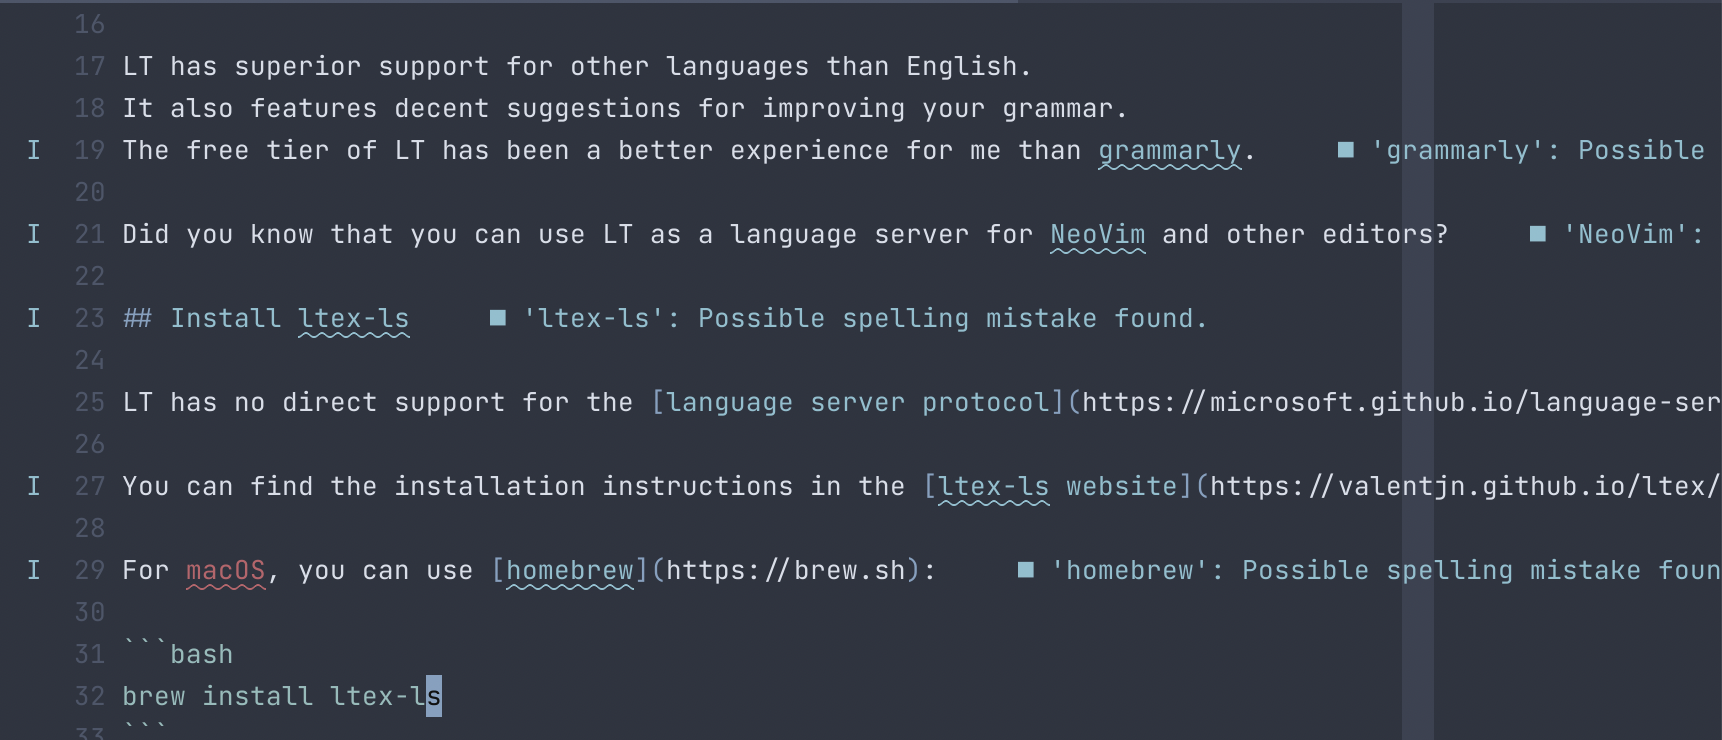
cmdsection. On macOS,ltex-lsworked fine for me.Here you can see how the tool points out possible errors in my text:
Other Editors
I originally found the instructions for using ltex-lsp on a blog about the Helix Editor : Note talking with Helix, Tp-Note and LanguageTool .
Here is the the content of
~/.config/helix/languages.toml:[[language]] file-types = ["md", "txt"] indent = { tab-width = 2, unit = " " } injection-regex = "md|markdown" language-server = { command = "ltex-ls" } name = "markdown" roots = [".git"] scope = "source.md"If you use VS Code , you can use the extension vscode-ltex .
Links
TIL About GNU Stow to Manage Dotfiles
Published: 2022-09-26
Updated: 2022-09-26
UTC: 2022-09-26 00:00:00+00:00
URL: https://www.rockyourcode.com/til-about-gnu-stow-to-manage-dotfiles/Today I learned about the tool GNU Stow, a free program that helps with managing symbolic links on your system.Content Preview
Today I learned about the tool GNU Stow , a free program that helps with managing symbolic links on your system.
What does that even mean?
I store my user configuration in a dotfile .
Using Git, I can synchronize my settings across different machines.
Now I have a backup, even if I lose my computer, or it breaks.So far, I’ve used symlinks to create a link on my machine to the central git repository.
But I learned about a great utility called GNU Stow that helps with managing dotfiles. Stow makes neat symbolic links in the right location.
You can easily pick and choose which configurations you want to sync.
So, let’s say your dotfiles repository looks like this:
$ tree -a ~/dotfiles
.
├── bash
│ ├── .bashrc
│ └── .bash_profile
├── kitty
│ └── .config
│ └── kitty
│ └── kitty.conf
└── vim
 └── .vimrc
Then you can use stow like this:
stow bash
stow kitty
stow vim
Links
You can find detailed explanations here:
Thanks to Sandra Parsick and Georg Berky for introducing me to this tool.
Helix Editor – 90% of Neovim With Kakoune
Published: 2022-09-22
Updated: 2022-09-22
UTC: 2022-09-22 00:00:00+00:00
URL: https://www.rockyourcode.com/helix-editor-90-percent-of-neovim-with-kakoune/I’ve spend too many hours setting up the recent NeoVim features (since v0.5): tree-sitter, nvim-lsp, nvim-cmp.Content Preview
I’ve spend too many hours setting up the recent NeoVim features (since v0.5): tree-sitter , nvim-lsp , nvim-cmp .
Why?
NeoVim’s parser tool tree-sitter offers a better integration of language servers, syntax highlighting and auto-completion.The Problem
Vim and NeoVim are great.
However, I put a lot of effort into customizing these editors to my liking, so that I could comfortably use them for coding.In fact, my configuration has become more complicated over the years.
Migrating my Vim configuration to take advantage of tree-sitter was an exercise in frustration.
Better Than (Neo)Vim?
By chance I stumbled upon a review of Rust text editors on lobste.rs .
The article favorably mentions Helix , a modal text editor inspired by Vim and Kakoune .
Other commentators also seemed taken with this new text editor.

I gave Helix a try and I am pleasantly surprised.
Helix is a fully-fledged text editor that comes with wonderful capabilities out of the box.
For example, you get a fuzzy file finder, language server integration, a vim-surround -like plugin and great editor themes for free.In the end, Helix offers almost everything I need from a terminal-based text editor with zero config .
After wasting hours of my free time on tweaking NeoVim, Helix’s sane defaults and inbuilt features blew me out of the water.
Kakoune – Why!?
Helix has one advantage over Vim/NeoVim - multiple cursors. This features makes text editing a smoother experience.
Multiple cursors come from Kakoune , a text editor I never heard of.
Vim’s core editing model revolves around verbs and (text) objects . For example, to delete a word, you type
dw, like in a natural language like English.Kakoune turns this model on its head: in Kakoune, you always select text objects first, then operate on them with words.
Helix uses the same model as Kakoune.
The idea is that you always start by making a selection first (that way it’s interactive and you see that you selected the right thing), then you operate on it.I’m not sure if I can forego my muscle memory and retrain myself to use the “Kakoune” way. For me, it feels incredibly awkward.
I am also missing some commands in normal mode.
For example, I can easily move or copy lines to other locations in the file without having to make a selection and without leaving normal mode .
This is a clash with Kakoune’s/Helix’s philosophy.What I am missing most is
ci(forchange inside).
I often use this command to change text in brackets (ci{), single quotes (ci') or other text objects.Now What?
Helix is in active development.
But even so, the editor is already usable. Because it is written in Rust, it’s fast and stable.The maintainers plan a plugin system with WebAssembly , which would be a big milestone for the project.
All in all, Helix looks like a valid alternative to Vim/NeoVim if you like modal editors.
My Configuration
Here is my complete configuration file:
theme = "nord"

[editor.cursor-shape]
insert = "bar"
normal = "block"
select = "underline"

[editor.statusline]
left = ["mode", "diagnostics"]
center = ["file-name"]
right = ["selections", "file-type", "file-encoding", "position-percentage", "position"]

[keys.normal]
g = { a = "code_action", o = "goto_last_accessed_file" }
"ret" = ["move_line_down", "goto_first_nonwhitespace"] # Maps the enter key to move to start of next line
X = "extend_line_above"
D = "delete_char_backward"

[keys.insert]
C-space = "completion"
# Move cursor in insert mode
A-h = "move_char_left"
A-j = "move_line_down"
A-k = "move_line_up"
A-l = "move_char_right"
A-o = "open_below"
A-O = "open_above"
It adds a default theme, a few convenience key mappings plus some customization around the status-line and the cursor.
In comparison, here is my code for the status-line in Vim/NeoVim alone – which is (more or less) a three-liner in Helix.
Links